How to replace and upgrade 2008-2012 Ford Mustang F150 Car Stereos by 10 steps?

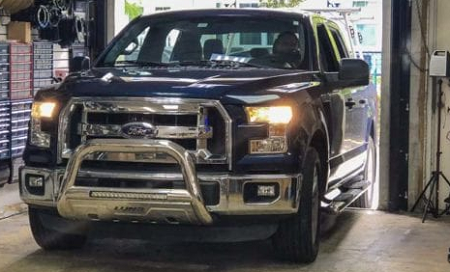
With the improvement of people’s life, more and more people choose to upgrade their factory audio system as it can make their driving experience more enjoyable. Therefore the replacement of car touch screen has been the first daunting task for them. And if you own 2009 Ford Mustang F150, the following steps of upgrading 2008-2012 Ford Mustang F150 Car stereos may take an important role in your impressive installation. And as long as you read it with enough patience, you will learn the whole DIY installation procedure in an easy way.

Before installation, you should pay attention to some important tips. First of all, you can disconnect the power and prepare some tools such as lever or a screwdriver before the removal and the installation. Secondly, you should keep all the separate parts from the car and take great care of the dashboard to avoid scratching it during its detachment and installation.

Last but not least, you should keep handy any parts from the car and make use of all the original screws from the car as much as possible so that each related part of the unit can be fixed securely.

2008-2012 Ford Mustang F150 Radio Installation Instruction

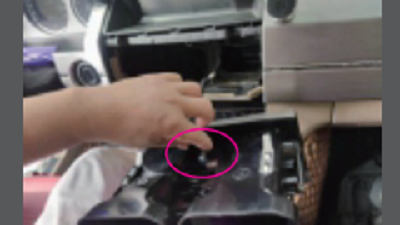
Step 1.Remove two screws on the center console and pull up the the rectangular trim piece around the shifter

Step 2.Pull the center console up and Remove two Phillips screws from arm rest console

Step 3.Remove plastic trim around shifter and the center trim.

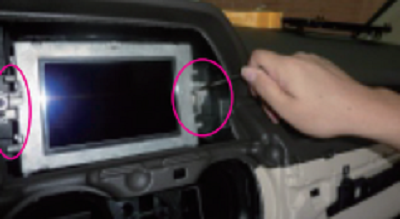
Step 4.Remove stereo side panels and six screws.

Step 5.use your finger to disconnect the HVAC connector on both sides of passenger and the driver

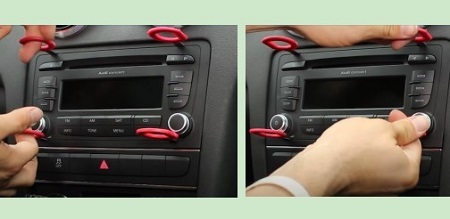
Step 6.Remove trim and disconnect connectors.

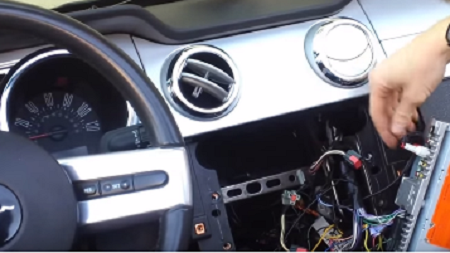
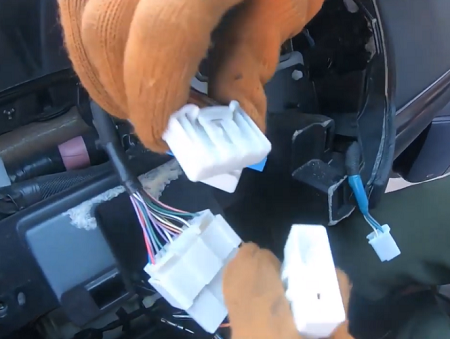
Step 7.Remove four 7mm screws and Disconnect connectors from the back of the stereo.

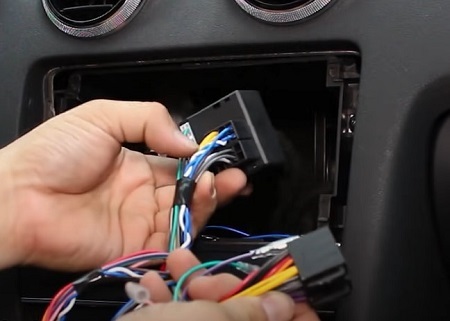
Step 8.Connect connectors in their proper slots.

Step 9.Tighten the six screws around the stereo and install two side panels around the stereo.

Step 10.Install center plastic trim, shifter trim, and tighten two Phillips screws on center console.

Hope you can benefit from the above steps and have an overview about how to install your own stereos. If you meet any troubles during this process, you should seek help from your dealer or some experienced technician. Remember to check whether all the functions of stereos can be used in this way. If you still have some doubts during this process, you can contact us by Seicane.com, recently it has new release product of 2008-2012 Ford Mustang F150 Radio, which will give you more entertainment about driving time.

If you like to listen to radios, it’s the best choice for you. This head unit integrated with high-sensitive radio IC with good reception, which can support worldwide analog radio channels reception. While the RDS standard includes some European countries where with RDS radio signal.

Besides, It looks great and it sounds great exactly. If you have any question about this receiver, please don’t hesitate to get in touch with us. And if you want to know more details about it , feel free to post and right here in the comments on our relevant site.

7 Steps To Installing Your Radio with Bluetooth Carplay in 2008-2012 Audi A3

Whether you’re an experienced user or installing your car stereos in your Audi for the first time, it’s necessary to realize that there are specific steps that should be followed before starting the installation. Audi Users who attempt to replace the factory touch screen on his own  without any guide often experience car installer remorse or worse due to their unsuccessful installation. If you want to upgrade or install your radio in your Audi A3, this 7 steps guide to Installing a stereo with Bluetooth Carplay in 2008-2012 Audi A3 will act as a great refresher, which will give your helpful advice and clear structure during the procedure. All you have to do is read it carefully before you plan to start the brain-burning journey.  

Before installation, you should pay attention to some important tips. First of all, you can disconnect the power and prepare some tools such as lever or removal keys before the removal and the installation. Secondly, you should keep all the separate parts from the car and take great care of the dashboard to avoid scratching it during its detachment and installation.

Last but not least, you should keep handy any parts from the car and make use of all the original screws from the car as much as possible so that each related part of the unit can be fixed securely.

2008-2012 Audi A3 Radio Installation Guide

Step 1, Use 4 radio removal keys and insert them into the slots of the car radio system

Step 2, Pull the 4 key buckles with appropriate force in order to pull out the radio unit

Step 3, Take down the radio unit, remove the key tool, and unplug the connections at the back of the radio unit

Step 4, Have a check for the wiring parts of the new car radio unit

Step 5, Connect the new wiring parts to the car plugs

Step 6, Connect the new touchscreen radio head unit to the dashboard

Step 7, After installing the new radio, start the car to test whether the new radio system functions normally

That’s the whole easy steps of installing Audi A3 car stereos. Don’t forget to check that the radio is switched on, that the sound is working and that you’re picking up the radio and ready to enjoy your new driving time. If you have other trouble, or want to learn more about relevant details, you can ask for a professional technician for help or consult your car dealers. There are also plenty of resources of teaching tutorials online available for each users any time. Here is a link of 2008-2012 Audi A3 Radio from Seicane , which provides good services in car radios market for over 10 years. You can visit this page and consult its Audi A3 Category if you have further questions.

This new car radio offers wireless carplay and Android Auto to create an interface that’s just like your phone. All of your navigation, music, apps are performed and controlled on its big 9.7 inch touchscreen display.

In addition, it supports 36 EQ adjustment, which means to provides you the best sound quality during the driving trip and you don’t need to worry about the sound problems. Besides these functions mentioned above, it supports 360°camera, which gives you bird’s eye view panoramic reversing videos requares 4 cameras.

Just like the old saying goes, actions speak louder than words, so don’t hesitate to visit it now if you like it very much !

How to install 2008-2015 Toyota Land Cruiser (High Version) Radio easily?

Apparently, buying a new car stereo for Toyota owners can bring much more benefits than they can imagine not only because of its fantastic looks, but also can have expansion options such as smartphone integration, navigation, and additional camera etc. Therefore, more and more people choose to buy it and some of them even install it by themselves. But not all of them have an overview of a basic car radio installation, this article below will illustrate the specific installation guide of 2008-2015 Toyota Land Cruiser(High Version)required for your vehicle. You can take it as a refer and hope you can get useful advice from it.

Before installation, you should pay attention to some important tips. First of all, you can disconnect the power and prepare some tools such as lever before the removal and the installation. Secondly, you should keep all the separate parts from the car and take great care of the dashboard to avoid scratching it during its detachment and installation.

Last but not least, you should keep handy any parts from the car and make use of all the original screws from the car as much as possible so that each related part of the unit can be fixed securely.

2008-2015 Toyota Land Cruiser (High Version) Radio Installation Guide

1.Remove the fixed panel on the left side under the radio system

2.Unscrew the screw and remove the trim frame on the left side of the radio system

3.Remove the fixed panel on the right side under the radio system

4.Unscrew the screw and remove the trim frame on the right side of the radio system

5.Pry to remove the A/C vents, take down the vents and unplug the connectors.

6.Pry to remove the plastic panel on the top of the radio system.

7.Remove four screws that fix the screen unit

8.Take down the screen and disconnect its plugs

9.Remove four screws that fix the CD unit

10.Take down the CD unit and unplug the connectors

11.Correspondingly connect the cables of the new car radio to the car plugs.

12.Connect the new radio system and install it back to the dashboard.

13.Install back the trim frames, fixed panels, A/C vents and plastic panel.

14.Turn on the car to check whether the upgraded radio system functions normally

Whatever your level of experience, you can start to try under the guidance of this article and you’ll save money when you install it yourself. But if you still have some questions during the process, you can ask for a professional technician for help as they will give your the best service as much as possible. And you can also use some modern tools such as facebook or the related website to search your answers. Here I would like to share a product of 2008-2015 Toyota Land Cruiser(High Version)from Seicane. You can find the audio gear that fits your car and also take it as a tool as it is covered with a wide range of car stereo equipment.

This Touch Screen is integrated with high-sensitive radio IC with good reception, supports worldwide analogradio channels reception, RDS standard included for some European countries where with RDS radio signal. Built-in 16 segment EQ adjustment DSP tuning, it supports ahd signal input and AV dual video output, which means you can get audio enjoyment as well as visual one.

Come and visit more detailed installation here, you can get most from your DIY Try now!

Practical Installation Manual of 2009-2012 Mercedes Benz GLK Stereo Navigation System with Bluetooth Carplay

Have you ever wonder to enjoy your free time inside your car by turning on your audio? As the fans of Mercedes Benz, it is not difficult to buy a new head unit but the difficult point lies in whether you’d like to buy the installation service of the radios or just replace it by yourself. For most of those who budget carefully, it’s the best choice for them to install a new radio on their own. And this article of 2009-2012 Mercedes Benz GLK Radio from Seicane will provide you with a general guide on how to do it. Hope you will get useful advice from the following instructions.

Before installation, you should pay attention to some important tips. First of all, you can disconnect the power and prepare some tools such as lever before the removal and the installation. Secondly, you should keep all the separate parts from the car and take great care of the dashboard to avoid scratching it during its detachment and installation.

Last but not least, you should keep handy any parts from the car and make use of all the original screws from the car as much as possible so that each related part of the unit can be fixed securely.

2009-2012 Mercedes Benz GLK car radio installation manual

1. Lever vent panel and take off the connectors.

2.Lever the screen frame.

3.Take off the screws and the screen frame.

4.Pull out the screen and disconnect hardness cord.

5.Lever the decorative trim and take off it.

6.Take off the screws on both sides.

7.Pull up the buckle of head unit, take out the head unit and unplug power cable.

8.Connect original LVDS wire together with a new BMW 4.0 system box.

9.Connect the new LVDS wire.

10.Connect the original video power wire and the small speaker wire.

11.Install the new base and fix the screws.

12.Connect power cable and USB cable.

13.Install the new screen by fixing 2 screws, then recover all panels.

When you finished all the steps of installation, you can test the function of the new radio and its performance as well. Every step needs your practical attempt to make it comes true. And you will get successful experience as long as you’d like to try on your best to do it. Even though sometimes you still think it is a complicated procedure, you can ask for your car dealer for help or search for some detailed information from the websites. Here I’d like to share a link of 2009-2012 Mercedes Benz GLK car radio, which is fashionable and attractive enough to catch your attention.

With the latest operation system Android 10.0 and 16EQ DSP tuning systems, you can surf the Internet in the fastest speed and enjoy various sense of sound at the same time.Unlike the other screen, the IPS screen comes with higher resolution, which provides you with a clearer image and stronger sense of hierarchy.

In addition, the dual system free switching will allow the computer information display of the original car, highly analyze the original car protocol, and support multi-functional steering wheel control, etc. Moreover, if the original car is equipped with a reversing image system, the reversing track of the original car can be display on the large screen.

Last but not least, it supports different options including Car DVR, OBD II, TPMS, which ensure that you can enjoy your own time during the driving journey. So embrace it now just as you come to the new life.