Step-By-Step Guide for BMW 5 Series E60 2009-2012 Stereo Navigation System with Bluetooth Carplay

In a BMW, there’s nothing better than installing a car radio, especially if the driver is used to using the way of carplay during the driving time. And it is regarded as the smartest and the safest way to use your phone while you’re on the road. Therefore, most of those who pursue high-quality driving life will always put the installation of car stereo as an important role as the correct installation steps can help them reduce the budget as well as the extra energy. As for those who has no experience before installation, I sincerely recommend you to read the following easy guide for BMW 5 Series E60 2009-2012 Stereo Navigation System as a reference.

Before installation, you should pay attention to some important tips. First of all, you can disconnect the power and prepare some tools such as lever before the removal and the installation. Secondly, you should keep all the separate parts from the car and take great care of the dashboard to avoid scratching it during its detachment and installation.

Last but not least, you should keep handy any parts from the car and make use of all the original screws from the car as much as possible so that each related part of the unit can be fixed securely.

Installation Instruction of Navigation for BMW 5 Series E60 2009-2012 Radio

Step 1: Take off the left screw and the right screw.

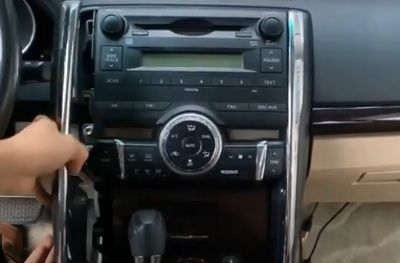
Step 2: Lever original car screen frame and Pull out the frame.

Step 3: Disconnect LVDS connector and the power cable.

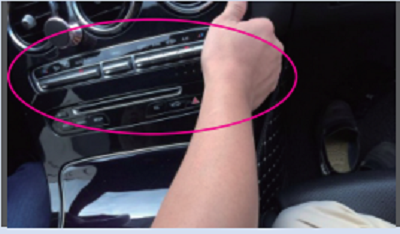
Step 4: Lever the vent panel as reveal from the right side and the middle vent panel from the bottom.

Step 5: Lever the left panel as reveal and Take off the emergency light cable.

Step 6: Take off the left screw and the screws on the right side.

Step 7: Pull out the air conditioner panel and Unplug air conditioner connectors

Step 8: Lever the box from the right side and the same box from its left side.

Step 9: Take off the 2 screws, then Pull out the head unit and disconnect power cable.

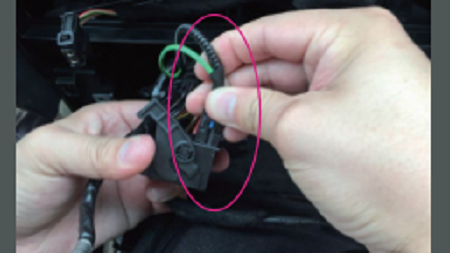
Step 10: Pull out new wires( power cable, USB wire,GPS antenna) and original car LVDS connector.

Step 11: Connect above wires with the new android screen

Step 12: Install new screen, first put bottom inside, then fix the screen to stand and adjust to exact screw position on the top.

Step 13: Fix the screws and take out original car optical fiber connector.

Step 14: Connect original car power cable with new power cable and the unplugged fiber optical connector with new wiring.

Step 15: Connect new power cable with the car head unit, then Install the head unit and fix the 2 screws.

Step 16: Put the AC vent assembly back and fix 2 screws.

Step 17: After installing AC panel, Connect emergency light wire and Put emergency light assembly back.

After the installation, you can check whether the new head unit can be used as normal. And as you can see the process of the installation is not difficult as long as you would like to learn these steps above even you have no skills before. However, if you think there is still a bit hard for you to get these knowledge from the article, you can ask for a trained professional technicians for help or consult your car dealer directly. There are dozens of resource available on the Internet and you can click them for more information as you wish. Here I would like to shark a link of a product of BMW 5 Series E60 Car Audio System from Seicane. Hope you can benefit from it as you want.

With the latest and fastest responsive operation System -Android 10.0, it supports your entertainment time in a more flexible way. Besides, without uninstalling your old stereo, this new android car navigation system will keep your original radio ,idrive system and amplifer system.

Compared to other car radio ,this one can provide a chance for you to hear from the center being surrounded from all direction instead of hearing of the main sound from front right direction. In addition, with high speed CPU and large storage, you can download various apps and make phone call as smooth as usual when you are driving on the road.

Last but not least, it can be connected to the Internet whenever you drive, and the DVR functions can support you to record every moment in your journey, which will make you never miss anything. So if you have desire to make your car a place you love to be, please grab this chance from now on.

How to set up Car Radio Navigation System with Bluetooth Carplay in your 2015-2019 Mercedes-Benz C-Class ?

It is common that many people prefer to install a car stereo in there car now as it can bring much entertainment and convenience, which benefit their driving life in a degree. However, it is rare for those people to know how to set up car radio exactly in their car, especially for owners of Mercedes-C-Class. Thus, it is essential to get the informative steps of installation from online or offline. And there is a recommended step-by-step guide of 2015-2019 Mercedes-Benz C-Class Stereo Navigation System with Bluetooth Carplay. And follow the steps below, you will learn what you need in the process.

Before installation, you should pay attention to some important tips. First of all, you can disconnect the power and prepare some tools such as lever when you start the removal. Secondly, you should keep all the separate parts from the car and take great care of the dashboard to avoid scratching it during its detachment and installation.

Last but not least, you should keep handy any parts from the car and make use of all the original screws from the car as much as possible so that each related part of the unit can be fixed securely.

Installation Instruction of Mercedes-Benz 2015-2019 C-Class Stereo 

Step 1: Pry the top cover of car speaker and take off the 2 screws

Step 2: Pull out car original screen and disconnect wire looms

Step3: Press two buttons, then pry the silver trim

Step 4: Take the trim away and take off marked 2 screws

Step 5: Pull out the car control panel and take out control panel.

Step 6: Pull out car head unit and unplug the wire

Step 7:Put the wire go through the hole as revealed

Step 8: Connect car wires and specific new wire

Step9: Plug the new wire to the head unit instead,then Put the head unit back and fix 2 screws

Step10: Well-place AUX connector as the picture shows and Put AUX connector to trans-connector (AUX trans USB)

Step 11: .Plug the trans-connector(AUX trans USB) to car USB port

Step 12: Put the console panel back and fix the 2 screws

Step 13: Replace the silver trim and Connect LVDS wires well.

Step 14: Pull the wire go through the new bracket then fix the bracket

Step 15: Fix 2 screw shown in the picture

Step 16: Connect the wires to the screen, then fix the screen and 2 screws

Step 17: Put speaker cover back

Now that your basic work have been finished and you are ready to check whether the head unit can be used as a new one and try all its functions. The process maybe a little difficult for the people who have never had experience before. But this guide will show you the main idea of installation and give you useful information as you want. If you still have some questions here, it is recommended to ask for your car dealer for help or consult a professional technician who can offer you help in this way. And here I want to share a link of Mercedes-Benz 2015-2019 C-Class Stereo from Seicane. You can know more details from it including its functions and installation details.

If you want to keep your Mercedes-Benz enjoying the top-level entertainment on the way, this product can be a proper choice for the most owners and lovers as its functions can be covered in a wide range including wireless carplay, split screen, backup camera, high-quality navigation system and even wifi&Bluetooth etc.

With the 10.25 inch round corner designed, road top car touch screen, looks more beautiful. In addition, the high resolution and IPS high-definition picture quality will provide you a clearer and more beautiful image. You can also enjoy faster running with 8-core CPU 4 GB RAM 64GB ROM for downloading more favorite apps to obtain richer car experience.

All in all, it is definitely a perfect choice for those who would like to enjoy themselves during the driving. So what are you waiting for now? Click the page and get this surprise from now on!

An easy guide to replacing 2010-2015 Mercedes-Benz E-Class Radio Navigation System with Bluetooth Carplay

As the owner of Mercedes-Benz E-class, it is not difficult for you to buy the appropriate car radio online or offline . However, installing or replacing a radio can range in difficulty, especially as a person who has no experience of installation before. And there are also some factors that must be considerable such as the consuming time and the personal energy. Thus, I sincerely recommend you to read the following easy guide to replacing your 2010-2015 Mercedes-Benz E-Class Radio from Seicane. In this guide, you can see the whole process of installation and get what you need as you want.

Before installation, you should pay attention to some important tips. First of all, you can disconnect the power and prepare some tools such as lever before the removal and the installation. Secondly, you should keep all the separate parts from the car and take great care of the dashboard to avoid scratching it during its detachment and installation.

Last but not least, you should keep handy any parts from the car and make use of all the original screws from the car as much as possible so that each related part of the unit can be fixed securely.

2010-2015 Mercedes-Benz E-Class car radio installation guide

1. Lever original car screen frame and take off the two screws.

2.Pull out the screen and disconnect the cable.

3.Lever the vent panel and disconnect the emergency light wiring harness.

4.Take off the screws on the both sides.

5.Knock the screw down and pull out the monitor.

6.Pull out the monitor and disconnect the power cable.

7.Pull out the power cable and USB wire from the right side.

8.Connect original LVDS wire together with the new assembly box, the new LVDS wire and the original video power wire(only 4.0 system).

9.Install the new base and fix the screw.

10.Fix the nut cover and connect original car power cable with new power cable.

11.Plug in the new power cable.

12.Install the head unit and fix the 2 screws.

13.Connect the emergency light wiring harness and install the air outlet panel.

14.Connect the wiring harness and install the screen.

15.Fix the two screws to finish installation.

After finishing the whole installation, you can test the function of the car stereo on your own and check whether it can perform as well. As long as you tried all the steps above, you will have your clear plan about how to install your radio at the same time. But if you still feel it hard for you to finish this whole procedure by yourself, you can ask for your car dealer directly who will offer the most professional advice for you. In addition, you can also find various tutorials and relevant resource here on the Internet. Here I want to share one of the most impressive product from Seicane, 2010-2015 Mercedes-Benz E-Class car radio, which owns different functions and act as brilliant as other radios.

Unlike other operation system, it is equipped with the latest operation system Android 10.0, which ensure the best using feeling and care for each user’s need. What’s more, with multiple point high-sensitive touchscreen, it can bring smooth operation and you can enjoy visual feast on this 10.25 inch 1280*480 resolution display.

Built in GPS module, it support both online and offline navigation app from Google Play app market, which means you don’t need to worry about whether you will get lost during the driving with the help of the updated data from these apps.

Besides, integrated with BC6 Bluetooth module, it supports phonebook sync, hand-free call, and music streaming from your phone. And there are also other outstanding functions here such as the rear view camera, which supports RCA AV connector type rear view camera signal input, automatically switch to parking image when reversing gear engaged.

All in all, never hesitate to buy if you really desire it and embrace what you love now !

How to install Android Touch Screen in 2010-2015 TOYOTA REIZ Mark X quickly

In this era, it has been common that nearly every car owner has installed their favorite car radios inside the car. Apparently, the new radios can bring many benefits including entertainment, phone calls and 4G&wifi function. In this case, more and more people prefer to install the touch screen in their own car by themself as it can save money. As a car owner of TOYOTA REIZ Mark X, how do you start to install your new car stereos on your own? Here is a a 2010-2015 TOYOTA REIZ Mark X car radio installation guide from Seicane. You can refer to the following installation guide if you need.

Before installation, you should pay attention to some important tips. First of all, you can disconnect the power and prepare some tools such as lever before the removal and the installation. Secondly, you should keep all the separate parts from the car and take great care of the dashboard to avoid scratching it during its detachment and installation.

Last but not least, you should keep handy any parts from the car and make use of all the original screws from the car as much as possible so that each related part of the unit can be fixed securely.

2010-2015 TOYOTA REIZ Mark X car radio installation guide

1.Remove the trim panels.

2.Remove screws that fix car stereo.

3.Take down the radios and disconnect the plugs.

4.Seperate the main unit and the A/C button panel.

5.keep the A/C button panel and install it back to the dash.

6.Tighten the screws.

7.Connect Power Harness, RCA Cable and CAM Cable to the new radio.

8.Correspondingly connect the new radio cables to the car plugs.

9.Install the Touch Radio to the dash.

10.Install trim panels back.

After reading the 10 steps above, I believe you should have a clear idea about how to install your own car touch screen by yourself. If you find some problems during this procedure, you can ask for a professional for help or consult your car dealer directly. I  sure you will get what you want from them. And it is wise for you to surf the internet to search for some useful information which can satisfy your need because there are full of various installation videos and manuals there. And here I would like to share one of the outstanding product from Seicane, 2010-2015 TOYOTA REIZ Mark X car radios, which can show you its brilliant function and specific installation steps.

Built in WIFI module, it supports to connect WiFi hotspots to surfing the Internet. It can also supports 3G internet, require to buy external android compatible 3G USB module and insert SIM card from your local telecom carrier. You can enjoy a high speed entertainment during your driving journey.

With the latest Android 10.0 system, it can support for sophisticate technology and features, which means you can keep things up-to-date as you wish. Moreover, its GPS module can support both online and offline navigation app from Google Play App market, you will never get lost during the driving time.

Besides, it is equipped with many optional function such as HD Digital TV, backup camera, TPMS and DAB+, which and enrich your driving life. With high-quality sound, it offers more radio programs over a specific spectrum than analogue FM radio.

In a word, just grab this chance from this moment and buy what you want !