Practical Installation Manual of 2009-2012 Mercedes Benz GLK Stereo Navigation System with Bluetooth Carplay

Have you ever wonder to enjoy your free time inside your car by turning on your audio? As the fans of Mercedes Benz, it is not difficult to buy a new head unit but the difficult point lies in whether you’d like to buy the installation service of the radios or just replace it by yourself. For most of those who budget carefully, it’s the best choice for them to install a new radio on their own. And this article of 2009-2012 Mercedes Benz GLK Radio from Seicane will provide you with a general guide on how to do it. Hope you will get useful advice from the following instructions.

Before installation, you should pay attention to some important tips. First of all, you can disconnect the power and prepare some tools such as lever before the removal and the installation. Secondly, you should keep all the separate parts from the car and take great care of the dashboard to avoid scratching it during its detachment and installation.

Last but not least, you should keep handy any parts from the car and make use of all the original screws from the car as much as possible so that each related part of the unit can be fixed securely.

2009-2012 Mercedes Benz GLK car radio installation manual

1. Lever vent panel and take off the connectors.

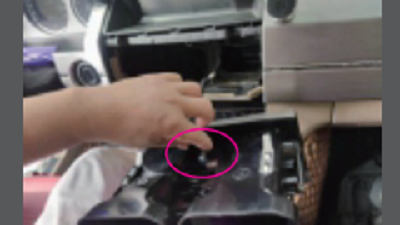
2.Lever the screen frame.

3.Take off the screws and the screen frame.

4.Pull out the screen and disconnect hardness cord.

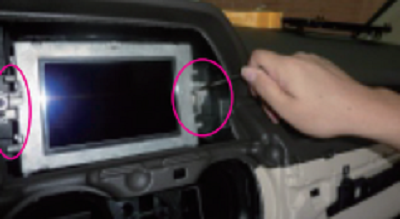
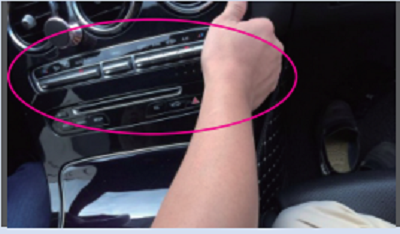
5.Lever the decorative trim and take off it.

6.Take off the screws on both sides.

7.Pull up the buckle of head unit, take out the head unit and unplug power cable.

8.Connect original LVDS wire together with a new BMW 4.0 system box.

9.Connect the new LVDS wire.

10.Connect the original video power wire and the small speaker wire.

11.Install the new base and fix the screws.

12.Connect power cable and USB cable.

13.Install the new screen by fixing 2 screws, then recover all panels.

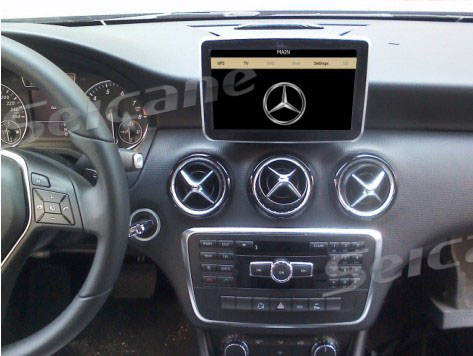
When you finished all the steps of installation, you can test the function of the new radio and its performance as well. Every step needs your practical attempt to make it comes true. And you will get successful experience as long as you’d like to try on your best to do it. Even though sometimes you still think it is a complicated procedure, you can ask for your car dealer for help or search for some detailed information from the websites. Here I’d like to share a link of 2009-2012 Mercedes Benz GLK car radio, which is fashionable and attractive enough to catch your attention.

With the latest operation system Android 10.0 and 16EQ DSP tuning systems, you can surf the Internet in the fastest speed and enjoy various sense of sound at the same time.Unlike the other screen, the IPS screen comes with higher resolution, which provides you with a clearer image and stronger sense of hierarchy.

In addition, the dual system free switching will allow the computer information display of the original car, highly analyze the original car protocol, and support multi-functional steering wheel control, etc. Moreover, if the original car is equipped with a reversing image system, the reversing track of the original car can be display on the large screen.

Last but not least, it supports different options including Car DVR, OBD II, TPMS, which ensure that you can enjoy your own time during the driving journey. So embrace it now just as you come to the new life.

How to set up Car Radio Navigation System with Bluetooth Carplay in your 2015-2019 Mercedes-Benz C-Class ?

It is common that many people prefer to install a car stereo in there car now as it can bring much entertainment and convenience, which benefit their driving life in a degree. However, it is rare for those people to know how to set up car radio exactly in their car, especially for owners of Mercedes-C-Class. Thus, it is essential to get the informative steps of installation from online or offline. And there is a recommended step-by-step guide of 2015-2019 Mercedes-Benz C-Class Stereo Navigation System with Bluetooth Carplay. And follow the steps below, you will learn what you need in the process.

Before installation, you should pay attention to some important tips. First of all, you can disconnect the power and prepare some tools such as lever when you start the removal. Secondly, you should keep all the separate parts from the car and take great care of the dashboard to avoid scratching it during its detachment and installation.

Last but not least, you should keep handy any parts from the car and make use of all the original screws from the car as much as possible so that each related part of the unit can be fixed securely.

Installation Instruction of Mercedes-Benz 2015-2019 C-Class Stereo 

Step 1: Pry the top cover of car speaker and take off the 2 screws

Step 2: Pull out car original screen and disconnect wire looms

Step3: Press two buttons, then pry the silver trim

Step 4: Take the trim away and take off marked 2 screws

Step 5: Pull out the car control panel and take out control panel.

Step 6: Pull out car head unit and unplug the wire

Step 7:Put the wire go through the hole as revealed

Step 8: Connect car wires and specific new wire

Step9: Plug the new wire to the head unit instead,then Put the head unit back and fix 2 screws

Step10: Well-place AUX connector as the picture shows and Put AUX connector to trans-connector (AUX trans USB)

Step 11: .Plug the trans-connector(AUX trans USB) to car USB port

Step 12: Put the console panel back and fix the 2 screws

Step 13: Replace the silver trim and Connect LVDS wires well.

Step 14: Pull the wire go through the new bracket then fix the bracket

Step 15: Fix 2 screw shown in the picture

Step 16: Connect the wires to the screen, then fix the screen and 2 screws

Step 17: Put speaker cover back

Now that your basic work have been finished and you are ready to check whether the head unit can be used as a new one and try all its functions. The process maybe a little difficult for the people who have never had experience before. But this guide will show you the main idea of installation and give you useful information as you want. If you still have some questions here, it is recommended to ask for your car dealer for help or consult a professional technician who can offer you help in this way. And here I want to share a link of Mercedes-Benz 2015-2019 C-Class Stereo from Seicane. You can know more details from it including its functions and installation details.

If you want to keep your Mercedes-Benz enjoying the top-level entertainment on the way, this product can be a proper choice for the most owners and lovers as its functions can be covered in a wide range including wireless carplay, split screen, backup camera, high-quality navigation system and even wifi&Bluetooth etc.

With the 10.25 inch round corner designed, road top car touch screen, looks more beautiful. In addition, the high resolution and IPS high-definition picture quality will provide you a clearer and more beautiful image. You can also enjoy faster running with 8-core CPU 4 GB RAM 64GB ROM for downloading more favorite apps to obtain richer car experience.

All in all, it is definitely a perfect choice for those who would like to enjoy themselves during the driving. So what are you waiting for now? Click the page and get this surprise from now on!

An easy guide to replacing 2010-2015 Mercedes-Benz E-Class Radio Navigation System with Bluetooth Carplay

As the owner of Mercedes-Benz E-class, it is not difficult for you to buy the appropriate car radio online or offline . However, installing or replacing a radio can range in difficulty, especially as a person who has no experience of installation before. And there are also some factors that must be considerable such as the consuming time and the personal energy. Thus, I sincerely recommend you to read the following easy guide to replacing your 2010-2015 Mercedes-Benz E-Class Radio from Seicane. In this guide, you can see the whole process of installation and get what you need as you want.

Before installation, you should pay attention to some important tips. First of all, you can disconnect the power and prepare some tools such as lever before the removal and the installation. Secondly, you should keep all the separate parts from the car and take great care of the dashboard to avoid scratching it during its detachment and installation.

Last but not least, you should keep handy any parts from the car and make use of all the original screws from the car as much as possible so that each related part of the unit can be fixed securely.

2010-2015 Mercedes-Benz E-Class car radio installation guide

1. Lever original car screen frame and take off the two screws.

2.Pull out the screen and disconnect the cable.

3.Lever the vent panel and disconnect the emergency light wiring harness.

4.Take off the screws on the both sides.

5.Knock the screw down and pull out the monitor.

6.Pull out the monitor and disconnect the power cable.

7.Pull out the power cable and USB wire from the right side.

8.Connect original LVDS wire together with the new assembly box, the new LVDS wire and the original video power wire(only 4.0 system).

9.Install the new base and fix the screw.

10.Fix the nut cover and connect original car power cable with new power cable.

11.Plug in the new power cable.

12.Install the head unit and fix the 2 screws.

13.Connect the emergency light wiring harness and install the air outlet panel.

14.Connect the wiring harness and install the screen.

15.Fix the two screws to finish installation.

After finishing the whole installation, you can test the function of the car stereo on your own and check whether it can perform as well. As long as you tried all the steps above, you will have your clear plan about how to install your radio at the same time. But if you still feel it hard for you to finish this whole procedure by yourself, you can ask for your car dealer directly who will offer the most professional advice for you. In addition, you can also find various tutorials and relevant resource here on the Internet. Here I want to share one of the most impressive product from Seicane, 2010-2015 Mercedes-Benz E-Class car radio, which owns different functions and act as brilliant as other radios.

Unlike other operation system, it is equipped with the latest operation system Android 10.0, which ensure the best using feeling and care for each user’s need. What’s more, with multiple point high-sensitive touchscreen, it can bring smooth operation and you can enjoy visual feast on this 10.25 inch 1280*480 resolution display.

Built in GPS module, it support both online and offline navigation app from Google Play app market, which means you don’t need to worry about whether you will get lost during the driving with the help of the updated data from these apps.

Besides, integrated with BC6 Bluetooth module, it supports phonebook sync, hand-free call, and music streaming from your phone. And there are also other outstanding functions here such as the rear view camera, which supports RCA AV connector type rear view camera signal input, automatically switch to parking image when reversing gear engaged.

All in all, never hesitate to buy if you really desire it and embrace what you love now !

How to upgrade a 2005-2012 Mercedes Benz GL Class X164 head unit with CD DVD Player 3G WiFi Bluetooth


First shows you a great 2005-2012 Mercedes Benz GL Class X164 head unit from Seicane, it’s the picture of after installation. It looks cool, doesn’t it? It is the best choice for you to improve the car interior environment. What’s more important, you are able to enjoy a lot of convenience and enjoyment it provides for you. As a matter of fact, it’s easy for you to install such a fantastic head unit in your car. If you have the same dashboard, you can refer to the following installation guide to help you with the installation.

2005-2012 Mercedes Benz GL Class X164 head unit after installation


Precautions:

  1. Please apply the parking brake and remove the negative cable on the vehicle battery before the removal to ensure safety.
  2. A lever and a screwdriver need to be prepared before the installation.


2005-2012 Mercedes Benz GL Class X164 head unit installation guide:


1.Pry out the air conditioner panel along gap with a lever.

2005-2012 Mercedes Benz GL Class X164 head unit installation step 1


2.Remove the air conditioner panel.

2005-2012 Mercedes Benz GL Class X164 head unit installation step 2


3.Remove two screws holding the stereo in the dashboard frame with a screwdriver.

2005-2012 Mercedes Benz GL Class X164 head unit installation step 3


4.Pull the buckles down.

2005-2012 Mercedes Benz GL Class X164 head unit installation step 4


5.Carefully take the original CD player out of the dashboard.

2005-2012 Mercedes Benz GL Class X164 head unit installation step 5


6.Disconnect the ISO plug of the car in the socket of the DVD player.

2005-2012 Mercedes Benz GL Class X164 head unit installation step 6


7.Connect the cables of the new Seicane head unit as the user manual shows.


8.Connect the ISO plug.


9.Put the new Seicane head unit back into the dash.


10.Put the buckles back into its original place.


11.Install two screws and the air conditioner panel.


12.Turn on the new Seicane head unit and have a comprehensive test if everything works well.


Warning:

Please don’t pull out the GPS SD card with the power on in case of data corruption.


Installation tips for the GPS antenna.

Please don’t shorten or lengthen the GPS antenna to avoid a short circuit or antenna problems. Please place the antenna on the dashboard or on the roof of the car in a horizontal position as best as possible. If there if any film on the windows and heat insulation in the car, it may have a direct effect on the GPS antenna, like positioning precision and signal intensity.


If it’s the first time for you to upgrade your factory radio, you may find it difficult to understand all the steps. In that case, you’d better go to a car stereo upgrade center or ask a professional to install it. If you have any questions, you can consult your dealer.


In addition, it’s suggested you confirm you have a head unit which is suitable for your car. Or it can’t work or be installed perfectly in your car. If you have no idea which head unit can fit your  2005-2012 Mercedes Benz GL Class X164, I’d like to share an intelligent Mercedes Benz GL Class X164 head unit from Seicane for you. It’s the latest head unit with the most advanced features for 2005-2012 Mercedes Benz GL Class X164. Here’s the link:


http://www.seicane.com/seicane-s127511-android-4-4-4-in-dash-gps-radio-system-for-2005-2012-mercedes-benz-gl-class-x164-gl300-gl350-gl420-with-3g-wifi-cd-dvd-player-mirror-link-obd2-bluetooth-music-aux


Built in an Android 4.4.4 operation system, this Mercedes Benz GL Class X164 head unit is an ideal replacement to enhance the software and hardware of your factory radio. The upgraded RK3188 1.6 GHz Cortex A9 Quad-core CPU greatly improves the performance of the stereo. You can also enjoy watching videos on a more intuitive interface due to the 7 inch multi-touch screen with HD 1024*600 pixel resolution. What’s more, the latest GPS system allows you to get to anywhere you like without getting lost. A backup camera is also compatible with this unit to offer help to you when you are parking.


Just take this amazing Mercedes Benz GL Class X164 head unit on all your trips and enjoy your driving al the time! It’ s you best choice! Good luck to you!

How to install Mercedes Benz A Class W176 B Class W246 Head Unit GPS Navigation System

Nowadays,more and more owners are willing to install a GPS Navigation System in their cars.This fully shows that installing a GPS Navigation System is really necessary and convinent.But do you know how to install a GPS Navigation System for your car?Don’t worry,this article will tell you in some detail.Next,we will show you how to install Mercedes Benz A Class W176 B Class W246 Head Unit GPS Navigation System.

Announcements:Please check the appearance and the unit functions before install the unit.Don’t shorten or extened the GPS antenna,it will lead to the antenna problem.Don’t make the GPS antenna winding the steering wheel and shift lever,it will be dangerous.

Warm prompt:

1.Don’t use strong chemicals,cleaning agents,strong detergent to washing the machine.

2.Please use a clean soft fabric to wipe the screen,don’t use ordinary fabric.

3.Please use the touch screen pen to operation unit,please don’t use other sharp objects,or it will damage to the screen.

4.Please don’t self-service,maintenance or install the unit,in case of the power is on,don’t install or repair the unit,it is very dangerous if the person who did not receive the electronic equipment or vehicle installation training or lack of experienced personnel to install and repair the unit.

5.Please protect the original display when the staff dismounting the original CD and keep the original CD,try to use the original screw.

6.Navigation and rearview camera only to auxiliary function,it can’t replace your attention and judgment.

7.When the customer choose the digital TV,our unit could realized the digital TV touch.


Mercedes Benz A/B class Navigation & Audio System Installation Instruction Manual.

Mercedes Benz A/B class Navigation System Installation Manual

1.Original car console.

Original Mercedes Benz A/B class console

2.The accessories.

The accessories
The accessories

3.Remove the screws and take out the display screen.

Remove Mercedes Benz A/B class screws and take out the display screen


Remove Mercedes Benz A/B class screws and take out the display screen

4.Remove the framework holder and the 3 fixed screws.

Remove the framework holder and the 3 fixed screws

5.Remove the Air Conditioner vent.

Remove the Air Conditioner vent

6.Loose the CD fixed screws in left and right vents.

Loose the CD fixed screws in left and right vents

7.Pull out the left and right screws and remove the original CD,unplug the main cable connector.

Pull out the left and right screws and remove the original CD,unplug the main cable connector

8.Remove the storage box and decorative plate in the co-polit seat for wiring.

Remove the storage box and decorative plate in the co-polit seat for wiring

9.Connect our power cable to original CD’s connector,and plug our male connector to original CD.

Connect our power cable to original CD's connector,and plug our male connector to original CD
Connect our power cable to original CD’s connector,and plug our male connector to original CD

Connect our power cable to original CD's connector,and plug our male connector to original CD
Connect our power cable to original CD’s connector,and plug our male connector to original CD

10.Put the mini speaker to the central dashbord.

Put the mini speaker to the central dashbord

11.Plug the CAN BUS.

Plug the CAN BUS
Plug the CAN BUS

12.Fix the framework holder and tight the 3 fixed screws.

Fix the framework holder and tight the 3 fixed screws

13.Connect the GND to the original CD’s shell.

Connect the GND to the original CD's shell
Connect the GND to the original CD’s shell

14.Pull 2 original CD fixed screws and put back the original CD then tight the screws.

Pull 2 original CD fixed screws and put back the original CD then tight the screws

15.Plug the all cables and fix the head unit.

Setting sounds come out from original speakers

16.Picture after installation.

Picture after installation

Steps to setting up the sounds come out and interface switching.

1.Setting sounds come out from original speakers.Enter into original CD main menu first,select the Audio interface by original knobs,enter into AUX interface,now the our head unit sounds come out from original speakers.

Setting sounds come out from original speakers

Setting sounds come out from original speakers

2.Setting the navigation sound come out from mini speaker while listening original CD and Radio.While in original CD or radio interface,press the navigation shortcut key in steering wheel control to enter into navigation interface.Now the original CD and radio play continued and the navigation sound come out from mini speaker.To use this shortcut key to foreground and background switching.

Setting the navigation sound come out from mini speaker while listening original CD and Radio

Setting the navigation sound come out from mini speaker while listening original CD and Radio

3.Touch the original menu to switch to our menu.

Touch the original menu to switch to our menu

4.While in our menu,you can select the original functions to enter the original system.

While in our menu,you can select the original functions to enter the original system

Below is the video how to use the GPS Navigation System for Mercedes Benz A Class W176 B Class W246:

Through the detailed description,we believe that you have mainly grasped how to install Mercedes Benz A Class W176 B Class W246 Head Unit GPS Navigation System.For more information,please visit:  http://www.seicane.com/8-inch-touch-screen-mercedes-benz-a-class-w176-head-unit-gps-navigation-system-with-usb-sd-ipod-canbus-aux-srd-8848   If you still have any problem on it,tell us and we will be happy to offer some help for you.At the same time,you will get a pleasant installation journey obviously.Then you will find how convinent and pefect when the GPS Navigation System comes in your car.At that moment,you will be proud of yourself for making such wise choice.Do you have a GPS Navigation System in your car? Why or why not?

Mercedes-Benz E-Class W211 E200 E220 E240 E270 E280 GPS Navigation System Upgrade

Having a navigation system brings much convenience to us specially when we are in a strange city.Nowadays,most cars have been occupied with sat-navi device.There is no doubt that Mercedes-Benz E-Class W211 E200 E220 E240 E270 E280 GPS Navigation System Upgrade is more and more important.Even there is no such device in your car,connect to a device with navigation function,like smart phone,can also meet our requirement.

Mercedes-Benz E-Class W211 E200 E220 E240 E270 E280 GPS Navigation System is aimed at introducing driving lines to drivers consistently by audio or sound ways.It can direct drivers to where they want to go by using GPS datas.Driving speed and direction, and then showing in ways of signs,digital maps and voice output.Dynamic navigation system can read the traffic condition in time and figer out the best driving line to destination.

One picture about Mercedes-Benz E-Class W211 E200 E220 E240 E270 E280 GPS Navigation System:

Mercedes-Benz E-Class W211 E200 E220 E240 E270 E280 GPS Navigation System

These are all the accessories about Mercedes-Benz E-Class W211 E200 E220 E240 E270 E280 GPS Navigation System Upgrade.All these cables are useful for this device’s upgrade.You need to remove your original Mercedes-Benz E-Class W211 E200 E220 E240 E270 E280 car’s CD player.Disconnect your original car’s plug,and then install this unit to your dashboard.

Counting the line is based on the best driving time or driving line including avoid highway,crossing or bridge which take charges.After know the destination,Mercedes-Benz E-Class W211 E200 E220 E240 E270 E280 GPS Navigation System was expected to work out the recommending driving line in 30 seconds.If it is deviated from the best line,it will need to do it again.Tracking the destination means to compare the real driving lien with the counting time for drivers to decide whether they need to make a turning or not in the following road.

One video about Mercedes-Benz E-Class W211 E200 E220 E240 E270 E280 GPS Navigation System Upgrade and how to use:


During driving,navigation system will give points before turning or changing road. If there is a turning,it will point to the driving direction on this unit’s screen.Besides,the average driving time of every section is according to there we start to count. Navigation system can work out the crowding section by analysing traffic informations on the road where we are driving. More details about this Mercedes-Benz E-Class W211 E200 E220 E240 E270 E280 GPS Navigation System Upgradehttp://www.seicane.com/car-dvd-player-for-mercedes-benz-e-class-w211-with-gps-radio-tv-bluetooth-srd-8797 . When this device gets to recount the line,it will set a lower driving speed according to the degree of traffic.It will give you much helpful information when your are driving.


How to install 1998-2004 Mercedes-Benz CLK-W209 DVD player with Special Optic Fiber Amplifier

If you original car’s amplifier has optic fiber,and your optic fiber looks like this one in following picture,then your original car’s Optic Fiber Amplifier is very special.We will tell you how to install 1998-2004 Mercedes-Benz CLK-W209 DVD player with Special Optic Fiber Amplifier.This installation instructions not only can be used in Mercedes-Benz CLK-W209 DVD player,but also can be used in all Mercedes-Benz series cars which has such special optic fiber amplifier.

Mercedes-Benz special optic fiber amplifier

Following is about all the accessories in the package for Mercedes-Benz CLK-W209 DVD player.You can find that these is one 6 meter long cable in the package.This one 6 meter long cable is for the cars with Optic Fiber Amplifier. You need to connec t this 6 meter long cable from front head unit to your car’s rear trunk.

Mercedes-Benz CLK-W209 DVD player 6 meter long cable for special optic fiber amplifier

When you are installing this aftermarket Mercedes-Benz CLK-W209 multimedia stereo,you may find that the cables is not compatible with your car.Please don’t be worry.Because Some Mercedes-Benz CLK-w209 has optic fiber and the installation will be a little complex.We can provide you more detailed instruction with photos about how to connect our cable to your plug.You don’t need to cut your original car’s wires,just need to cut our cables.Your original optic fiber amplifier will not work after installation.This Mercedes-Benz CLK-W209 DVD player has built-in amplifier,and can support 5 speakers in your car.It also will have very good sound.

1. Please use this 6 meter long cable as a speaker long cable.

W209 DVD player 6 meter long cable connection


2. Please cut this 6 meter long cable’s plug 2 and plug 3.

3. Please connect the short power cable to this unit’s back.

4. Please connect this 6 meter long cable plug 2’s 4 pair speaker cables to the short power cable. Just joint the same color together.

Mercedes-Benz CLK-W209 DVD player with Special Optic Fiber Amplifier power cable connection


5. Please connect this 6 meter long cable plug 3’s 4 pair speaker cables to your original car’s optic fiber amplifier plug’s 4 pair speaker cables:

Mercedes-Benz CLK-W209 DVD player Special Optic Fiber Amplifier plug speaker cables connection


Then the speaker cables are all connected well.To make this unit power on, you need to connect canbus connector B2 and B3-B6.

Mercedes-Benz CLK-W209 DVD player Special Optic Fiber Amplifier plug short power cable connection

There are 3 kinds of connections:

1+2+5

1+4+5

1+3+6

Please try all these 3 kinds of connections, and see which one can make this unit power on.

At last,1998-2004 Mercedes-Benz CLK-W209 DVD player with Special Optic Fiber Amplifier installation are finished.You can find that this is a wonderful Mercedes-Benz CLK-W209 DVD player.This is a video about how to use Mercedes-Benz CLK-W209 DVD player with Special Optic Fiber Amplifier:


This specialized China Top 2 din multimedia stereo can combined with your original car with Special Optic Fiber Amplifier perfectly.No need to cut your original car’s cables, just need to remove your Mercedes-Benz CLK-W209 original CD, and install this head unit. This Mercedes-Benz CLK-W209 DVD player’s detail information: http://www.seicane.com/car-dvd-player-for-mercedes-benz-clk-w209-with-gps-radio-tv-bluetooth-srd-8802-6 It will keep your steering wheel control works as original after replacement.Fit like OEM, Keep original Style, Upgrade Perfectly.GPS is brilliant for roads.Guidance with this aftermarket sat nav, you can go anywhere.Bluetooth is also so helpful.If you have any questions about installation,please send us photos about your original car’s plugs.Maybe we can make a wiring diagram for your car.If your car has special Optic Fiber Amplifier,then we will suggestion you read this article about how to install 1998-2004 Mercedes-Benz CLK-W209 DVD player with Special Optic Fiber Amplifier.After you read this article,I think you will be clear about how to remove and how to install.You will find you are proud when you install this  Mercedes-Benz CLK-W209 DVD player with Special Optic Fiber Amplifier sucessfully.


MB G Class W467 GPS Navigation System

This is a topic about MB G Class W467 GPS Navigation System.This GPS Navigation System has supplied the newest IGO8 map which contains the function of schedule,address book,track,system help,turn off function and so on.If you press the “turn off” button, the system will prompt you “turn off” or not.

By using the map,we can easily find the location we are and the place we need.When you are searching for some places, you can use the method of PINYIN input or Bihua input with the 26 letters on the screen.By the way,the map will also exhibit the distances and time (you can set up the time 24h or 12h format).

MB G Class W467 GPS Navigation System

Acoording to the track of the car,the map can exhibit iton the screen.At the same time,you can search other services around yor location.The regular operations also contain:Navigationmodel,schedule explanation, cancel the path ,track records,usually-used locations,and back off,This map can exhibit the speed of the car.If you have drove above the speed of car,if you have drove above the speed,it will give you a voice signal,It can also find some places with intelligent functions,such as metrol station,park place,restaurant,washing room and hotel.Now,this MB G Class W467 GPS Navigation System use the technologe of C-CAR map which make it possible for 3D.

The voice of navigation and radio can combine together to navigation and play the radio at the same time.It is very convinent for you to listen to the radio while in the navigation.This product support various kinds of sofware that you can read text and see the pictures in your car.It just look at that you have owned a car computer.

In order to satisfied the needs of customers,this MB G Class W467 GPS Navigation System: http://www.seicane.com/in-dash-car-dvd-gps-navigation-stereo-for-mercedes-benz-g-class-w467-with-radio-tv-bluetooth-ipod-si-9311-1 has installed the 4G SD card.You can play music or video with mp3 or mp4 formats.You can receive the call in any time because it has bluetooth,exhibit of coming call,telephone record and search of telephone records.

Mercedes-Benz CLK-W209/C-Class W203 DVD Player Installation

Here is the information about Mercedes-Benz CLK-W209/C-Class W203 DVD Player Installation.


Product name: In-Dash car DVD Gps navigation Stereo for Mercedes-Benz CLK W209 with Radio TV Bluetooth Ipod

link: http://www.seicane.com/in-dash-car-dvd-gps-navigation-stereo-for-mercedes-benz-clk-w209-with-radio-tv-bluetooth-ipod-si-9302


Product name: In-Dash car DVD Gps navigation Stereo for Mercedes-Benz C-Class W203 with Radio TV Bluetooth Ipod

link:  http://www.seicane.com/in-dash-car-dvd-gps-navigation-stereo-for-mercedes-benz-c-class-w203-with-radio-tv-bluetooth-ipod-si-9302-1


Product name:  Android 7 Inch Car DVD Player for Mercedes-Benz CLK W209(Touchscreen,GPS,TV,Ipod, 3G,Wifi)

link:  http://www.seicane.com/android-7-inch-car-dvd-player-for-mercedes-benz-clk-w209-touchscreen-gps-tv-ipod-3g-wifi-sia-9302


Product name: Android 7 Inch Car DVD Player for Mercedes-Benz C-Class W203(Touchscreen,GPS,TV,Ipod, 3G,Wifi)

link: http://www.seicane.com/android-7-inch-car-dvd-player-for-mercedes-benz-c-class-w203-touchscreen-gps-tv-ipod-3g-wifi-sia-9302-1


This installation can used to all of above four products.

Mercedes-Benz CLK-W209 C-Class W203 DVD Player Installation


1. The picture of the original CD player:

Mercedes-Benz CLK-W209 C-Class W203 DVD Player Installation

2. First detach the gear shift panel:

Mercedes-Benz CLK-W209 C-Class W203 DVD Player Installation

3. Use a screw driver to remove the screw marked with a red circle to release the car charger and ashtray:

4. Remove the car charger and ashtray assembly:

Mercedes-Benz CLK-W209 C-Class W203 DVD Player Installation

5. Use a screw driver to remove the screw marked with a red circle:

6. Pry the air conditioner panel out with a plastic lever:

Mercedes-Benz CLK-W209 C-Class W203 DVD Player Installation

7. Remove the original air conditioner panel:

8. Remove the heated seat and control panel assembly:

Mercedes-Benz CLK-W209 C-Class W203 DVD Player Installation

Mercedes-Benz CLK-W209 DVD Player Installation

Mercedes-Benz C-Class W203 DVD Player Installation

Mercedes-Benz CLK-W209 DVD Player

Mercedes-Benz C-Class W203 DVD Player

Mercedes-Benz CLK-W209 C-Class W203 DVD Player

Mercedes-Benz CLK-W209 C-Class W203 DVD Player Installation

Hope can help a lot about this Mercedes-Benz CLK-W209/C-Class W203 DVD Player Installation,and also hope can give you confidence about buying such a Mercedes-Benz CLK-W209/C-Class W203 DVD Player.

Update your Mercedes-Benz GLK X204 Stereo

Did you ever want to update your Mercedes-Benz GLK X204 Stereo?If your car is Mercedes-Benz GLK X204 from year 2008 to year 2012,then you can consider update your original car’s cd or dvd to this Mercedes-Benz GLK X204 dvd player with GPS navigation radio bluetooth ipod.

When you installed this Mercedes-Benz GLK X204 dvd player,it will change small screen to bigger one:7 inch screen+one head unit,and it will not need to disconnect your original car’s CD or dvd.

This Mercedes-Benz GLK X204 dvd player adopt the latest ARM11 to develop high performance multimedia with the functions of navigation, audio&video, entertainment and etc.It can play 1080P HD video.GPS navigation function:SiRF Prima, CPU: ARM11,800MHZ  and the os is WinCE6.0.The RAM is 256M,Support hard disk 500G and HD map.It also can support Sanyo 6 Disc DVD Changer.Support original car reverse track(can’t support if original car don’t have).The SD card maximum support is 128G which is big enough.

Mercedes-Benz GLK X204 dvd player Operating voltage range:DC10.5V~ 16V,Maximum operating current: 10A.Operating temperature : -20º~60º, Storage temperature: -30º~70º. Standby current: ≤50mA, After power off in 10 minutes: <1mA. Shutdown current: <1mA.DVD player adopt the MTK1389L decoding chip.Support the Bluetooth function, Phone book, A2DP.Built-in TDA7703 FM/AM radio module.Built-in 4 X 40W amplifier output.

Update your Mercedes-Benz GLK X204 Stereo with Two SD slot: GPS navigation map card, multimedia card.This Mercedes-Benz GLK X204 dvd player also Support USB 2.0 high speed OTG, USB1.1 HOST; support the USB SATA hard disk.Support two AV IN (one is front AUX audio and video input, one is rear AUX audio and video input).Support IPOD input (audio).Digital television function: CMMB; DVB-T; ATSC; ISDB (optional)Support reversing auxiliary function of original car.

And the most important function of this Mercedes-Benz GLK X204 dvd player is TWO-Way CAN BUS.Keep the principle of original car steering wheel control system function interlinked with unit(this function can be chose).Backlight adjustment.Car/Vehicle speed.Driving Computer Information.System configuration information.Time and date information.Steering wheel buttons.CDC Playing information.CDC Disc Status information.Return control information.Door information.Software Version information.And the warranty is one year.

More functions,more entertainment for your beloved Mercedes-Benz GLK X204.Do you still have any questions about this Mercedes-Benz GLK X204 dvd player which can Update your Mercedes-Benz GLK X204 Stereo? If you have any question,pls contact us,leave a message or write comment.If you like this Mercedes-Benz GLK X204 dvd player,please share it to your family,your friends.