How to Install an Android Radio Screen with Bluetooth in BMW 3 Series?

All we know that BMW is one of famous and popular car brands in the world. Most people dream of having a car from BMW.

Three years ago, I was lucky enough to get a BMW 3 Series car from my uncle. I love the car so much, and always try my best to take care of it. If there was a bigger touchscreen radio system, it must be perfect. So I decided to find a way to upgrade the original radio system. Just last month, I got a 10.25 inches Android touchscreen radio system from Seicane and had it install in my BMW. Now at this article, I share the upgrade guide as well as the use of Seicane radio system.  

Part 1, Upgrade the BMW 3 Series car screen 

A new radio screen for BMW 3 Series, plastic pry tools and screwdrivers are needed for the upgrade work. As there will involve the power plugs in the process, cut off the car power at the beginning is must.

Original car radio system

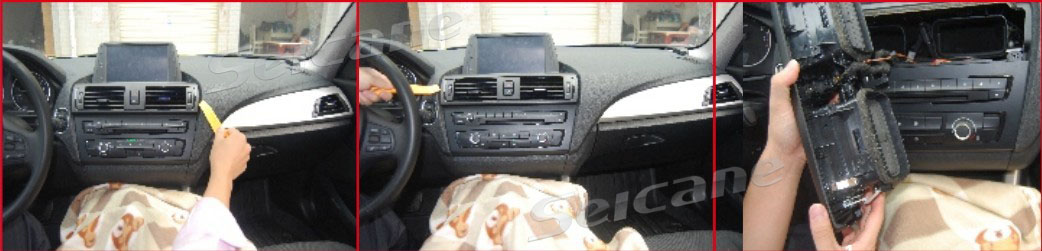
Step 1, Remove the air conditioning vent: Use the plastic pry tool to pry the A/C vent, take it down and unplug the connector.

Step 2, Remove these two screws that fixed the original radio screen, take down the screen and unplug the connector.

Step 3, Remove screws that fixed the CD button panel, take down the panel and unplug the connector.

Step 4, Remove screws that fixed the original CD unit, take down the unit and unplug the connectors.

Step 5, Check the wiring harness and other accessories of the new radio screen.

Step 6, Connect the new radio screen and original CD unit with the new wiring harness. You’d better check the user manual of the new radio screen if you are not sure the cable interfaces.

Step 7, Turn on the power to test whether the new radio functions normally. If there is no problem, install all the accessories including CD button panel and A/C vent back. If it doesn’t work, please check whether cables are connected correctly.

Part 2, The Seicane Bluetooth touchscreen radio for BMW 3 Series

Based on Android 10.0 system, the 10.25 inches IPS touchscreen looks very exquisite and provides users with smooth operation. It does make huge differences compared to using the original screen, especially when you navigate.

Apart from supporting all original car functions, this new radio system with large screen expands more functions such as Bluetooth music and phone, Carplay, rear view camera image etc. With Bluetooth technology, drivers are able to stream music wirelessly from the phone and answer hand-free call while keeping safe drive. On the other hand, for those who always have difficulties in parking, with rear view camera installing, there will be rear images shown on the unit display, thus they can see the rear situation clearly and park the car easily.

The product also designed with various wonderful UI displays, greatly improving user experience.

BMW X6 E71 car gps dvd SAT Navi Navigation with much entertainment

BMW is a good choice for many women when buying a car for themselves.The beautiful and loved appearance is the main reason.But the most important reason is the superior performance and brand influence.It seems that it has become a symbol of fortune especially for women.There is no denying that it indeed has so many advantages among other cars in the world.But it will be inferior a lot without a GPS Navigation System nowadays.Why do I say so?Let’s search for the answer from this article: BMW X6 E71 car gps dvd SAT Navi Navigation with much entertainment.X6 is really a good one to choose.Ladies, are you ready?

Does your car dashboard looks like this?

original BMW X6's CD
original BMW X6’s CD

original BMW X6's DVD
original BMW X6’s DVD

If your car doesn’t match these pictures,don’t worry,you can also continue to read the words below.Because all the GPS dvd Navigation systems are interlinked.And if you want to find the one matches yours,you can click the link we supply below.BMW X6 E71 SAT Navi Navigation can be used as a typical example to make you know more information.The video is well worth to watch:

BMW X6 E71 Head Unit GPS dvd Navigation will provide you with great music to remove the boredom from traveling for long hours by car. Your riders will be able to get more entertainment, considering that they have no other thing to do except sit down and watch the scenery outside.More wonderful information please click here gently:  http://www.seicane.com/aftermarket-oem-bmw-x6-e71-head-unit-gps-navigation-system-with-ipod-usb-sd-aux-rearview-canbus-srd-8825-1  It will not let you loss on the way.Enjoying the beautiful journey at the same time.Driving is no longer a dry sport.You can also listen to the latest news even if you are heading to the most isolated part of the world.You will also be aware of any weather disturbances that may affect your trip.Surprise is waiting for you!

How to install BMW 1 Series F20 3 Series F30 GPS navigation system with Radio Bluetooth Ipod

You want to make travel time more enjoyable and assured for you, so you decided on a GPS navigation system.Deciding to install a GPS navigation system can be rewarding in the long run,but a little complex in the beginning.Certainly,a novice also can complete this type of installation project,but some experience in this subject will make the process go more quickly. Either way you will save installation cost.You may also be able to seek installation support through the company you purchased the system from.Take your time and it will pay off on those long travel trips.Do you want to save some money and time on the installation?Please read this article:How to install BMW 1 Series F20 3 Series F30 GPS navigation system with Radio Bluetooth Ipod.And you will make it come true.


BMW F20 F30 navigation & audio system installation instruction and things to note.

BMW F20 F30 navigation & audio system installation instruction and things to note

1.Center Console Picture.

Center Console Picture

2.Accessories: 1) Head Unit 2) Mini Speaker 3) Ipod cable 4) USB cable 5) GPS antenna and two screws for fix Head Unit 6) User Manual 7) Touch Pen 8) Video cable 9) Power cable 10) Head Unit and display screen connecting cable 11) Display Screen

Accessories
Accessories

3.Pry and remove air conditioning vent by pry tool,and unplug the connector.

Pry and remove air conditioning vent by pry tool,and unplug the connector

4.Remove the 4 screws which fixed the original screen and air conditioning panel by screwdriver.

Remove the 4 screws which fixed the original screen and air conditioning panel by screwdriver

5.Pry and remove the air conditioning,and unplug the connectors.

Pry and remove the air conditioning,and unplug the connectors

6.Use the pry tool remove the panel.

Use the pry tool remove the panel

7.Remove the two screws which for the original CD.

Remove the two screws which for the original CD

8.Remove the original display screen and unplug the connector.

Remove the original display screen and unplug the connector

9.Unplug the original CD’s connector,connect to our power cable,if there are fiber optic wires,please move to relevant PIN of our connector.

Unplug the original CD's connector
Unplug the original CD’s connector

10.Plug the Head Unit and display screen connecting cable and GPS antenna.

Plug the Head Unit and display screen connecting cable and GPS antenna

11.Put the USB cable to USB slot in storage box,and put the iPod cable to there too.

Put the USB cable to USB slot in storage box,and put the iPod cable to there too

12.Install the mini speaker and plug the mini speaker connector.

Install the mini speaker and plug the mini speaker connector

13.Plug all connectors and tighten the screws to fix the CD and head unit.

Plug all connectors and tighten the screws to fix the CD and head unit

14.Plug all connectors in screen and fix the screen by screws.

Plug all connectors in screen and fix the screen by screws

Plug all connectors in screen and fix the screen by screws

15.Put the air conditioning panel,panel,air conditioning vent back and plug all connectors,tighten the screws.

Put the air conditioning panel,panel,air conditioning vent back and plug all connectors,tighten the screws

Put the air conditioning panel,panel,air conditioning vent back and plug all connectors,tighten the screws

16. After installation picture.

After installation picture

How to setting up the sounds.

Set up our unit’s sounds out from original speakers.

1.Switch to original radio interface.

Switch to original radio interface

2.Switch to main interface by press MENU button in iDrive.

Switch to main interface by press MENU button in Idrive

3.Choice CD/Multimedia.

Choice CD/Multimedia

4.Enter into Multimedia interface by iDrive.

Enter into Multimedia interface by iDrive

5.Start the AUX and adjust to proper volume.

Start the AUX and adjust to proper volume

6.Press MENU button 3 Seconds to enter into our main interface.

Press MENU button 3 Seconds to enter into our main interface

Setting up the Navigation sounds from MINI speaker while listening original radio and CD.

1.Switch to original radio or CD interface.Press the voice shortcuts button to enter into navigation.

Switch to original radio or CD interface.Press the voice shortcuts button to enter into navigation

2.Now the original radio or CD still have sounds and navigation sounds from MINI speaker.

Now the original radio or CD still have sounds and navigation sounds from MINI speaker

Below is a video about how to use the GPS navigation system after installing it.

Through the introduction above,you will feel that it is not so complex about How to install BMW 1 Series F20 3 Series F30 GPS navigation system with Radio Bluetooth Ipod.Isn’t it?Maybe you are a novice,but keep patient and read this article carefully.You will learn something more than installation.To know more about BMW 1 Series F20 3 Series F30 GPS navigation system,please visit: http://www.seicane.com/bmw-1-series-f20-gps-navigation-with-radio-bluetooth-ipod-srd-8840   http://www.seicane.com/bmw-3-series-f30-gps-navigation-with-radio-bluetooth-ipod-srd-8840-1   Enjoy the fun of driving is more important than just have it.GPS navigation system is a very important member in the big car family.If you have one,enjoying it to the fullest.If not,taking one as soon as possible.At that time,car is a lovely partner more than a vehicles.