The greatest benefit of this Mercedes Benz A Class W176 GPS Navigation System is that it can furthest keep your original car’s functions.You even can just buy a touch screen without any accessories.If you are the one who don’t want to change too much for your Mercedes Benz car,then you can take this unit.There is no doubt that 8 inch Mercedes Benz A Class W176 GPS Navigation System built in 1 din DVD as options is your best choice.With your car equipped with this high-tech multi-media unit, you will find driving it a pleasant experience, especially when driving alone or when having several people with you.Not just you yourself,your friends will fall in love with your magic Mercedes Benz.
touch screen Mercedes Benz A Class W176 GPS Navigationinstalled 8 inch touch screen Mercedes Benz A Class W176 GPS Navigation System
You can determine which accessories to choose including the 1 din DVD.Because of this,the installation become much easier.You don’t need to drill any hole when installing this unit.It also supports Sanyo 6 disc DVD optionally.If you want more entertainment,you can think about it.It’s a good choice to enjoy in your car.Mercedes Benz A Class W176 GPS Navigation System is a multifunctional electronic equipment.And it’s up to you to choose which functions to use.It’s so convenient that it has become nearly the most popular unit among those car accessories.The trend is unstoppable just like the water flowing to the east.The video will make its functions clear.
Mercedes Benz is a symbol in car industry.The GPS navigator will guide it to the right direction.The futher information please visit: http://www.seicane.com/8-inch-touch-screen-mercedes-benz-a-class-w176-head-unit-gps-navigation-system-with-usb-sd-ipod-canbus-aux-srd-8848 The navigator allows you to receive or make calls, read or send messages, and change channels, stations or media players without taking off your hands from the steering wheel, which could be a cause of road accidents.It also gives you updates on traffic situation, which enables you to look for a route that is less congested. You get stable signal anywhere you are, which keeps you connected with your family, your office and your colleagues even if you are traveling.
Almost all of owners know about the GPS Navigation System today.Even many ones have possessed one.Certainly,if you are the owner of a car who have not heard about GPS Navigation System yet,congratulations,you will have been out of date.What are you waiting for?Look at here and follow me to read the Detailed installation instructions for 2007-2011 Mercedes-Benz C Class W204 Head Unit GPS Navigation System.Then you will find it’s not so easy to fully possess her.Many owners will meet some trouble when installing the GPS Navigation System by themselves after buying her.So don’t get too excited.She isn’t the one who will be conquered so easy.Do you want to enjoy with you partner smoothly?Come on,this article will help you make the dream come true.Read it patiently.
Installation process and matters attention.
The navigation entertainment system for C200
1.Original car picture.
Original Mercedes-Benz C Class W204 picture
2.Original steering wheel control picture.
Original steering wheel control picture
3.Remove the original air-conditioning outlet.
Remove the original air-conditioning outlet
4. Remove the air-conditioning panel.
Remove the air-conditioning panel
5.Find the plug.
Find the plug
6.Pull out the plug.
Pull out the plug
7.Remove the screw on the store content box.
Remove the screw on the store content box
8.Remove the store content box.
Remove the store content box
9.Remove the plug.
Remove the plug
10.Remove the screw on the original CD.
Remove the screw on the original CD
11.Drawing out first in the direction shown by the arrow,and then picked up.
Drawing out first in the direction shown by the arrow,and then picked up
12.Find the original CD plug.
Find the original CD plug
13.Remove the original CD plug.
Remove the original CD plug
14.Pry the panel in the picture.
Pry the panel in the picture
15.Install the little loudspeaker.
Install the little loudspeaker
16.Put the cable on the mark position.
Put the cable on the mark position
17.Adjust the cable.
Adjust the cable
18.Connect the cable with our unit.
Connect the cable with our unit
19.Put back the original CD.
Put back the original CD
20.Install our unit and the original air-conditioning outlet.
Install our unit and the original air-conditioning outlet
21.The effect picture of install our unit and the original air-conditioning outlet.
The effect picture of install our unit and the original air-conditioning outlet
22.Install the frame.
Install the frame
23.Install the frame.
Install the frame
After installation,we can use it directly.The way to use it will be shown to us through the video below:
Through the detailed introduction above,we will have a basic frame at least.If you’ve chosen to install a Head Unit GPS Navigation System by yourselves and don’t know where to begin,you did get a real good deal after reading this article:Detailed installation instructions for 2007-2011 Mercedes-Benz C Class W204 Head Unit GPS Navigation System.You will know about more information about Mercedes-Benz C Class W204 Head Unit GPS Navigation System if you visit this: http://www.seicane.com/8-inch-touch-screen-2007-2011-mercedes-benz-c-class-w204-head-unit-gps-navigation-system-with-ipod-usb-sd-aux-rearview-canbus-srd-8810 You might find this project a little confusing,but the enjoyment and convinence GPS Navigation System brings is amazing.Don’t believe that?Just try experiencing it and you will fall in love with her.It will bring you home nowhere you are.
Nowadays,more and more owners are willing to install a GPS Navigation System in their cars.This fully shows that installing a GPS Navigation System is really necessary and convinent.But do you know how to install a GPS Navigation System for your car?Don’t worry,this article will tell you in some detail.Next,we will show you how to install Mercedes Benz A Class W176 B Class W246 Head Unit GPS Navigation System.
Announcements:Please check the appearance and the unit functions before install the unit.Don’t shorten or extened the GPS antenna,it will lead to the antenna problem.Don’t make the GPS antenna winding the steering wheel and shift lever,it will be dangerous.
Warm prompt:
1.Don’t use strong chemicals,cleaning agents,strong detergent to washing the machine.
2.Please use a clean soft fabric to wipe the screen,don’t use ordinary fabric.
3.Please use the touch screen pen to operation unit,please don’t use other sharp objects,or it will damage to the screen.
4.Please don’t self-service,maintenance or install the unit,in case of the power is on,don’t install or repair the unit,it is very dangerous if the person who did not receive the electronic equipment or vehicle installation training or lack of experienced personnel to install and repair the unit.
5.Please protect the original display when the staff dismounting the original CD and keep the original CD,try to use the original screw.
6.Navigation and rearview camera only to auxiliary function,it can’t replace your attention and judgment.
7.When the customer choose the digital TV,our unit could realized the digital TV touch.
Mercedes Benz A/B class Navigation & Audio System Installation Instruction Manual.
Mercedes Benz A/B class Navigation System Installation Manual
1.Original car console.
Original Mercedes Benz A/B class console
2.The accessories.
The accessories
3.Remove the screws and take out the display screen.
Remove Mercedes Benz A/B class screws and take out the display screen
Remove Mercedes Benz A/B class screws and take out the display screen
4.Remove the framework holder and the 3 fixed screws.
Remove the framework holder and the 3 fixed screws
5.Remove the Air Conditioner vent.
Remove the Air Conditioner vent
6.Loose the CD fixed screws in left and right vents.
Loose the CD fixed screws in left and right vents
7.Pull out the left and right screws and remove the original CD,unplug the main cable connector.
Pull out the left and right screws and remove the original CD,unplug the main cable connector
8.Remove the storage box and decorative plate in the co-polit seat for wiring.
Remove the storage box and decorative plate in the co-polit seat for wiring
9.Connect our power cable to original CD’s connector,and plug our male connector to original CD.
Connect our power cable to original CD’s connector,and plug our male connector to original CDConnect our power cable to original CD’s connector,and plug our male connector to original CD
10.Put the mini speaker to the central dashbord.
Put the mini speaker to the central dashbord
11.Plug the CAN BUS.
Plug the CAN BUS
12.Fix the framework holder and tight the 3 fixed screws.
Fix the framework holder and tight the 3 fixed screws
13.Connect the GND to the original CD’s shell.
Connect the GND to the original CD’s shell
14.Pull 2 original CD fixed screws and put back the original CD then tight the screws.
Pull 2 original CD fixed screws and put back the original CD then tight the screws
15.Plug the all cables and fix the head unit.
Setting sounds come out from original speakers
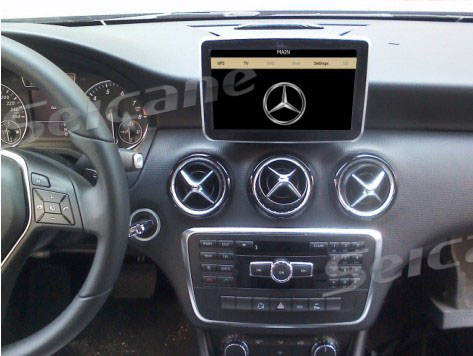
16.Picture after installation.
Picture after installation
Steps to setting up the sounds come out and interface switching.
1.Setting sounds come out from original speakers.Enter into original CD main menu first,select the Audio interface by original knobs,enter into AUX interface,now the our head unit sounds come out from original speakers.
Setting sounds come out from original speakersSetting sounds come out from original speakers
2.Setting the navigation sound come out from mini speaker while listening original CD and Radio.While in original CD or radio interface,press the navigation shortcut key in steering wheel control to enter into navigation interface.Now the original CD and radio play continued and the navigation sound come out from mini speaker.To use this shortcut key to foreground and background switching.
Setting the navigation sound come out from mini speaker while listening original CD and RadioSetting the navigation sound come out from mini speaker while listening original CD and Radio
3.Touch the original menu to switch to our menu.
Touch the original menu to switch to our menu
4.While in our menu,you can select the original functions to enter the original system.
While in our menu,you can select the original functions to enter the original system
Below is the video how to use the GPS Navigation System for Mercedes Benz A Class W176 B Class W246:
Through the detailed description,we believe that you have mainly grasped how to install Mercedes Benz A Class W176 B Class W246 Head Unit GPS Navigation System.For more information,please visit:http://www.seicane.com/8-inch-touch-screen-mercedes-benz-a-class-w176-head-unit-gps-navigation-system-with-usb-sd-ipod-canbus-aux-srd-8848 If you still have any problem on it,tell us and we will be happy to offer some help for you.At the same time,you will get a pleasant installation journey obviously.Then you will find how convinent and pefect when the GPS Navigation System comes in your car.At that moment,you will be proud of yourself for making such wise choice.Do you have a GPS Navigation System in your car? Why or why not?


Recent Comments