How to Install a 12.3″ Touch Screen to 2014-2019 Lexus RX?

In the modern society, full-size screen smartphone, laptop, TVs etc. are seen everywhere. They greatly improve our visual experience. The good news is that now you have chance to put a large screen head unit in your car dashboard too, making daily drive more convenient.

Last week, I just replaced the small screen of my 2019 Lexus RX to a 12.3-inch head unit. Compared to the old screen, it looks very exquisite, not only shows information super clear, but comes with various useful functions. Now, let me tell you how I did the replacement job.

This is the original radio screen of my ride, the available section is a half of the new radio.

About the removal and installation part

To be honest, it’s not a difficult DIY project, most people can do that. The tools we need are plastic pry tools and screwdrivers. Before working, we must power off the car battery to keep safety. Let’s get started.

1, Remove the armrest part between the front seats, and disconnect its plug.

2, Remove the side panels of the left and right.

3, Remove these frames that fixed the radio system.

4, Remove the screws that fixed the radio unit, then pull out the unit.

5, Pry to remove this plastic piece near the radio screen.

6, Take away this protective panel of the screen.

7, Remove all the screws that fixed the screen.

8, Take off the screen and disconnect its plugs.

9, Have a check for the new touch screen radio head unit.

10, Use the new cables to connect to the original radio unit.

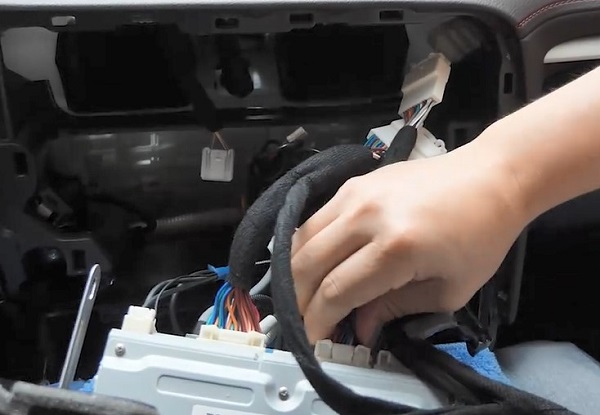
11, Then connect the new screen and install it back.

12, Turn on the car to test the new radio system.

About the new large screen head unit

I was recommended to get this (2014-2019) Lexus RX touch screen radio from Seicane, and it didn’t let me down.

The head unit is designed with 12.3” big screen, smooth to operate and fast to respond. I can watch 1080P video, apply off-line navigation, check driving information etc.

On the other hand, it absolutely brings Carplay function, that you can freely use phone applications like call, music, map on the radio screen. You are able to install backup camera to the car, and the screen will show you the rear images whenever you reverse and park car.

Drivers are highly advised to use large screen stereo system when there is only old standard radio in their cars. That stuff makes your every drive better.

For 2013-2016 BMW 3 Series F30 F31 F34 F35 Factory Radio Upgrade Guide

Instead replacing the whole car radio system, lots of BMW owners would rather than choosing to change the radio screen, which is indeed a quick and easy way to upgrade the factory radio system in recent years.

As a professional supplier of aftermarket car radio GPS system, Seicane not only produces quality radio system for various car models, but provides comprehensive installation guides for car owners. And here is a detailed guide to install an upgraded android radio screen unit in 2013-2016 BMW 3 Series F30 F31 F34 F35. Hope it be useful for you.

  • Tools: Plastic pry tool, screwdrivers.
  • Note: Cut off the car power during the installation process to ensure safety.

The original car radio system

Step 1, Removing the A/C vent panel. We need to start this from the co-pilot position. Use the plastic pry tool to pry the panel, then take down the whole vent panel and disconnect the plug.

Step 2, Next we go to remove the trim panel at the bottom of the radio system. Still need to pry it, then take it down and unplug the connector.

Step 3, Remove screws that fixed the button panel. Take down the panel and disconnect the plugs.

Step 4, Remove screws that fixed the original radio screen, take it down and unplug its connectors.

Step 5, Remove screws that fixed the original CD unit, take out the unit and unplug the connectors.

Step 6, Have a check for the new car radio screen unit to make sure everything of it in good condition.

Step 7, According to the radio user manual, correspondingly connect the new wiring harness to the car.

Step 8, Connect the new screen to the car.

Step 9, Connect the original CD unit.

Step 10, Test the new radio system. If it works normally, install all the car parts back. If there is problem, check again the wiring condition.

Key features of Seicane upgraded radio screen for BMW models

  • The 10.25” IPS screen can greatly improve your viewing experience when watch videos and use navigation.
  • Equipped with the latest Android system, it provides stable operation and performance.
  • It supports all original car functions, keeping you comfortable using experience.
  • There are built-in Bluetooth and microphone, so you can use Bluetooth to call and listen to music.
  • It’s able to support Carplay, just connect your phone to the radio with a Carplay USB dongle, then you can use phone applications freely, being the best way to play phone while drive safe on the road.
  • You can also add DVR, rear view camera, TPMS and so on to help increase driving safety as they are supported by this Android radio screen.

How to Replace (2006-2013) BMW Mini Cooper Radio with a Touchscreen Bluetooth Car Stereo System?

BMW’s Mini Cooper is one of popular models loved by many people. It has a sense of design regardless of its external shape or internal situation, while the radio system is one of amazing design.

Normally, the original car radio of BMW Mini Cooper is the combination of a large circular display meter and button-operated CD player, which in fact is with simple function and no special feature. With the innovation of car stereo technology, now we can find many new car stereos that come with various features and functions in the market to upgrade the old radio. This post is about how to remove old radio and install a touchscreen multifunctional radio in the (2006-2013) Mini Cooper. Let’s check whether you can do it yourself.

The original car stereo system.

The removal and installation steps

Preparation: New car stereo system (the one we used is a Seicane Android car stereo navigation system). Tools include plastic pry tools, screwdrivers. Power off the car before moving anything.

Step 1, Remove the two plastic pieces from the top air outlet

Step 2, Remove the fixing screws inside (one on each side)

Step 3, Use a pry tool to pry open the trim panel at the instrument position of the steering wheel, keep it loose.

Step 4, Press to open the right trim panel (arrow) by hand, and pry to remove the small plastic sheet (circle) at the right air vent position.

Step 5, Remove the fixing screws on the left and right sides of the air vents, take down the frame structure, and disconnect the plug.

Step 6, Remove all the screws that fix the trim board shown in the picture to make it loose.

Step 7, Pry to remove the fixed panel on the right side of the radio system.

Step 8, Unscrew the screws that fix the panel under the steering wheel, remove the panel.

Step 9, Then pry to remove the fixed panel on the left side of the radio system.

Step 10, Remove screws that fixed the start button panel to make it loose.

Step 11, To remove the button panel of the radio system: Firstly, remove the fixing plastic sheet at the bottom of the panel and unscrew the screw inside; Then unscrew the screws that fix the whole button panel on the left and right sides; Take out the panel and unplug its all connected plugs.

Step 12, Remove all the screws that fix the display meter and the CD player.

Step 13, Take down the display meter and the CD player, unplug all the connectors.

Step 14, Remove the black frame that fixed the display meter and the CD player. The frame will be used for the new stereo system.

Step 15, Check the wiring harness and other accessories of the Seicane car stereo system.

Step 16, Fix the screen and CD unit of the new car radio system with the black frame.

Step 17, Use the new cables to connect the new radio system (screen and CD unit) to the car. Being carefully and taking a look at the radio user manual will be great help.

Step 18, Next, turn on the car to test the working condition of the new car radio system.

Step 19, If it is confirmed that the new stereo system is working normally, install all the original car accessories including screws and panels back. If there is problem, check again the wiring condition to see if ok.

Brief introduction of Seicane car stereo navigation system

It comes with a 7 inches touchscreen that easy to operate and see information clearly. The most fantastic design of the product is it can support the fuel consumption display and Harmon Kardon Sound System, so it’s easy to plug and play for the installation.

With this multifunctional car radio, whenever and wherever you drive, you’ll get lot fun on the road. Not only can you listen to music, receive radios channels, you can also watch videos, surf the Internet via 3G/WIFI network. Most importantly, you won’t get lost by checking the latest navigation information to your destination provided by this radio. Besides, it helps you drive safer. For example, making Bluetooth calls instead of answering the phone with your hands; Easily to park and reverse the car with the help of rear images shown on display when there is rear view camera connected to the radio system.

In short, this Seicane Bluetooth car stereo system help improve your driving experience.