How to install BMW 1 Series F20 3 Series F30 GPS navigation system with Radio Bluetooth Ipod

You want to make travel time more enjoyable and assured for you, so you decided on a GPS navigation system.Deciding to install a GPS navigation system can be rewarding in the long run,but a little complex in the beginning.Certainly,a novice also can complete this type of installation project,but some experience in this subject will make the process go more quickly. Either way you will save installation cost.You may also be able to seek installation support through the company you purchased the system from.Take your time and it will pay off on those long travel trips.Do you want to save some money and time on the installation?Please read this article:How to install BMW 1 Series F20 3 Series F30 GPS navigation system with Radio Bluetooth Ipod.And you will make it come true.


BMW F20 F30 navigation & audio system installation instruction and things to note.

BMW F20 F30 navigation & audio system installation instruction and things to note

1.Center Console Picture.

Center Console Picture

2.Accessories: 1) Head Unit 2) Mini Speaker 3) Ipod cable 4) USB cable 5) GPS antenna and two screws for fix Head Unit 6) User Manual 7) Touch Pen 8) Video cable 9) Power cable 10) Head Unit and display screen connecting cable 11) Display Screen

Accessories
Accessories

3.Pry and remove air conditioning vent by pry tool,and unplug the connector.

Pry and remove air conditioning vent by pry tool,and unplug the connector

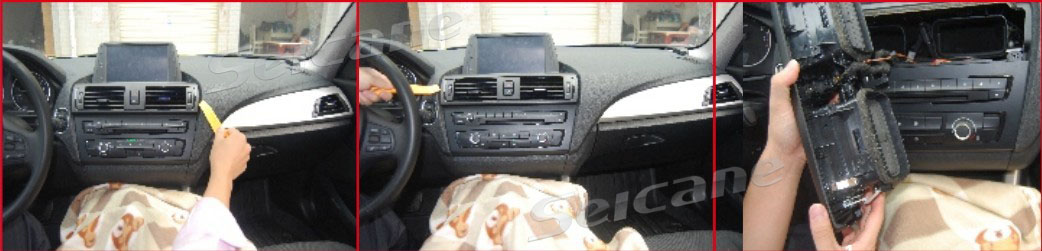
4.Remove the 4 screws which fixed the original screen and air conditioning panel by screwdriver.

Remove the 4 screws which fixed the original screen and air conditioning panel by screwdriver

5.Pry and remove the air conditioning,and unplug the connectors.

Pry and remove the air conditioning,and unplug the connectors

6.Use the pry tool remove the panel.

Use the pry tool remove the panel

7.Remove the two screws which for the original CD.

Remove the two screws which for the original CD

8.Remove the original display screen and unplug the connector.

Remove the original display screen and unplug the connector

9.Unplug the original CD’s connector,connect to our power cable,if there are fiber optic wires,please move to relevant PIN of our connector.

Unplug the original CD's connector
Unplug the original CD’s connector

10.Plug the Head Unit and display screen connecting cable and GPS antenna.

Plug the Head Unit and display screen connecting cable and GPS antenna

11.Put the USB cable to USB slot in storage box,and put the iPod cable to there too.

Put the USB cable to USB slot in storage box,and put the iPod cable to there too

12.Install the mini speaker and plug the mini speaker connector.

Install the mini speaker and plug the mini speaker connector

13.Plug all connectors and tighten the screws to fix the CD and head unit.

Plug all connectors and tighten the screws to fix the CD and head unit

14.Plug all connectors in screen and fix the screen by screws.

Plug all connectors in screen and fix the screen by screws

15.Put the air conditioning panel,panel,air conditioning vent back and plug all connectors,tighten the screws.

Put the air conditioning panel,panel,air conditioning vent back and plug all connectors,tighten the screws

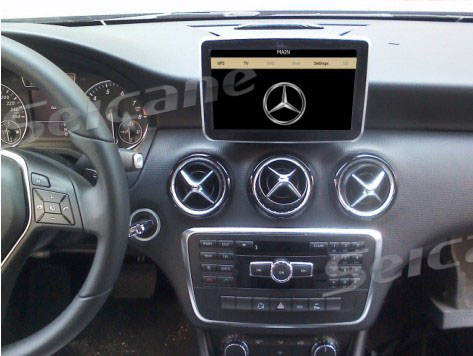
16. After installation picture.

After installation picture

How to setting up the sounds.

Set up our unit’s sounds out from original speakers.

1.Switch to original radio interface.

Switch to original radio interface

2.Switch to main interface by press MENU button in iDrive.

Switch to main interface by press MENU button in Idrive

3.Choice CD/Multimedia.

Choice CD/Multimedia

4.Enter into Multimedia interface by iDrive.

Enter into Multimedia interface by iDrive

5.Start the AUX and adjust to proper volume.

Start the AUX and adjust to proper volume

6.Press MENU button 3 Seconds to enter into our main interface.

Press MENU button 3 Seconds to enter into our main interface

Setting up the Navigation sounds from MINI speaker while listening original radio and CD.

1.Switch to original radio or CD interface.Press the voice shortcuts button to enter into navigation.

Switch to original radio or CD interface.Press the voice shortcuts button to enter into navigation

2.Now the original radio or CD still have sounds and navigation sounds from MINI speaker.

Now the original radio or CD still have sounds and navigation sounds from MINI speaker

Below is a video about how to use the GPS navigation system after installing it.

Through the introduction above,you will feel that it is not so complex about How to install BMW 1 Series F20 3 Series F30 GPS navigation system with Radio Bluetooth Ipod.Isn’t it?Maybe you are a novice,but keep patient and read this article carefully.You will learn something more than installation.To know more about BMW 1 Series F20 3 Series F30 GPS navigation system,please visit: http://www.seicane.com/bmw-1-series-f20-gps-navigation-with-radio-bluetooth-ipod-srd-8840   http://www.seicane.com/bmw-3-series-f30-gps-navigation-with-radio-bluetooth-ipod-srd-8840-1   Enjoy the fun of driving is more important than just have it.GPS navigation system is a very important member in the big car family.If you have one,enjoying it to the fullest.If not,taking one as soon as possible.At that time,car is a lovely partner more than a vehicles.


How to install Mercedes Benz A Class W176 B Class W246 Head Unit GPS Navigation System

Nowadays,more and more owners are willing to install a GPS Navigation System in their cars.This fully shows that installing a GPS Navigation System is really necessary and convinent.But do you know how to install a GPS Navigation System for your car?Don’t worry,this article will tell you in some detail.Next,we will show you how to install Mercedes Benz A Class W176 B Class W246 Head Unit GPS Navigation System.

Announcements:Please check the appearance and the unit functions before install the unit.Don’t shorten or extened the GPS antenna,it will lead to the antenna problem.Don’t make the GPS antenna winding the steering wheel and shift lever,it will be dangerous.

Warm prompt:

1.Don’t use strong chemicals,cleaning agents,strong detergent to washing the machine.

2.Please use a clean soft fabric to wipe the screen,don’t use ordinary fabric.

3.Please use the touch screen pen to operation unit,please don’t use other sharp objects,or it will damage to the screen.

4.Please don’t self-service,maintenance or install the unit,in case of the power is on,don’t install or repair the unit,it is very dangerous if the person who did not receive the electronic equipment or vehicle installation training or lack of experienced personnel to install and repair the unit.

5.Please protect the original display when the staff dismounting the original CD and keep the original CD,try to use the original screw.

6.Navigation and rearview camera only to auxiliary function,it can’t replace your attention and judgment.

7.When the customer choose the digital TV,our unit could realized the digital TV touch.


Mercedes Benz A/B class Navigation & Audio System Installation Instruction Manual.

Mercedes Benz A/B class Navigation System Installation Manual

1.Original car console.

Original Mercedes Benz A/B class console

2.The accessories.

The accessories
The accessories

3.Remove the screws and take out the display screen.

Remove Mercedes Benz A/B class screws and take out the display screen


Remove Mercedes Benz A/B class screws and take out the display screen

4.Remove the framework holder and the 3 fixed screws.

Remove the framework holder and the 3 fixed screws

5.Remove the Air Conditioner vent.

Remove the Air Conditioner vent

6.Loose the CD fixed screws in left and right vents.

Loose the CD fixed screws in left and right vents

7.Pull out the left and right screws and remove the original CD,unplug the main cable connector.

Pull out the left and right screws and remove the original CD,unplug the main cable connector

8.Remove the storage box and decorative plate in the co-polit seat for wiring.

Remove the storage box and decorative plate in the co-polit seat for wiring

9.Connect our power cable to original CD’s connector,and plug our male connector to original CD.

Connect our power cable to original CD's connector,and plug our male connector to original CD
Connect our power cable to original CD’s connector,and plug our male connector to original CD
Connect our power cable to original CD's connector,and plug our male connector to original CD
Connect our power cable to original CD’s connector,and plug our male connector to original CD

10.Put the mini speaker to the central dashbord.

Put the mini speaker to the central dashbord

11.Plug the CAN BUS.

Plug the CAN BUS
Plug the CAN BUS

12.Fix the framework holder and tight the 3 fixed screws.

Fix the framework holder and tight the 3 fixed screws

13.Connect the GND to the original CD’s shell.

Connect the GND to the original CD's shell
Connect the GND to the original CD’s shell

14.Pull 2 original CD fixed screws and put back the original CD then tight the screws.

Pull 2 original CD fixed screws and put back the original CD then tight the screws

15.Plug the all cables and fix the head unit.

Setting sounds come out from original speakers

16.Picture after installation.

Picture after installation

Steps to setting up the sounds come out and interface switching.

1.Setting sounds come out from original speakers.Enter into original CD main menu first,select the Audio interface by original knobs,enter into AUX interface,now the our head unit sounds come out from original speakers.

Setting sounds come out from original speakers

2.Setting the navigation sound come out from mini speaker while listening original CD and Radio.While in original CD or radio interface,press the navigation shortcut key in steering wheel control to enter into navigation interface.Now the original CD and radio play continued and the navigation sound come out from mini speaker.To use this shortcut key to foreground and background switching.

Setting the navigation sound come out from mini speaker while listening original CD and Radio

3.Touch the original menu to switch to our menu.

Touch the original menu to switch to our menu

4.While in our menu,you can select the original functions to enter the original system.

While in our menu,you can select the original functions to enter the original system

Below is the video how to use the GPS Navigation System for Mercedes Benz A Class W176 B Class W246:

Through the detailed description,we believe that you have mainly grasped how to install Mercedes Benz A Class W176 B Class W246 Head Unit GPS Navigation System.For more information,please visit:  http://www.seicane.com/8-inch-touch-screen-mercedes-benz-a-class-w176-head-unit-gps-navigation-system-with-usb-sd-ipod-canbus-aux-srd-8848   If you still have any problem on it,tell us and we will be happy to offer some help for you.At the same time,you will get a pleasant installation journey obviously.Then you will find how convinent and pefect when the GPS Navigation System comes in your car.At that moment,you will be proud of yourself for making such wise choice.Do you have a GPS Navigation System in your car? Why or why not?