Adding Touch Screen Android Radio Head Unit to VW Volkswagen Golf

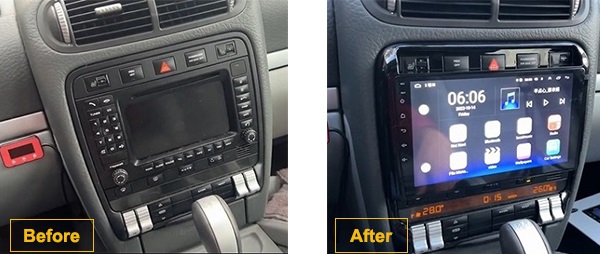
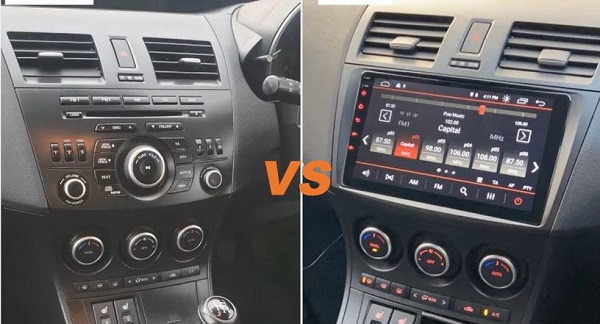
When it comes to car radio system, there is huge difference between the old standard radio and new touch screen head unit. The former is normally designed with many buttons and complex operation, but only offers few function. The latter equips large screen, which is super easy to operate. It also provides various amazing function, greatly improving our driving experience. That’s why I got an aftermarket touch screen radio for VW Volkswagen Golf.

How my drive will be with the touch screen radio?

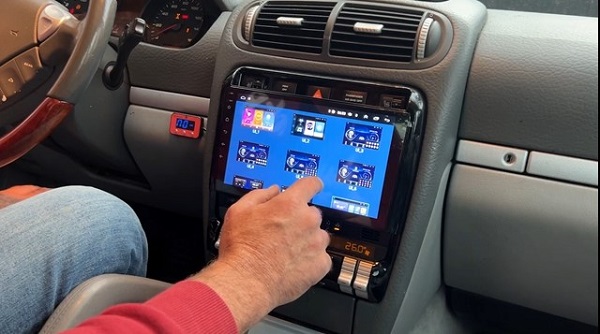
Convenient operation – When I used the old radio, I had to focus on recognizing which button I need to press, sometimes it does take time. On the new screen radio, I just need to touch the screen slightly to operate everything. On the other hand, the exquisite screen makes my car look high-end.

Carplay functions – It’s the best way to connect phone to the car, giving us the ability to use phone applications freely on the radio screen. For example, we can use the phone map, phone call, contact books, phone music… keeping the historical usage records, more convenient.

Offline navigation – I love to drive for road trip, and a reliable car navigation system is very important. This touch screen radio is with built-in high quality GPS module, supports various navigation map. What’s more, even when there is no Internet signal, it still works well. You will never lose the way wherever you go.

Backup camera – Are you often trouble in parking the car? For many drivers, they do need a good parking assistant, and the rear view camera is perfect. Install the backup camera to the car and connect it to the touch screen car stereo, the radio screen will be able to show the rear images when we reverse and park the car, so helpful.

Internet connection – Now we can also access the Internet on the big screen car stereo system, via WIFI or 4G network. You can listen to the latest songs, watch Youtube videos, go online shopping, check Google emails and so on.

Having touch screen radio, having better drive!

How to replace the factory radio by ourselves?

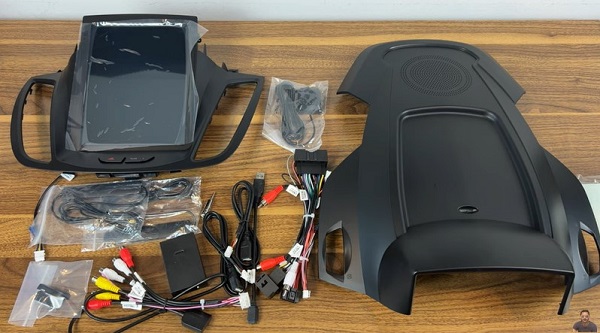
If you are also planning to upgrade your Volkswagen Golf’s factory stereo, take a look at this DIY installation guide.

Notes

– Toolbox: Plastic pry tools, screwdrivers, cable ties, tapes etc.

– For safety, must turn off the car power.

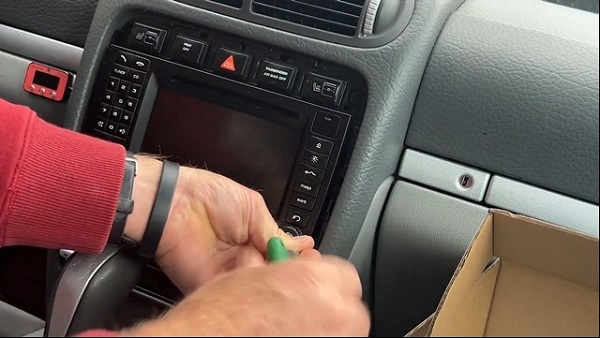
1, Use the plastic pry tool to remove the frame, mind your hands’ force.

2, Remove 4 screws that fixed the radio unit.

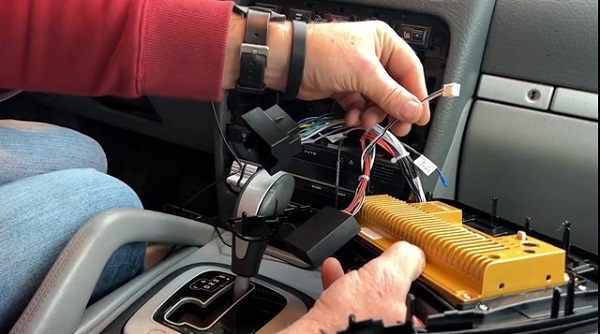
3, Pull out the main unit.

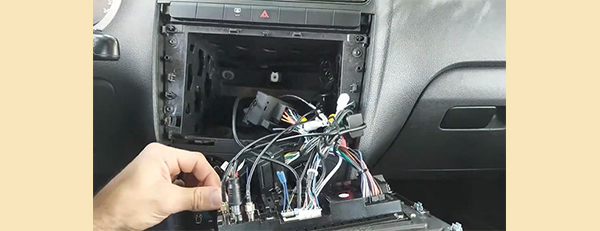
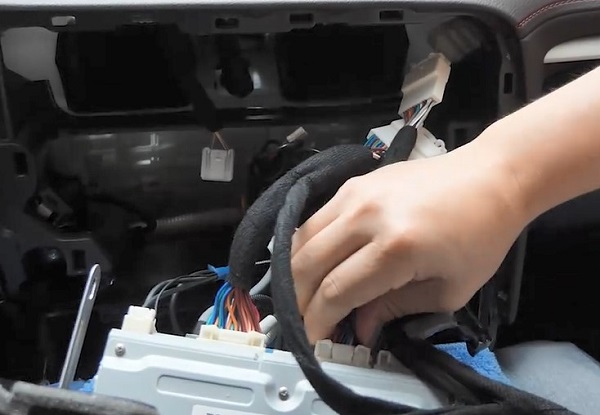
4, And unplug all the connectors.

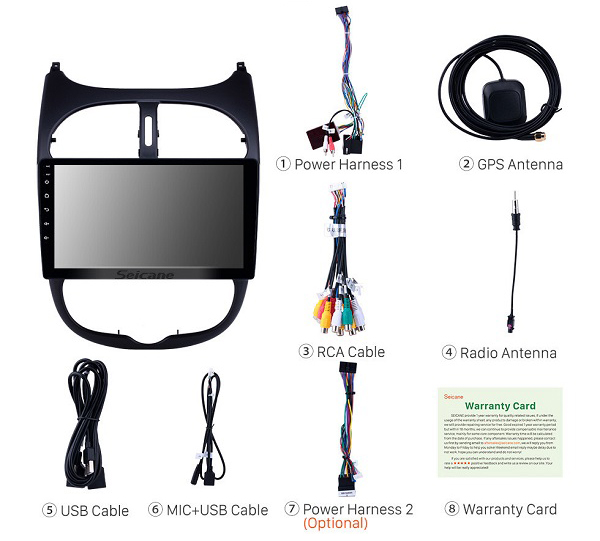
5, Connect the new Android radio system to the car via the new cables. Carefully check the manual if you are not sure the wiring interfaces.

6, After connecting all the cables, you are advised to turn on the car to test the new car radio system. If there is any problem, check again the wiring condition or ask the sell for assistance. If the unit functions well, go next steps.

7, Fit the new radio to the car.

8, Install back the frame.

Upgrade 2012-2015 VW Volkswagen Polo Factory Radio to Touch Screen Carplay Head Unit

If you are still using the old button-operated factory radio in your Volkswagen Polo, you lost much fun. That’s same to you use an old Nokia while other use big screen Apple phone. You won’t know how’s amazing having large screen head unit until you get one for your loved vehicle.

Whether you are replace the factory radio now or later, you can take a look at this post about how to install touch screen radio to 2012 2013 2014 2015 VW Volkswagen Polo. It’s not difficult, most people can do it themselves.

Section 1, Install Touch Screen Radio to 2012-2015 VW Polo

Important Notes,

  1. Prepare toolbox: Plastic pry tools, screwdrivers, cable ties, tapes etc.
  2. Safety tip: Power off the car battery before working on the radio system.

1, Use the plastic pry tool to remove the frame of the radio system.

2, You’ll see 4 screws that fixed the radio unit. Remove them.

3, So you can pull out the main unit, unplug the connectors.

4, Next, you can connect the new cables of the new Volkswagen Polo Android radio to the car. Make sure they are correctly connected.

5, Connect the new screen to the car via the new cables. The interfaces are different,  they are easy to distinguish and connect well.

6, Install the new screen well.

7, Turn on the car to check whether it works normally. When there are problems, you are advised to double check the wiring conditions, or ask sellers for assistant.

Section 2, Having Wonderful Drive with Big Screen Radio

Compared to the old radio, the new touch screen radio head unit provides various amazing functions and features.

  • It’s made of 9-inch touch screen, you can see everything clearly. On the other hand, it’s equipped with Android 10 system and high quality CPU, offering fast respond and smooth operation.
  • You can apply Carplay/Android Auto in the unit. This function allows you to use the phone applications such as contact, maps, music etc on the radio screen freely and conveniently, also helping improve driving safety.
  • Having a big screen, you can connect rear view camera to help you park car well. The screen will automatically switch to the rear images every time when you reverse and park the vehicle, so you can see clearly the rear situation to avoid any possible accident.
  • As to entertainment, it also offers different ways. You can enjoy high quality Bluetooth music, you can listen to real-time FM/AM radio, you can watch 1080P videos, you can also access the Internet to visit different website. Never get boring on a long drive!

How to Install Big Screen Radio Head Unit to Porsche Cayenne 2003-2011?

If you decide to get and DIY install the touch screen Android radio to 2003 2004 2005 2006 2007 2008 2009 2010 2011 Porsche Cayenne, here you can find the detailed and reliable installation instructions. Are you ready for that?

Important Preparation Information

Basic Tools: Plastic pry tool and screwdriver.

A Safety Tip: Power off the car batter before working.

Removal & Installation Steps

1, Carefully pry to remove the plastic frame.

2, Remove all the screws that fix the main unit.

3, Pull out the unit.

4, You can see that there are various wiring cables, we need to unplug them all from the unit.

5, Reconnect to the car via new cables of the aftermarket touch screen radio.

6, Then connect the new radio head unit.

7, Put the new radio to the dashboard.

8, Turn on the car to test whether it functions well.

You Can Enjoy Wonderful Drive

With the big screen head unit, your drive must be greatly different.

There are various amazing functions offered by the Android radio system, including:

Playing Bluetooth Music – It’s built-in Bluetooth module, you can directly connect your phone to the radio via Bluetooth, then you can play phone music. Just enjoy your favorite playlist whenever wherever you go.

Applying Carplay/Android Auto – This function gives you the safest way to play phone when driving. Once you apply the Carplay, the radio acts as your phone, you can use phone applications freely on the radio screen, such as phone map, phone music, contact books etc.

Connecting Backup Camera – Will you be able to park car well just with the help of the front mirrors? The new radio makes car parking easier and safer. After installing car cameras, images from the radio display show situations clearly, assisting you park the car quickly.

Watching 1080P Videos – On one hand, you can insert a USB memory card to play videos. On the other hand, you can connect WIFI to access the Internet to watch Youtube videos or movies online. With the 1080P resolution, get perfect viewing experience.

In fact, you can use more other functions than above mentioned. Compared to the original button-operated radio, the aftermarket touch screen radio makes our driving better.

How Easy to Add Tesla Screen to My 2017 Ford Escape

The fact is I almost only use the A/C setting on my 2017 Ford Escape radio system. As playing music and navigating, I use my phone to do. Some people may love to use the classic button-controlled radio, like the one in my 2017 Ford Escape. But as to me, it’s almost useless. That’s why I decide to get an aftermarket touch screen head unit to replace it.

I finished the installation job last month. So far, the new screen works so good, greatly improving driving experience. At this post, I would like to share everything about this Tesla screen to you.

Section 1, About the installation

DIY installation is not so difficult. Get your toolbox ready. Make sure the car battery is off before starting.

1, Pry to remove the top cover of the radio system.

2, There are two screws that fix the factory screen. Remove them to take off the screen and disconnect the plug.

3, Remove this screw.

4, And pry to remove this plastic piece. After that, remove these two screws.

5, Now we can pry to remove this plastic cover.

6, The next we’ll go to remove the button panel. Firstly, remove the screws.

7, Then pry to remove the whole panel and disconnect its plug.

8, Following is to remove the screws that fix the main unit.

9, Pull out the unit and unplug the connectors.

10, The removal job is finished. Have a check for the new touch screen radio system. Make sure it comes everything we need.

11, Before installing this Teals screen radio to the car, we need to remove the A/C outlets of the original button panel and install them to the new radio.

12, Connect the new wiring cables to the new radio.

13, And connect the radio to the car. In this step, you should pay more attention and check the wiring condition carefully.

14, Put the radio screen to the dashboard, then power the car to have a test for it.

15, If the new radio head unit functions well, install the cover and other needed parts to the dashboard. If there are problems, check the wiring situation or contact seller for assistant.

Section 2, About the benefits

Obviously, the new radio stereo system is big big different to the old one. There is large touch screen, many apps, plug and play, super easy to use and fast to response.

In terms of entertainment, I can connect Bluetooth to apply Bluetooth music at high quality sound effect. I can also listen to FM/AM radios. On the other hand, I can watch 1080P videos on the screen, what a great viewing experience!

When it comes to driving safety, sure it’s also a good assistant. On one hand, when there is call during driving, we can answer it by Bluetooth call function. On the other hand, it’s able to support 360 cameras, which help us check driving conditions clearly to avoid accident.

What’s more, it comes with Carplay, that give us ability to use phone maps, music calls freely on the radio screen once connected. It’s a safest way to use phone.

Using a big screen radio system, I am sure you will have amazing drive.

Step-by-step Radio Upgrade Installation on 2013-2018 Audi Q3

Big screen are more and more commonly applied to car dashboard, because it does bring more convenience and comfort to driving. Drivers now can easily upgrade their small screen radio to the big screen head unit. They can go to car store to do that, or by DIY.

The following is a radio replacement guide for 2013 2014 2015 2016 2017 2018 Audi Q3. After checking the content, you may have new thoughts on car radio upgrade.

Part 1, Remove the Old, Install the New

For DIY radio upgrade project, we should have some tools in advance, including plastic pry tools and screwdrivers. Another important thing is that the car power must be cut off before working on the dashboard.

Step 1, Use the plastic pry tool to remove the A/C outlet and unplug its connectors.

Step 2, Remove the screw that fixed the radio screen. See in the picture.

Step 3, Before taking down the screen, we also need to pry this plastic frame. Then take down the whole screen and unplug the connectors.

Step 4, Now let’s move to the CD part of the radio. Use special key fobs to insert the slots, then pull them to pull out the CD unit.

Step 5, Next turn to the A/C controller part. It must be pried from the top, not from the left and right.

Step 6, The removal job is finished now, next step is to install the new unit. As we just need to replace the screen, the original CD unit is still kept. We need to reconnect it to the car with new wiring.

Step 7, Connect the new large touch screen stereo head unit.

Step 8, After connecting all the new cables, have a full test for the new radio system. If there is no problem, then we can install back all the parts.

Part 2, About Big Screen Radio Head Unit

It is an obvious fact that when there is bigger screen, information shown in a clearer way. On the other hand, it’s easier and fast to operate than the button-operated radio.

There are so many applications on the touch screen Android radio, greatly adding joy and convenience on driving. For example, we can play various music online/offline, watch HD videos, listen to FM/AM/RDS radio channels. Besides, we can also apply Carplay, then we can use phone apps like music, call, map etc. freely.

Some people love to use big screen head unit because it can show rear view situation when reverse, helping park car easier. That’s really a powerful function we need.

In a word, new cars come with the factory big screen radio head unit, old cars will be added aftermarket touch screen radios by their users.

What Car Upgrades You Can Do?

For some people, due to various reasons, a factory car may not perfectly meets their needs, as a result, they decide to make some car upgrades.

There are many car upgrade projects such as tires, paint, seats, brakes etc. If you want to upgrade your factory car, you must learn to know the reasonable and illegal upgrades. While in this post, we would like to share with you some reasonable upgrades.

Change the tire style

As long as the size of the wheel is consistent with the registration certificate, the style can be changed, even if the four wheel styles are different. However, I suggest that the modification of the tire still needs careful consideration, because it is an important part to support the car. If something happens to the tire, it will be more dangerous than the brake.

Install luggage racks

If you love to go road trips and have a SUV or MPV, you may need to add luggage racks to the car, so you can pack more useful things to have a better trip. Just keep in mind that the height of the installed luggage racks must be controlled within the range of 300 mm.

Replace the factory radio

This has been the most popular car upgrade. A lot of drivers get a touch screen Android radio head unit to their dashboard. The big screen not only looks exquisite, but provides various useful functions. Compared to the standard radio, the touch screen radio can support GPS navigation, Carplay or Android Auto, 1080P video, rear view camera, dash cam etc, making your drive more fun and convenient.

Install aftermarket sound system

The fact is that we always listen to music whenever wherever we drive. But not all car brings wonderful sound effect, we have to install some aftermarket sound systems for quality sound. Anyway, you can find affordable stuff after costing some time on searches.

Consider massaging and heated seats

On long drives, it’s great to get a massage to keep relax. And, on cold mornings, heated seats warm you up before your car’s system blows hot. There are many models available for less than $100. All you have to do is put it in place and plug it into your car’s power source.

Add fog lights for bad weather assistance

Fog lights rarely are standard equipment, and although they’re only necessary for bad weather conditions, they’re incredibly useful — and safe — in limited-visibility driving conditions. They emit light from a bar-shaped beam pointed toward the road at a sharp angle, illuminating the ground immediately in front of the car without reflecting light back at the driver off of dust, rain, heavy snow and, of course, fog.

There are more common upgrades than we discussed in this short list. You can dig into fuel upgrades, bigger intake manifolds, engine internals and more. However, before taking any car upgrade project, you must know everything about it.

How to Install a 12.3″ Touch Screen to 2014-2019 Lexus RX?

In the modern society, full-size screen smartphone, laptop, TVs etc. are seen everywhere. They greatly improve our visual experience. The good news is that now you have chance to put a large screen head unit in your car dashboard too, making daily drive more convenient.

Last week, I just replaced the small screen of my 2019 Lexus RX to a 12.3-inch head unit. Compared to the old screen, it looks very exquisite, not only shows information super clear, but comes with various useful functions. Now, let me tell you how I did the replacement job.

This is the original radio screen of my ride, the available section is a half of the new radio.

About the removal and installation part

To be honest, it’s not a difficult DIY project, most people can do that. The tools we need are plastic pry tools and screwdrivers. Before working, we must power off the car battery to keep safety. Let’s get started.

1, Remove the armrest part between the front seats, and disconnect its plug.

2, Remove the side panels of the left and right.

3, Remove these frames that fixed the radio system.

4, Remove the screws that fixed the radio unit, then pull out the unit.

5, Pry to remove this plastic piece near the radio screen.

6, Take away this protective panel of the screen.

7, Remove all the screws that fixed the screen.

8, Take off the screen and disconnect its plugs.

9, Have a check for the new touch screen radio head unit.

10, Use the new cables to connect to the original radio unit.

11, Then connect the new screen and install it back.

12, Turn on the car to test the new radio system.

About the new large screen head unit

I was recommended to get this (2014-2019) Lexus RX touch screen radio from Seicane, and it didn’t let me down.

The head unit is designed with 12.3” big screen, smooth to operate and fast to respond. I can watch 1080P video, apply off-line navigation, check driving information etc.

On the other hand, it absolutely brings Carplay function, that you can freely use phone applications like call, music, map on the radio screen. You are able to install backup camera to the car, and the screen will show you the rear images whenever you reverse and park car.

Drivers are highly advised to use large screen stereo system when there is only old standard radio in their cars. That stuff makes your every drive better.

How to Install A Touchscreen Android Stereo to Peugeot 206 (2000-2016)?

Many cars only come with a standard radio system that has no large touchscreen and brings simple functions. So, as far as I’m concerned, in terms of car upgrade or car modification, these old factory radio units should be moved at first.

The following content is about how to upgrade factory radio of Peugeot 206 (2000-2016). We got the old system removed, and installed an aftermarket touchscreen head unit to the dash.

Part 1, Steps to remove and install the (2000-2016) Peugeot 206 radio

This is one of the Peugeot 206 factory radios.

First of all, before starting to work, we need to prepare tools including plastic pry tools and screwdrivers. And keep in mind that the car power must be cut off to ensure safety.

Step 1, Using the plastic pry tool to remove the top cover of the factory radio.

Step 2, After removing the top cover, you can see there are two screws that fixed the radio system, use the screwdriver to remove the screws. Then you can take down the whole radio system. And all the connectors should be unplugged.

Step 3, Following we can check the new touchscreen radio system, correspondingly connect the new cables to its. Take a look at the user manual if you are not sure the interfaces.

Step 4, In this step, we need to remove the A/C outlets of the factory radio, and install them to the new radio.

Step 5, Now you can install the new radio system to the dashboard. Make sure the cables are correctly connected. Then turn on the car to test whether the new radio works normally. When there is problem, double check the wiring condition, or contact sell for help.

Part 2, Let’s explore the fantastic features of the new radio stereo system

Obviously a touchscreen car stereo system looks beautiful. We can operate it by touch screen or the steering wheel, super convenient. The big screen also shows clearer and more information. For navigation, large screen always be the first main role.

The unit is equipped with Android 11 system, we can freely download various APPs on the Android Store. In terms of phone connection application, you are given 3 methods to do, via USB, via Bluetooth and via Carplay. Carplay is the most powerful feature since it keeps us to use the navigation, music on the radio as on the phone.

Compared to the standard radio, this upgraded touchscreen stereo is able to provide rear view images once we connect backup camera to the car. With the rear view images, we see rear situation clearly when reversing and parking car, avoiding collision.

All in all, there are also many other useful functions brought by the touchscreen Android radio, I am sure your drive must be better with such amazing radio.

How to Install Android Radio Tesla Screen to Ford Fiesta (2009-2014)?

Recently, many Ford Fiesta owners are planning to upgrade their factory radio. Most of them prefer Tesla screen head unit as it looks exquisite and the big screen makes everything work simply.

As one of Ford Fiesta car owners and to help these drivers solve the problems, here I will share my experience of how to install an Android Tesla touchscreen to the car and how it makes my drive better.

Part 1, Get a Tesla screen radio to my car

Before finding the suitable radio head unit for Ford Fiesta, I took some time to do researches, as you know there are various options on the Internet. Considering the budget, shipment, after-sales service and radio functions, finally I chose a Seicane car radio (model: H7668). The unit comes a 9.7″ IPS screen, 8-core CPU, with built-in Carplay/Android Auto and DSP setting for quality sound effect. It also provides many functions like navigation, rear view camera supported, A/C control etc. I love it so much.

Part 2, The removal and installation steps

There are two must-do things before working, one is preparing the needed tools including a plastic pry tool and the screwdrivers. Another is powering off the car to ensure a safe work.

Take a look the original car radio system.

1, Use a plastic pry tool to remove the small piece and the top plastic cover.

2, Unscrew the screws that fix the button control panel, take down the panel and unplug its connector.

3, Then you can pull out the main unit, and also need to unplug its connectors.

4, Next, let’s unscrew the screws that fix the small screen, take it off and disconnect the plug.

5, At this moment, we finish the removal job, now we can move to the installation steps. Firstly, check all the parts of the Seicane Android radio system, make sure they are in good condition.

6, Connect the new wiring cables to the car, just check the manual if you are not sure the interfaces.

7, After connecting the cables, we need to remove the A/C outlets of the button control panel, then install them to the new radio. Lastly, we can install the whole new radio to the dash, make sure the cables are correctly connected.

8, Following we can turn on the car to check whether the new radio stereo system work normally. If not, double check the wiring conditions or contact the seller for help.

Part 3, The powerful functions of the Seicane radio

Say true, this Ford Fiesta Android Tesla radio of Seicane is really well-look, adding much beauty to the interior. What’s more, it brings lots of useful functions that make my drive better.

First of all, it’s large touchscreen, easy to operate and things are clearly to see, which helps increase driving safety. On the other hand, when I go to a new place, I prefer using the navigation on the radio, you know, the screen is bigger than the phone.

As far as I’m concerned, Carplay is the most powerful feature, because it gives us the ability to use phone applications like phone call, phone map, phone music etc. on the radio screen, super convenient. Another outstanding feature should be the compatibility of car cameras, and it can support the 360°camera, no worry about the driving collisions.

Now you see, if I still keep using the original button-operated radio, I can’t do these fun things.

Why We Need Touchscreen Head Unit in the Car?

Nowadays, more and more cars are equipped with large touchscreen head unit. Not only the screen looks exquisite, but it provides lots of outstanding functions. All we have to acknowledge that these touchscreens do greatly improve our driving styles.

Super Convenient to Use, Good Vision Experience

The comparison between the car touch screen radio system and the traditional button-operated radio is just like the difference between a Nokia and an iPhone. The button-operated radio needs a lot of space to arrange the buttons. And most of the buttons are in irregular order, causing some time to find what we need. However, when there is large screen unit, we not only can see all information clearly, but we can use it fast and conveniently with some clicks. This user-friendly design simplifies operations.

Intelligent Artificial Communication

“Hey Siri, turn on the music.” Now Siri is no longer just for Apple Phones, you can talk to Siri on the touchscreen radio. This artificial communication is another outstanding features brought by the touchscreen radio. Lots of operations such as turning on the audio, turning on the air conditioner, adjusting the windows and other commands can be completed through voice, which greatly reduces the the danger of our driving. Although some advanced instructions can not be completed, but with the passage of time, this technology will be conquered sooner or later.

Integrated with Smartphone Application

One of the powerful function of the touchscreen radio is that it gives you the ability to use your phone apps on the radio screen. By connecting the phone to the radio via Android Auto, Carplay, Carlife and Mirrorlink, you can easily use phone apps like music, map, call on the radio screen. In this way, you can keep a safer drive.

Adding Much Joy and Safety to Your Drive

Apart from above advantages, the touchscreen Android radio system also provides many other functions, making your drive fun and safe. For example, when you are tired on a long drive, you can listen to online music and FM/AM radio to keep fresh. When you need to go to a unfamiliar destination, you can apply the GPS navigation system to plan the best route. What’s more, the touchscreen radio is compatible with various rear view cameras. And with the help of the rearview images, we can park the car easily and safely.

Whatever your car is, you can find the suitable head unit online. Seicane is one of the popular car radio brands, who comes with more than 10-year history, provides quality and multifunctional touchscreen radios all over and world. Now you should consider to upgrade your factory radio to have a better drive.