Nowadays, car stereo has become the most modern way to interact your car with radio navigation system. And more and more people prefer to choose install the car stereo on their own instead of buying services as before. Apparently it is more convenient for people to install a new car stereo by themselves as there are supply of resources online. Suppose you are the owner of Mercedes-Benz B-Class, what is the plan of your installation of your car stereo ? Perhaps you can read the following brief installation manual of 2012-2018 Mercedes-Benz B-Class Stereo Navigation System with Bluetooth Carplay as the reference.

Before installation, you should pay attention to some important tips. First of all, you can disconnect the power and prepare some tools such as lever when you start the removal. Secondly, you should keep all the separate parts from the car and take great care of the dashboard to avoid scratching it during its detachment and installation.
Last but not least, you should keep handy any parts from the car and make use of all the original screws from the car as much as possible so that each related part of the unit can be fixed securely.
Installation Manual of Mercedes-Benz 2012-2018 B-Class Stereo
Step 1: Lever the cover and Remove the screws.

Step 2: Pull out the display panel and remove the wires.

Step3: Lever vent hood on both left and right sides,then notice 4 buckles’ positions of the vent hood.

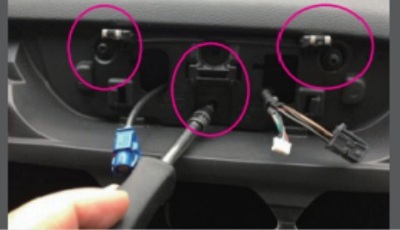
Step 4: Remove the screws on the left vent hood and Lever the large panel from the right side.

Step 5: Lever the large panel to the left side and Take off the screws.

Step 6: Pull out the head unit and disconnect the wires.

Step 7: Take off 3 screws and the bracket of the original car screen.
Step 8: Get the new wire go through hole
on the left side.

Step9: Connect the original wire with the new wire and Plug the new wire into the head unit.

Step10: Install the head unit and fix 2 screws.

Step 11: Plug the LVDS wire.

Step 12: Install the large panel and the special screen holder.

Step 13: Fix the screws and Plug in the wires.

Step 14: Install the vent hood ,the screen and fix 2 screws.

After reading the above steps, I believe you should have the basic structure of installation plan. Even for those who almost have no experience before should have enough confidence that it will never be the problem if you start to read the installation guide from now. However if you still have some problems during the procedure, you can ask a professional for help or consult your car dealer who can offer the excellent advice to you.
Besides, you can also search more detailed information from the Internet. And here I would like to share a link of Mercedes-Benz 2012-2018 B-Class Radio from Seicane.
Built-in 16EQ DSP tuning systems, it can adjust song with different tones and offer you various sense of sound during your driving way. Besides, it is the safest way for you to use phone while driving your car as it supports Carplay. With high CPU and large storage, not only can it offer smooth operation, but also it can offer stable performance.
Moreover, one of the outstanding function is that it supports 4G network which means you can enjoy online entertainment whenever you are driving.And it can also support the computer information display of the original car, highly analyze the original car protocol, support multi-functional steering wheel control, etc.
In a word, if you like this stereo ,don’t hesitate to buy this wonderful product at this moment !

Recent Comments