BMW Audio Upgrade: How to Install an Android Car Screen in 2010-2013 BMW X5 E70 (CIC System) ?

BMW vehicles come with good factory audio systems, however, there is still room for improvement, especially the older car models. Here comes a super easy and quick way to upgrade your 2010-2013 BMW X5 E70 (CIC System) audio, that’s to replace the factory radio screen with a 10.25″ Android touchscreen. In this way, you don’t need to change the whole radio system while the screen will be very easy to install, plug and play, saving much time. Following is the detailed steps.

  • New Radio Screen: Seicane H814 Touchscreen Radio Navigation System
  • Basic Tools: Plastic pry tools, screwdrivers
  • Precautions: Cut off the car power before working.

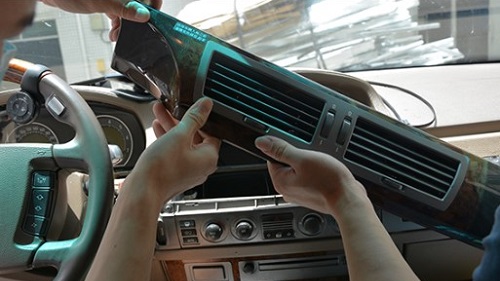
Step 1, Use the plastic pry tool to pry open the A/C outlet, take down the outlet and disconnect its plug.

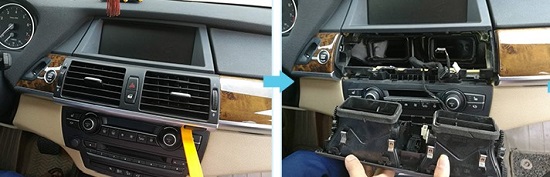
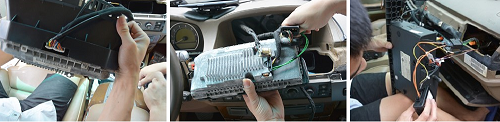
Step 2, Remove screws that fixed the original car screen, take it down and unplug the connectors.

Step 3, Remove screws that fixed the button panel, then pry to open it and take it down, as well as disconnect the plugs.

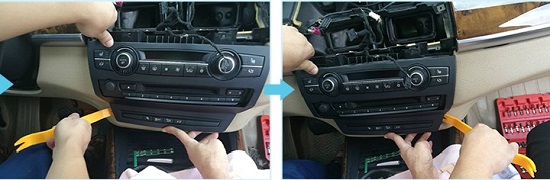
Step 4, Remove screws that fixed the original CD unit, take it down and unplug all the connectors.

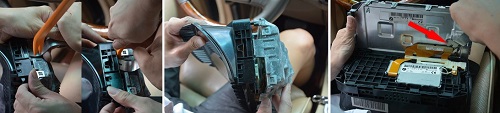
Step 5, Have a check for the wiring harness as well as other accessories of the new touchscreen radio system from Seicane.

Step 6, Connect the new wiring harness to car plugs, then correspondingly connect the new radio screen and original CD unit.

Step 7, Turn on your car to test the new radio system, if everything works normally, then install all the car parts back. If there is problem, check carefully whether the cables are connected correctly.  

Outstanding features of the upgraded Android radio screen

  • The product is equipped with a 10.25” IPS screen, which looks very exquisite, feels very smooth and flawless, giving you the best view to read information and an easy way to operate all pages.
  • It’s compatible with original cars with or without original navigation. This Android radio system used the latest GPS technology that can support various Map APPs and provide accurate navigation information in real time. Wherever you go, it will be your best road assistant.
  • Since you don’t need to replace the main unit of the radio system, the new Android screen is still able to support original car functions, so that you can use those functions as comfortable as before.
  • The new screen upgrades your radio with Carplay function. Connecting your phone to the radio system with the Carplay USB Dongle, then you can use lots of phone applications such music, navigation, address book and so on.

For 2013-2016 BMW 3 Series F30 F31 F34 F35 Factory Radio Upgrade Guide

Instead replacing the whole car radio system, lots of BMW owners would rather than choosing to change the radio screen, which is indeed a quick and easy way to upgrade the factory radio system in recent years.

As a professional supplier of aftermarket car radio GPS system, Seicane not only produces quality radio system for various car models, but provides comprehensive installation guides for car owners. And here is a detailed guide to install an upgraded android radio screen unit in 2013-2016 BMW 3 Series F30 F31 F34 F35. Hope it be useful for you.

  • Tools: Plastic pry tool, screwdrivers.
  • Note: Cut off the car power during the installation process to ensure safety.

The original car radio system

Step 1, Removing the A/C vent panel. We need to start this from the co-pilot position. Use the plastic pry tool to pry the panel, then take down the whole vent panel and disconnect the plug.

Step 2, Next we go to remove the trim panel at the bottom of the radio system. Still need to pry it, then take it down and unplug the connector.

Step 3, Remove screws that fixed the button panel. Take down the panel and disconnect the plugs.

Step 4, Remove screws that fixed the original radio screen, take it down and unplug its connectors.

Step 5, Remove screws that fixed the original CD unit, take out the unit and unplug the connectors.

Step 6, Have a check for the new car radio screen unit to make sure everything of it in good condition.

Step 7, According to the radio user manual, correspondingly connect the new wiring harness to the car.

Step 8, Connect the new screen to the car.

Step 9, Connect the original CD unit.

Step 10, Test the new radio system. If it works normally, install all the car parts back. If there is problem, check again the wiring condition.

Key features of Seicane upgraded radio screen for BMW models

  • The 10.25” IPS screen can greatly improve your viewing experience when watch videos and use navigation.
  • Equipped with the latest Android system, it provides stable operation and performance.
  • It supports all original car functions, keeping you comfortable using experience.
  • There are built-in Bluetooth and microphone, so you can use Bluetooth to call and listen to music.
  • It’s able to support Carplay, just connect your phone to the radio with a Carplay USB dongle, then you can use phone applications freely, being the best way to play phone while drive safe on the road.
  • You can also add DVR, rear view camera, TPMS and so on to help increase driving safety as they are supported by this Android radio screen.

Car Stereo Head Unit Upgrade Guide for 2009-2017 Audi Q5

Not every car is equipped with good car stereo which provides amazing sounds and more functions. If you’re someone who likes to play their music loud or enjoys more fun, it may be time to look into upgrading your car stereo system.

Nowadays you can easily find thousands of external car stereos in the market, and with various installation guide on the Internet, you are able to finish the installation yourself.

Below is a guide to upgrade 2009-2017 Audi Q5 radio, if you are the owner of Audi Q5, you may get help from here.  

Steps to remove and install the radio

Step 1, Pry to open the trim panel of the screen, remove the panel, and unplug the connectors.

Step 2, Remove 4 screws that fixed the screen, take out the screen, and unplug its connectors.

Step 3, Pry to open the A/C outlet, take down the outlet, and disconnect the plugs.

Step 4, Pry to remove the A/C button panel, take it down and unplug the connectors.

Step 5, Remove 4 screws that fixed the CD unit, pull it out and disconnect the plugs.

Step 6, The removal of Audi Q5’s based stereo is finished now. While before you installing the Seicane car stereo head unit, you should check the product and accessories in good condition.

Step 7, Take a look at the user manual to distinguish cable interfaces when you are not sure how to do, then correspondingly connect the new wiring harness to the car plugs.

Step 8, Connect the original CD unit and install it back to the dashboard.

Step 9, Install the screen bracket, connect the Seicane stereo screen unit, and tighten the screws to fix it.

Step 10, Power on the car to test the new radio system. If it functions normally, install all car parts back; if there is problem, check the wiring conditions.

Features of Audi Q5 2009-2017 Radio from Seicane

This car radio head unit is designed with a 12.3” large touchscreen which is easy to use and make you see information clearly. In addition, it comes with high hardware configuration including intelligent pure Android 10.0 operation system, 8-core 2.0 GHz Cortex-A53 processor, 4GB RAM and 64GB ROM, so that it offers stable performance and fast response.

When it comes to amusement, you are provided with numerous choices. Playing music, watching videos, listening radios, surfing the Internet etc. are basic functions. What’s more, the Carplay supported feature allows you to use phone applications freely and conveniently.

Apart from adding more fun to your drive, the product also helps increase driving safety. For example, it supports external backup camera, with clear rear images captured by this camera, you’ll park car easily. There is an ADAS Collision Warning Recorder in the car stereo system, this can monitor the road conditions ahead in real time, thus keep you safe drive.

How to Install Seicane H826 Touchscreen Radio System for 2001-2008 BMW 7 Series E65 E66?

Installing an upgraded radio screen in BMW 7 Series is not so difficult. I am sure the new radio screen do make differences in your drive. If you are planning to upgrade your BMW’s basic radio screen, take a look at this installation guide, you may get some tips from it.

Tools: Plastic pry tools, screwdrivers.

Note: Make sure the car power is off before working.

The original car radio system.

Step 1, Pry to open the front cover plate of the radio screen, then remove the cover plate.

Step 2, Remove 3 screws that fixed on the top of the radio screen, then pry to remove the radio screen, unplug its connector.

Step 3, Remove screws that fixed the A/C outlet panel; Pry to open the outlet panel from the side of co-pilot.

Step 4, Take down the whole A/C outlet panel and unplug the connector.

Step 5, Remove screws that fixed the original CD unit, take it down and disconnect its plugs.

Step 6, Pry to remove the metal sheet on the back of the original radio screen, then disassemble the screen and frame, and unplug the cable.

Step 7, Use new cable to assemble the frame on the new radio screen.

Step 8, Connect new wiring harness to the car plugs, then connect new radio screen and original CD unit.

Step 9, Start the car to test whether the new radio system can work normally, if there is no problem, install all the car accessories back; if there is something wrong, check whether the cables are correctly connected.

Know about Seicane car stereo GPS navigation system for BMW 7 Series E65 E66 2001-2008

It’s an 8.8” IPS screen system integrated with various functions including radio, music and video playing, Bluetooth, GPS navigation etc. It also supports the original car functions to keep you comfortable using experience. Besides, it supports Carplay, giving you the ability to freely enjoy your smartphone Carplay function on the radio display.   

On the other hand, the product is able to support external car cameras such as DVR, rear view camera and so on. With the DVR, you can record everything of traffic accident, providing accident liability certificate. While a rear view camera can show you clear rear images whenever you park and reverse the car, so that you park the car easier and more convenient.  

Choosing Seicane, you never regret!