Instructions of How to Upgrade the (2009-2010) BMW 5 Series E60 Factory Radio System

Cars are one of important parts in our life, we spend much time with the car. We drive to work, to picnic, to outdoor activities, to road trips and so on. To keep a comfortable and convenient drive, we do more or less changes to the car, and installing an aftermarket car radio system is one of popular modifications since many cars only come with standard button-operated radio.

In this post, we would like to share an installation guide of BMW 5 Series E60 radio with you. You’ll learn to know how to remove the original radio and install the new radio to the car.

We recommend the Seicane touchscreen radio system, which is easy to install and use. The basic tools you need to prepare are plastic pry tools, screwdrivers. Before the work, you must power off the car. Check the original radio system here.

Step 1, Pry to remove the A/C vent panel, take it down and unplug connector.

Step 2, Remove screws that fixed the CD button panel, then pry to take down the panel and unplug its connector.

Step 3, Pry the button panel at the bottom, take it down and unplug the connector.

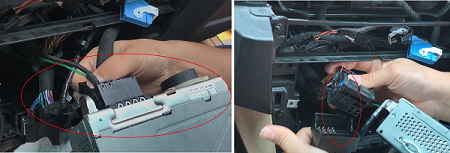
Step 4, Remove screws that fixed the CD unit, take down the unit and unplug its connectors.

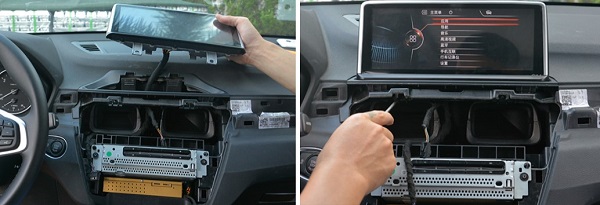
Step 5, Remove screws that fixed the radio screen, take down the screen and unplug connector.

Step 6, Check the new wiring harness of the Seicane touchscreen radio system, and correspondingly connect them to the car plugs.

Step 7, Connect the new radio screen with the new wiring harness.

Step 8, Connect the original radio CD unit with the new cables, then install it back to the dashboard.

Step 9, Install the bottom button panel back.

Step 10, Install the CD button panel back.

Step 11, Tighten the screws of the new radio screen to fix it.

Step 12, Finally, install the A/C vent panel back.

Step 13, Turn on your car to test the working conditions of the new radio system.

Why choose Seicane car radio system for BMW E60?

  • The product comes with an 8.8” IPS touchscreen with exquisite look, offering you with smooth and flawless operation.
  • This unit only exchanges your original car TFT monitor, which is easy to install and perfectly fit the car.
  • All original car functions are kept as before, you won’t have trouble to use the product.
  • The big size screen gives you a better view when navigate, watch videos&movies. You can use Carplay to enjoy more fun.
  • When you attach a rear view camera to the radio system, it displays rear image automatically when you reverse the car, help you park easily.

You will enjoy better drive after installing the Seicane android car radio!

How to Replace (2006-2013) BMW Mini Cooper Radio with a Touchscreen Bluetooth Car Stereo System?

BMW’s Mini Cooper is one of popular models loved by many people. It has a sense of design regardless of its external shape or internal situation, while the radio system is one of amazing design.

Normally, the original car radio of BMW Mini Cooper is the combination of a large circular display meter and button-operated CD player, which in fact is with simple function and no special feature. With the innovation of car stereo technology, now we can find many new car stereos that come with various features and functions in the market to upgrade the old radio. This post is about how to remove old radio and install a touchscreen multifunctional radio in the (2006-2013) Mini Cooper. Let’s check whether you can do it yourself.

The original car stereo system.

The removal and installation steps

Preparation: New car stereo system (the one we used is a Seicane Android car stereo navigation system). Tools include plastic pry tools, screwdrivers. Power off the car before moving anything.

Step 1, Remove the two plastic pieces from the top air outlet

Step 2, Remove the fixing screws inside (one on each side)

Step 3, Use a pry tool to pry open the trim panel at the instrument position of the steering wheel, keep it loose.

Step 4, Press to open the right trim panel (arrow) by hand, and pry to remove the small plastic sheet (circle) at the right air vent position.

Step 5, Remove the fixing screws on the left and right sides of the air vents, take down the frame structure, and disconnect the plug.

Step 6, Remove all the screws that fix the trim board shown in the picture to make it loose.

Step 7, Pry to remove the fixed panel on the right side of the radio system.

Step 8, Unscrew the screws that fix the panel under the steering wheel, remove the panel.

Step 9, Then pry to remove the fixed panel on the left side of the radio system.

Step 10, Remove screws that fixed the start button panel to make it loose.

Step 11, To remove the button panel of the radio system: Firstly, remove the fixing plastic sheet at the bottom of the panel and unscrew the screw inside; Then unscrew the screws that fix the whole button panel on the left and right sides; Take out the panel and unplug its all connected plugs.

Step 12, Remove all the screws that fix the display meter and the CD player.

Step 13, Take down the display meter and the CD player, unplug all the connectors.

Step 14, Remove the black frame that fixed the display meter and the CD player. The frame will be used for the new stereo system.

Step 15, Check the wiring harness and other accessories of the Seicane car stereo system.

Step 16, Fix the screen and CD unit of the new car radio system with the black frame.

Step 17, Use the new cables to connect the new radio system (screen and CD unit) to the car. Being carefully and taking a look at the radio user manual will be great help.

Step 18, Next, turn on the car to test the working condition of the new car radio system.

Step 19, If it is confirmed that the new stereo system is working normally, install all the original car accessories including screws and panels back. If there is problem, check again the wiring condition to see if ok.

Brief introduction of Seicane car stereo navigation system

It comes with a 7 inches touchscreen that easy to operate and see information clearly. The most fantastic design of the product is it can support the fuel consumption display and Harmon Kardon Sound System, so it’s easy to plug and play for the installation.

With this multifunctional car radio, whenever and wherever you drive, you’ll get lot fun on the road. Not only can you listen to music, receive radios channels, you can also watch videos, surf the Internet via 3G/WIFI network. Most importantly, you won’t get lost by checking the latest navigation information to your destination provided by this radio. Besides, it helps you drive safer. For example, making Bluetooth calls instead of answering the phone with your hands; Easily to park and reverse the car with the help of rear images shown on display when there is rear view camera connected to the radio system.

In short, this Seicane Bluetooth car stereo system help improve your driving experience.

Seicane Touchscreen Radio System to Upgrade BMW X1 F48 2016-2017 NBT System

Perhaps for many people, owning a BMW is one of their life goals. This is also my dream, and it’s worth celebrating that I finally got a BMW ten months ago, even it’s just a second-hand 2016 BMW X1 F48. I love it so much and often drive it for picnic, camping, road trips etc.

A few weeks ago, I made up my mind to make my BMW better, while the first thing I done was to upgrade the original radio screen. I just finished the installation with the help of my brother last week. You can find all the instructions in following content. 

After doing some researches online, I purchased the Seicane touchscreen android radio system for my car. To do the installation, we need to prepare plastic pry tools and screwdrivers. Below is the original radio system of my car.

Part 1, Removal

Step 1, Use the plastic pry tool to remove the button panel.

Step 2, Take down the button panel, disconnect the plugs.

Step 3, Remove screws that fixed the CD unit, take out the unit, and unplug the connectors.

Step 4, Pry the A/C vent panel, take it down and unplug the connectors.

Step 5, Remove screws that fixed the car radio screen, take down the screen and disconnect the plugs.

Part 2, Installation

Step 6, Before the installation, have a check for the wiring harness of the Seicane radio screen system to make sure everything is good. Also have the radio user manual in your hand to avoid inconvenience.

Step 7, Use the new wiring harness to connect the car plugs and the original CD unit.

Step 8, Install the CD unit to the dashboard.

Step 9, Connect the new radio screen and install it back. Then turn on the car to test the new radio system. If it works well, you can move to Step 10; If there is problem, please check whether the cables are connected correctly.

Step 10, Install the A/C vent panel back.

Step 11, Install the button panel back. The whole installation done.

Seicane touchscreen radio system for BMW X1 F48 2016-2017 NBT System provides with you plenty of amazing features and functions. The 10.25 inches IPS touchscreen is designed with exquisite look and 1280*480 resolution, giving you a very smooth and stable operation. Since the new radio system can support all the original car functions, you won’t have special troubles to use it, keeping you comfortable along the road.

The product also expands more functions. For example, it’s able to support Carplay, so you can use phone applications freely on the radio screen with this function. On the other hand, it also support rear view camera, and the rear images will help you park and reverse car easily. You will have a more happy drive with this Seicane radio navigation system.

How to Install an Android Radio Screen with Bluetooth in BMW 3 Series?

All we know that BMW is one of famous and popular car brands in the world. Most people dream of having a car from BMW.

Three years ago, I was lucky enough to get a BMW 3 Series car from my uncle. I love the car so much, and always try my best to take care of it. If there was a bigger touchscreen radio system, it must be perfect. So I decided to find a way to upgrade the original radio system. Just last month, I got a 10.25 inches Android touchscreen radio system from Seicane and had it install in my BMW. Now at this article, I share the upgrade guide as well as the use of Seicane radio system.  

Part 1, Upgrade the BMW 3 Series car screen 

A new radio screen for BMW 3 Series, plastic pry tools and screwdrivers are needed for the upgrade work. As there will involve the power plugs in the process, cut off the car power at the beginning is must.

Original car radio system

Step 1, Remove the air conditioning vent: Use the plastic pry tool to pry the A/C vent, take it down and unplug the connector.

Step 2, Remove these two screws that fixed the original radio screen, take down the screen and unplug the connector.

Step 3, Remove screws that fixed the CD button panel, take down the panel and unplug the connector.

Step 4, Remove screws that fixed the original CD unit, take down the unit and unplug the connectors.

Step 5, Check the wiring harness and other accessories of the new radio screen.

Step 6, Connect the new radio screen and original CD unit with the new wiring harness. You’d better check the user manual of the new radio screen if you are not sure the cable interfaces.

Step 7, Turn on the power to test whether the new radio functions normally. If there is no problem, install all the accessories including CD button panel and A/C vent back. If it doesn’t work, please check whether cables are connected correctly.

Part 2, The Seicane Bluetooth touchscreen radio for BMW 3 Series

Based on Android 10.0 system, the 10.25 inches IPS touchscreen looks very exquisite and provides users with smooth operation. It does make huge differences compared to using the original screen, especially when you navigate.

Apart from supporting all original car functions, this new radio system with large screen expands more functions such as Bluetooth music and phone, Carplay, rear view camera image etc. With Bluetooth technology, drivers are able to stream music wirelessly from the phone and answer hand-free call while keeping safe drive. On the other hand, for those who always have difficulties in parking, with rear view camera installing, there will be rear images shown on the unit display, thus they can see the rear situation clearly and park the car easily.

The product also designed with various wonderful UI displays, greatly improving user experience.