Hi everyone! In this blog post, we’ll teach you how to upgrade 2018-2022 Chevrolet Volrando car system. This upgrade includes AOS Wireless CarPlay and Android Auto. Once connected, you can make calls, listen to music, use online map navigation, and access many other mobile phone applications.
Want to know how to upgrade? Follow these steps:
The first step is to remove the protective cover on the back of the original car screen.
Secondly, unscrew the two screws that secure the screen.
Thirdly, remove your original car screen, then unplug all the plugs on the back.
Now let’s start wiring.
This is the network antenna
This is a GPS antenna
This is a video input cable
This is a USB transmission cable
And this is the original car USB adapter cable.
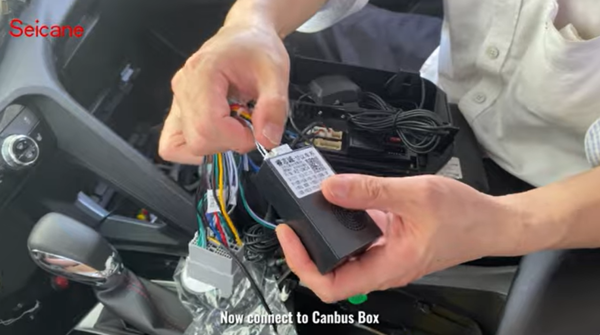
Now connect to the Canbus box
Reconnect the speaker
Reconnect the RC audio cable
Then connect the protocol serial port.
Now connect the screen power plug
Then connect the reverse rearview plug.
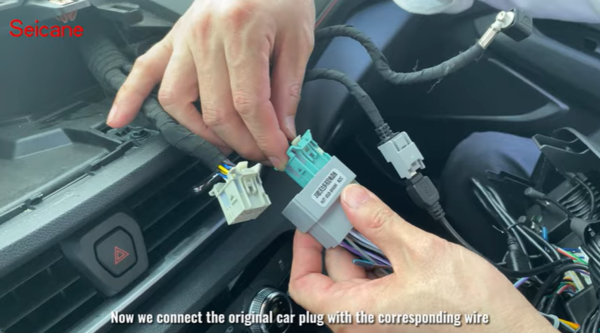
Now we connect the original car plug with the corresponding wire.
Finally, we will install the new screen and tighten its two screws.
The installation is now complete. As it is the first time installing, we need to set up Canvas.
After setting it, it can support reversing, the original car support during wheel button control.
In addition, it also supports wireless CarPlay, Android Auto, watching online movies, using the radio to automatically search for channels, online map navigation, Bluetooth phone, and Bluetooth music.
Thank you for reading this blog post. We hope this guide helps you successfully upgrade your Chevrolet Volrando car system.
If you are a owner of 2012 2013 2014 Chevrolet S10,I think you should be someone who are interested in upgrading your car stereos.
Actually the operating system of most car stereos are same,so a new stereo may can installed in several cars.A car also has some choices.
Let’s have a look at following image first :it’s head unit after upgrade,DVD GPS navigation system of 2012 2013 2014 Chevrolet S10.
Then you can decide whether to learn specific installation steps for 2012 2013 2014 Chevrolet S10 navigation system support BT pairing rearview camera.
Head unit after upgrade,DVD GPS navigation system of 2012 2013 2014 Chevrolet S10
This unit can be installed in your car if it belongs to what is mentioned in the picture.In addition,maybe this stereo can be installed into not only one type car,what can we know whether it’s suitable?All right,you can have a careful watch at its trim panel and make a comparison between factory one and this one,if they are same then the answer is yes.
Some of you may think installing Chevrolet S10 navigation radio in your car by yourself is not possible.However it’s very possible because many car owners who are not professional have achieved this goal by himself,of course it’s under the condition that him or her has made enough preparations for it,such as searching related information and ask workers of this market to get problems solved.Next comes to Chevrolet S10 radio installation.
2012 2013 2014 Chevrolet S10 stereo removal:
1.Gently lever the upper trim housing panel from the dash with a removal tool
Gently lever the upper trim housing panel from the dash with a removal tool
2.Lever edges of side panel,release and reposition the shifter
Fasten and reposition the shifter
3.Make out 2 screws(this screw and the other corresponding one) from the storage pocket,remove car storage
Make out 2 screws
remove car storage
4.Make out 4 screws which are on the accessorv control panel
Make out 4 screws which are on the accessorv control panel
Make out 4 screws which are on the accessorv control panel
5.When you remove this very tough panel you should be patient and the clips will loosen.,then let panel hang to side
remove this very tough panel
6.Make out 2 screws from radio control panel,unplug the radio control panel
Make out 2 screws from radio control panel
7.Take out the really strange blue clip absolutely before removing the other connector,and remove the latter one
Take out the really strange blue clip absolutely
8.Get out 2 screws which are on the radio chassis,and remove the other 2 screws which are near the top of the stereo,in order to fasten the screen
Get out 2 screws which are on the radio chassis
9.Make screen out by pulling,and get behind clip out
Make screen out
10.There are still 2 screws on stereo,remove them from car head unit
remove them from car head unit
11.Take stereo and connectors out
Take stereo and connectors out
2012 2013 2014 Chevrolet S10 DVD nav system installation:
12.Read installation instructions that within you new bought stereo,precisely make cables connection between new stereo with car’
13.After correct connection,install your new unit into your car and turn on it to test whether your actions are all right
13.Fix 2 screws to the stereo and install the dvd player in position
14.Make 2 screws back to the place near top of the stereo,and 2 screws to radio chassis
15.Make other parts back to original place and don’t forget to firm their screws back to them to fix corresponding machine
This is whole process for the installation,and you will succeed only if you can act as above steps carefully.
Please notice that keeping you safe is the most important,if you still account some problems that is difficult to deal with,you can ask someone who knows better for help,wish you good luck.


Recent Comments