Detailed Instructions for 2014 Peugeot 2008 Car Radio GPS Navigation System Upgrade

In modern society, one of the most common phenomenon we would find is that there are more cars on the roads, accompanied with the rapid development of automotive electronics at the same time.


Almost every family has a car, however, not every car can fully meet people’s needs. Some of car owners have realized the importance of in-car life since they need to spend lots of time in car everyday, so what we should do to make our in-car life better and more funny? The best answer is to upgrade the car, and the first work is replacing your old-fashioned car radio for a new one.


If you are searching for the way to upgrade your 2014 Peugeot 2008 Car Radio, You came to the right place here. Scroll down to get the detailed installation instructions. (The picture shows the original car radio.)


Car Stereo Brand: Seicane Car Audio System with Carplay GPS Navigation

Important Tools: Plastic pry tool, Screwdriver


Steps to Remove and Install Seicane Car Audio for 2014 Peugeot 2008

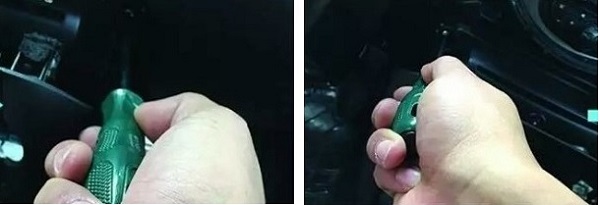
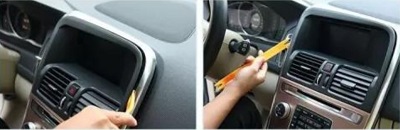
1 Use a plastic pry tool to open the panel and unplug its connector.


2 Remove two fixing screws of the original radio screen.


3 Take out the screen and unplug the connectors.


4 Remove four screws that fixed the frame of the radio and then take it out.


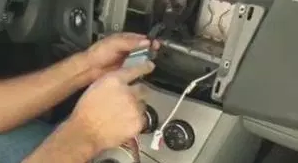
5 Pull out the old radio unit and unplug its connectors.


6 Check the wiring accessories of the new Seicane car radio system.


7 Correspondingly connect cables of new radio to the car plugs.


8 Fix well the new radio and turn on the car to test whether the new radio system works or not.


9 If everything is ok, the installation is finished, otherwise, double check the cable wiring.


Capability of 2014 Peugeot 2008 Car Audio GPS Navigation System by Seicane


About Configuration – Used the latest Android 10.0 operating system, with 8-core CPU as well as 4G RAM and 64G storage.


About Carplay – There is built-in Carplay, and customers are given two methods to connect it, by wired and wireless, offering the best way to use your Smartphone’s applications on the radio.


About Screen – It’s the 10.1 inch IPS screen, provides you with large viewing angle and there is no light reflecting under direct sunlight as well as no watermarks when touch.


About GPS Function – The car stereo is equipped with worldwide real-time navigation function of high accuracy. With dual zone function, the music from radio/AV/TV etc can be played behind the scene under GPS mode and it will switch to the GPS voice automatically.


Others – This Seicane car audio system for 2014 Peugeot 2008 has features of picture in picture and split screen display, and are able to support car DVR, backup camera, OBD II, HD digital TV, thus giving you better driving experience.

Instructions for 2012-2015 VW Volkswagen Lavida GPS Navigation Radio Upgrade

Since buying the Volkswagen Lavida, our lives have changed a lot. We don’t have to catch the buses and subways to go to work on rainy and snowy days. We also needn’t spend much money on transportation when we go travel. Our car takes us everywhere we want to go, more convenient and funny.


It’s a 2013 Volkswagen Lavida which has been with us for 8 years. There are more or  less breakdown and sure we got them repaired. Last year, we just changed the motor. While in order to enrich in-car life, my family decided to upgrade its old radio and my brother helped finish the installation last week.


We invested the new car radio system from Seicane because some of my friends purchased the Seicane products and they loved to use them. What’s more, its price is in our budget. I would like to share some experience with you at this post.


Important steps to install new 2012-2015 VW Volkswagen Lavida Radio

For convenience and safety, you should prepare the needed tools and cut off the power during the whole installation.

See original radio


1 Grab out the panel that fixed the factory radio, it’s stuck inside.


2 Remove the four fixing screws


3 Carefully take out the original radio, and pull out the plugs


4 Check the wiring accessories of the new Seicane car audio system and connect them to the system accordingly


5 Remove the old radio wiring harness connected to the car and needn’t use it


6 Then connect the wiring of the new audio system to the wiring of the car


7 Confirm that there is no problem with the wiring, so you can directly press the new radio into the central control and install the accessories


8 Turn on the car and test whether the Seicane GPS Navigation Stereo is working properly


Lets know more about the 2012-2015 VW Volkswagen Lavida GPS Navigation Radio

With this wonderful touch screen bluetooth radio for 2012-2015 VW Volkswagen Lavida, we gain more fun and convenience when driving.

  • The product supports video player, we can watch different videos when waiting for traffic lights or someone. And can also enjoy various good music.
  • What impressed me most isthe navigation function. By displaying navigation information such as current location, speed, mileage, landmark building etc. in 3D and with voice instructions, it programs the best way to help us arrive at destination safely & quickly, really g great assistant for driving.
  • It can support Carplay. By connecting the phone and radio with a Carplay USB dongle, you can use all the Carplay USB products on the radio.
  • The original car’s functions such as steering wheel control will still work after installing this auto radio navigation system.
  • In addition, there are options for other functions, like HD digital TV, DVR, rear view camera, TPMS, and so on.

It’s time to get one such quality aftermarket car radio to upgrade your old car.

How to Upgrade the 2006-2013 BMW Mini Cooper GPS Navigation DVD Player?

My first car is a 2009 BMW Mini Cooper, which was a gift from my father, and I really love it so much. While the only thing that made me unsatisfied was that its dashboard radio system function is too less and the operation is not smart enough. After thinking about some time, I decided to purchase an aftermarket car radio GPS navigation system for modification.

My friend recommended me to a radio navigation brand that is currently popular in the market, it’s called Seicane. He emphasized that the Seicane car radio GPS navigation systems are diverse in styles, high in quality, and affordable. Two weeks ago, I ordered the Seicane products and installed it myself. Here, I want to share with you the installation process and using experience.

First of all, there are some tips before the installation,

  • Prepare the needed tools, mainly include screwdriver and pry board.
  • Ensure that the disassembly and assembly process is in a power-off state
  • Be careful not to confuse the disassembly and assembly accessories, and keep them complete

Upgrade guide of 2009 BMW Mini Cooper car radio GPS navigation system

1 Remove the screw of the central control air outlet

2 Remove the fixed small plate of the air outlet

3 Remove the fixing screws of the air outlet on the other side

4 Remove the fixing screws of the glove box switch

5 Remove the fixing screws of the screen mask

6 Remove the fixing screws of key start button to remove its panel

7 Remove the fixing screws of original car radio

8 Remove the screws on the left and right sides of the air conditioner

9 Pry out the plastic panel under the air conditioner

10 Remove the screws on the plastic panel

11 Remove the CD fixing screws

12 Take off the original car radio and CD

13 Directly connect the original car plugs and the new Seicane car radio plugs, and then test to make sure that all functions are working properly, and then use a screwdriver to fix the Seicane radio navigation system in the dashboard.

The Seicane Car GPS Navigation DVD Player for 2006-2013 BMW Mini Cooper provides a wide range of wonderful features and functions.

Compared to the old dashboard radio, the Seicane car audio system has a high-definition interface, which is easy to operate all functions by touch screen. To enrich in-car life, you can download any applications in the android market for access to games, Skype, MSN, YouTube, twitter, E-Book, Gmail etc.

The car stereo is equipped with worldwide real-time navigation function of high accuracy. With current location, speed, mileage, landmark building display, 3D street view, destination search and turn-by-turn voice directions, it will be your perfect road companion.

Besides, the radio supports CarPlay/Android Auto, Bluetooth, CD DVD player, HD 1080P video, rear view camera and so on, adding much fun to your drive and keep safe on the road.

How to Upgrade the 2007-2012 Chevy Chevrolet Epica Audio GPS Navigation System?

Nowadays, in order to enrich in-car life and meet drivers’ different needs, more or less, car owners will make some modifications to their cars, and the most popular modification is to upgrade their factory car audios.


As a 2007-2012 Chevy Chevrolet Epica owner, I just changed the old audio for a new one from Seicane since the old one has single function and is inconvenient to operate. The Seicane car audio looks beautiful in interface, has diverse functions, as well as is easy to install. If you have the same car, following is a guide to do the installation.


There are useful tips for you before the installation:

  • Prepare a lever and a screwdriverand other tools. Check here to get a handy tool kit.
  • Make sure disconnect the power before removal and
  • Pay attention to protect all disassembled parts to avoid any loss.


Below is the 2007-2012 Chevy Chevrolet Epica audio installation guide

1, Remove the wooden trim strip. Use a plastic removal tool if necessary.

Remove the wooden trim strip. Use a plastic removal tool if necessary


2, Remove the rubber ring.

Remove the rubber ring


3, Remove the trim panel.

Remove the trim panel


4, Remove two screws under the air-conditioning vent.

Remove two screws under the air-conditioning vent


5, Remove two hidden screws on the dashboard.

Remove two hidden screws on the dashboard


6, Take out the air vent.

Take out the air vent


7, Unscrew four mounting screws that fix the original audio.

Unscrew four mounting screws that fix the original radio


8, Gently take out the original car audio.

Gently take out the original car radio


9, Unplug the connectors and cables at the back of the original audio.


10, Check all the accessories for the new Seicane car audio system.

Check all the accessories for the new Seicane car radio

11, Connect the harnesses to the back of the new audio.

12, Connect the Seicane car audio to your original car audio’s plugs.

13, Turn on the new Seicane car audio to have a careful check if everything works well. If it doesn’t, please check whether all the cables are connected correctly.

14, After testing, put the new Seicane car audio into the dash.

15, Put everything into their original place. All the installation is done.


This 2007-2012 Chevy Chevrolet Epica audio from Seicane includes a lot of outstanding features and functions which greatly add joy and convenience to your in-car life.


  • It’s made of 2.5D curved-display screen that looks very exquisite and seamless, and feels very smooth and flawless when touch.
  • The product integrated with high-sensitive radio IC with good reception, supports worldwide analog radio channels, you can listen to different music and broadcast anytime.
  • There is built-in GPS module, which supports both online and offline navigation app from Google Play app market, you will not get lost whenever driving on the road and arrive at your destination quickly and accurately.
  • On the other hand, the Seicane car audio GPS navigation system also supports bluetooth, rear view camera as well as 1080P video player etc.


Now do not hesitate to invest the product to keep you a joyful and safe drive.


A Quick Guide to Install Volvo XC60 Car Audio with GPS Navigation Bluetooth

Nowadays, almost every family has a car. The invention of cars has made our lives very convenient and easier. With a car, we don’t have to waste time on the road, we can get there quickly no matter where we go.

The car not only takes us everywhere, but it makes our time more fun during any trip, especially when there is an awesome car audio system in the car. Listening to comfortable music, watching videos, playing DVD etc., all are wonderful things to do with the audio when you are tired or bored during a long drive.

Recently, our family just upgraded a new car audio with GPS navigation from Seicane for the 2010 Volvo XC60, and was so surprise at the functions it offers. And I have to say that, anybody would do the installation work by themself. The following is a quick installation guide.


Read these tips firstly,

  • Prepare main tools: Pry plate, T20 screwdriver, Phillips screwdriver.
  • Cut off the power before the removal and installation.
  • Ensure the integrity of all disassembled parts.


Installation Guide of Car Audio with GPS Navigation for Volvo XC60

The original car audio system

Volvo XC60 Radio


Remove the two fixing screws behind the frame of the original audio


Slightly pry the frame


Take off the frame carefully


Loose and remove the screws that fixed the original audio


Take out the control panel of the audio and unplug the connector


Loose and remove the fixing screws of the original audio screen


Unplug the original audio screen


Remove the screws that fixed the original audio unit


And take out the unit


Connect the new Seicane car audio unit to the original car port


Plug the special port of the new audio screen to the original car screen port

After connect all the cables, turn on the new bluetooth car audio to test if everything works well. If it doesn’t, please check whether all the cables are connected correctly.

Put the new Seicane car audio into the dash. And keep all parts into their original places. The whole installation is done.


Using the latest Android System, this Seicane car radio fits 2008-2016 Volvo XC60, and includes lots of outstanding features.

High Configuration

  • Use high quality 8 – Core 1.5 GHz Coretex-A53 processor with great performance
  • With 600Mhz Mali-400 MP4 GPU, it supports dual-screen display for the highest resolution of 2048*1536
  • Large in storage, 4GB+64G
  • Multi-touch screen with smooth operation, high sensitivity and abundant interaction for the better view of your road ahead

More Functions

  • The 2008-2016 Volvo XC60 Seicane car stereo is equipped with worldwide real-time navigation function of high accuracy
  • Built-in with strong digital FM/AM radio tuner, this car A/V system features searching radio channels automatically, manually and storing them in the process. RDS is also supported
  • It upgrades your car with BC6 Bluetooth module for hands-free calls and music streaming
  • The radio can also support touch screen, wifi, HD digital TV, backup camera, and so on


If you are planing to upgrade a high quality and affordable car stereo, Seicane must be your first choice.

How to Install the 2013-2018 Cadillac Car Radio GPS Navigation System from Seicane by Yourself?

My family is planning for a road trip next month, and at present, we need to take our Cadillac for a comprehensive check and upgrade some parts to avoid breakdown. While when I look at the car radio player, to be honest, I think it won’t be much suitable for my trip, so why not also upgrade a new one since it won’t cost much?


After doing lot of searches, I finally got an awesome 2013-2018 Cadillac Car Radio GPS Navigation System from Seicane. It’s easy to install. Now I would love to share the installation guide with all of you.


Before doing, please note:

  • Make sure the power has been cut off before installation to avoid any danger.
  • Prepare the needed tools, and keep all accessories complete.


1 Get the unit


2 Get an aluminum sheet.


3 Fix the aluminum sheet to the unit, then fix the heating panel to the aluminum sheet.


4 Tighten the 9 screws of the back cover.


5 The whole unit was assembled.


6 Install the brackets.


7 Low and medium protocol box for 2013-2018 Cadillac.


8 Connect the cables to the protocol box.


9 Connect the protocol box to the unit.


10 Connect the original car LVDS plug to the one of protocol box.


11 Find out the port of original car screen unit and the power, take off the screen unit and connect the new unit to the power.


12 The original unit is in the co-pilot, connect the cables as the below picture.


13 After connecting the cables and powering up, click on the “car settings”, choose the “factory setting password”, click on Daojun, according to your own car model, choose the corresponding one to upgrade the agreement.


14 Click “application”, choose “original car interface” and click “support the function of original car”. Then test the car radio system whether works or not.


As you can see, below picture shows the effect after the installation.


Compare to the original radio, the Seicanes Bluetooth Car Radio GPS Navigation System for 2013-2018 Cadillac has more features and functions.


  • The 9.7 inch IPS screen is eye-friendly. No light reflecting under 360 degree direct sunlight, super fast response, and no watermark when touch.
  • Integrated with BC6 Bluetooth module, it support phonebook sync, hands-free call and music steaming from your phone.
  • Besides, it supports FM/RDS and carplay.
  • There is built in GPS module that supports both online and offline navigation app from Google Play app market. Keep you a smooth trip.
  • This car player is able to support a 360 degree camera and AHD night vision rearview camera, help you drive safe anytime.


With the new GPS car stereo system in my car, I believe our family trip must be more fun and happiness. If you want to upgrade your car radio, I highly recommend you to choose Seicane.


A Step-by-step Installation Guide for 2002-2008 Mercedes Benz W211 Car Stereo System with Bluetooth GPS Navigation

Here shows you an intelligent 2002-2008 Mercedes Benz W211 car stereo system from Seicane. The product comes with the latest operating system and 8-core CPU for you to upgrade your factory radio.


If you are going to replace your factory radio with a new aftermarket car stereo system, it’ll be great for you to know some installation instruction for it. The installation is not quite difficult, if you have some related installation experience and a correct guide, you can easily finish the installation on your own. Please look at the picture above, if you also have the same dashboard, you can refer to the following 2002-2008 Mercedes Benz W211 bluetooth car stereo instruction to help with the installation.


Precautions :

  1. Please disconnect the power before the installation.
  2. Please prepare unlock toolsbefore the removal and the installation.
  3. Please keep all the separate parts from the car. Please take great care of the dashboard to avoid scratching it during its detachment and installation. Please keep handy any parts from the car and make use of all the original screws from the car as much as possible. So each related part of the unit can be fixed securely.


2002-2008 Mercedes Benz W211 car stereo installation guide

The original dashboard.


Installation step 1. Use a lever to release the decoration panel and remove the cigarette lighter.

2004-2011 Mercedes-Benz CLS-W219 car stereo installation step 2


Installation step 2. Remove two screws under the 6-disc CD changer and take out the CD changer.

2004-2011 Mercedes-Benz CLS-W219 car stereo installation step 3


Installation step 3. Remove the two screws marked with red arrows and pull out the CD player.

2004-2011 Mercedes-Benz CLS-W219 car stereo installation step 4


Installation step 4. Connect the cables in the package.


Installation step 5. Remove the baffle-plate under the assistant driver seat, connect the CAN-H, CAN-L cable (green) with the CAN-BUS socket marked in the picture.

2004-2011 Mercedes-Benz CLS-W219 car stereo installation step 6


Installation step 6. Pry the decoration panel beside the driver’s seat, change fuse from 5A TO 10A

2004-2011 Mercedes-Benz CLS-W219 car stereo installation step 7


Installation step 7. Remove the screws for fastening the car pc in the left of the trunk.

2004-2011 Mercedes Benz CLS Class W219 car stereo installation step 8


Installation step 8. Find the amplifier in the left of the trunk and remove the four screws marked with red arrows.

2004-2011 Mercedes-Benz CLS-W219 car stereo installation step 9


Installation step 9. Remove the amplifier in the car.

2004-2011 Mercedes-Benz CLS-W219 car stereo installation step 10


Installation step 10. Connect the speaker cable with the speaker.


Installation step 11. Turn on the new Seicane bluetooth car stereo to have a careful check if everything works well.


Wish the above installation guide can be helpful for you. If you have any question, you can refer to your dealer or a professional for help. Please make clear every step before you start to install. If you find it too hard to understand all the steps, you’d better go to a car stereo upgrade center to have it installed.


In addition, to make sure you have a successful upgrade, you need to confirm that your new stereo is suitable for your car, so that it can work well with your car.


With this Android 10.0 Mercedes Benz W211 bluetooth car stereo which is 4G+64G and support touch screen spilt screen display in your car, you are enabled to play DVD, CD, VCD, FM/AM radio, HD 1080P Video, music, etc. The Bluetooth technology also makes you possible to dial and receive calls with your hands on the steering wheel control and your eyes on the road ahead to keep safe. The lane assist, voice prompts and accurate direction provided by the GPS navigation can lead you to your destination within the least time.


To improve your in-car environment and your driving experience, this Seicane Mercedes Benz W211 car stereo is just your ideal choice. Just take it and go!

How to install a 2007-2018 Toyota FJ CRUISER Bluetooth Radio GPS System

With the improvement of people’s life, more and more families prefer to buy car for outside activities. However, the factory radio seems can not satisfy their needs, most of them choose to install a Bluetooth Radio GPS System which make it possible to listen to radio or music while navigation. This kind of function may entertain the dull journey and comfort the naught children. There is no doubt that Bluetooth Radio GPS System can make you trip more convenient and easier. Since most people have no idea of how to install the devices, here we will share you a simple way of how to install a 2007-2018 Toyota FJ CRUISER Bluetooth Radio GPS System. You can follow the steps as the video if your car is similar to this one.


Preparation for Installation:

1.Make sure the power has been cut off before installation to avoid any danger.
2. Check your professional car radio dismantling tools, screwdriver, 3M electronic tape, 3M double side tape, sleeve, cotton cloth.
3. Keep all the separate parts from the car.
4. For your convenience, here’s the recommended tools for removal and installation from Seicane, please check for more details: http://www.seicane.com/car-dvd-dismantling-device-srd-400


2007-2018 Toyota FJ CRUISER Bluetooth Radio GPS System Disassembly and Installation Steps:


1.  Original dashboard

2. Remove the frame of both left and right side

3. Remove the two screwson each side

4. Take the main frame out and pull out the plug on it

5. Remove the screws inside and take the original radio out

6. Pull out the plug on the original radio

7. Install the new screen on the main frame

8. Plug well the power harness/USB cable/GPS antenna

9. Fasten the two screws on the main frame

10. Fix the two frames on each side

11. Full Test


If you still don’t know how to operate after watching the video, you can find professional people around you to help you install the device. And if you don’t know which Bluetooth Radio GPS System is suitable for you, I would like to share you a  2007-2018 Toyota FJ CRUISER Bluetooth Radio GPS System for you. You can click the following link to find more details:

https://www.seicane.com/full-touchscreen-2007-2018-toyota-fj-cruiserradio-gps-navigation-system-bluetooth-3g-wifi-rearview-camera-mirror-link-obd2-dvr-steering-wheel-control-h6031k

With intelligent pure Android 8.1 operation system and 9 inch full touchscreen, it will be your perfect road companion. The system supports surfing internet via 3G or WiFi.You can download any applications in the android market for access to games.The car stereo is equipped with worldwide real-time navigation function of high accuracy. These function will provide you the best driving experience.

If you are interested in this devices, please don’t hesitate to contact us!


How to Install or Replace 2011 2012 BMW 5 Series F10/F11 CIC GPS Navigation Radio


car gps navigation radio for 2011 2012 BMW 5 Series
Car GPS Navigation radio for 2011 2012 BMW 5 Series

Nowadays, car are playing very important roles in our daily life and it seems that the factory radio can not meet most people’s needs.The GPS Navigation Radio can not only guide your way ,but also entertain your dull trip. The dual zone function makes it possible to listen to radio/USB/SD music while navigating. In demand of good driving experiences, people would like to choose the GPS Navigation Radio to replace the original radio.  However, most people don’t know how to install a GRS Navigation Radio by themselves. Here, our Seicane will lead your way to know how to install or replace 2011 2012 BMW 5 Series F10/F11 CIC GPS Navigation Radio.


Precaution for Installation:

1. Cut off the power before installation to avoid any danger.

2. Please prepare professional car radio dismantling tools, screwdriver, 3M electronic tape, 3M double side tape, sleeve, cotton cloth.

3. Please keep all the separate parts from the car.

4. For your convenience, here’s the recommended tools for removal and installation from Seicane, please check for more details: http://www.seicane.com/car-dvd-dismantling-device-srd-400


Before installation, please check your car firstly. If it is similar to this type, then you can refer to this video to install or replace 2011 2012 BMW 5 Series F10/F11 CIC GPS Navigation Radio.


If you still have no idea of how to install or replace this kind of GPS Navigation Radio after watching the video, you can consult us or ask professional people around for help. And if you don’t know how to choose a GPS Navigation Radio, I would like to share you a remarkable 2011 2012 BMW 5 Series F10/F11 CIC GPS Navigation Radio for you. For more detailed information, you can go to the following website:

https://www.seicane.com/android-2011-2012-bmw-5-series-f10-f11-cic-hd-touchscreen-car-stereo-radio-head-unit-gps-navigation-bluetooth-phone-mp3-steering-wheel-control-wifi-backup-camera-s028208

With 8.8 /10.25 inch IPS screen, this unit looks very exquisite. Its screen feels very smooth and flawless. Just enjoy a visual feast on this 1280*480 resolution unit. It can support the original car’s all functions, such as radio or Bluetooth function, or the users can utilize this unit’s built-in radio or music function. Besides, its customized wallpaper allows you to set your own photo as background of the main menu.

If you have any question, please feel free to let us know!

How to upgrade a 2007 2008 Chrysler Aspen(W NAV) head unit with TV Tuner Bluetooth IPod Iphone AUX USB SD Dual Zone

2007 2008 Chrysler Aspen(W NAV) head unit after installation

Travelling in your own car with your families is quite exciting, isn’t it? To have a more pleasant experience, you can easily add more fun by upgrading your factory radio with an aftermarket multifunctional…..car stereo which can be compatible with a host of entertainment in a car. And you can read carefully this step-by-step 2007 2008 Chrysler Aspen(W NAV) head unit installation instruction from Seicane to guide you to install it in your car.

2007 2008 Chrysler Aspen(W NAV) head unit after installation


Tips about the installation:


1.Please disconnect the power before the installation.

2.Please prepare a lever and a screwdriver before the removal and the installation.

3.Please keep all the separate parts from the car. Please take great care of the dashboard to avoid scratching it during its detachment and installation. Please keep handy any parts from the car and make use of all the original screws from the car as much as possible. so each related part of the unit can be fixed securely.

4.For your convenience, here’s the recommended tools for removal and installation from Seicane, please check for more details: http://www.seicane.com/car-dvd-dismantling-device-srd-400


2007 2008 Chrysler Aspen(W NAV) head unit installation guide


1.Loosen the trim panel with a lever.

1.Loosen the trim panel with a lever


2.Take the panel off the dash and disconnect the wires from the car.

2-1.Take the panel off the dash and disconnect the wires from the car.
2-2.Take the panel off the dash and disconnect the wires from the car.


3.Remove the four screws which are holding the unit with a screwdriver.

3.Remove the four screws which are holding the unit with a screwdriver.


4.Take out the unit and disconnect the wire harness at the back of the unit.

4-1.Take out the unit and disconnect the wire harness at the back of the unit.
4-2.Take out the unit and disconnect the wire harness at the back of the unit.


5.Check all the accessories for the new Seicane unit.

5.Check all the accessories for the new Seicane car radio.


6.Connect the Seicane unit to your original car radio ‘s plugs.

6-1. Connect the Seicane car stereo to your original car radio 's plugs.
6-1. Connect the Seicane car stereo to your original car radio ‘s plugs.
6-2. Connect the Seicane car stereo to your original car radio 's plugs.
6-2. Connect the Seicane car stereo to your original car radio ‘s plugs.


7.Put the new Seicane unit into the dash.

7.Put the new Seicane stereo into the dash.


8.Turn on the new unit and have a test if the new Seicane unit is working without problem..

9.Put trim panel back on your new Seicane unit after the normal test.


Wish you can get some help from the above installation guide for a 2007 2008 Chrysler Aspen(W NAV) head unit. If you find your dashboard is different from that shown in the guide pictures, please don’t worry, you can still refer to it for your installation. If there is any problem, you can turn to your dealer for help.


Besides, it’s necessary for you to check the compatibility between the your new unit and your car. But if you don’t have a suitable unit for your car, you can refer to this intelligent 2007 2008 Chrysler Aspen(W NAV) head unit from Seicane, please click for more details:


http://www.seicane.com/2-din-2002-2007-2008-chrysler-aspen-concorde-pacifica-dvd-gps-sat-nav-am-fm-radio-tv-tuner-bluetooth-ipod-iphone-aux-steering-wheel-control-usb-sd-dual-zone-t6015


This up-to-date aftermarket Chrysler Aspen(W NAV) head unit is an ideal replacement for you to upgrade your factory radio to better capabilities. With the built-in wifi, you can freely get access to the online data in your car as long as you can connect with a wifi hotspot. If you want to keep safer and happier on your journey, you can simply link with your enabled cell phone for hands-free calling and music streaming. Just navigate to your destination on time with the help of the most accurate spoken guidance provided by this great unit! Good luck to you!