How to Replace (2006-2013) BMW Mini Cooper Radio with a Touchscreen Bluetooth Car Stereo System?

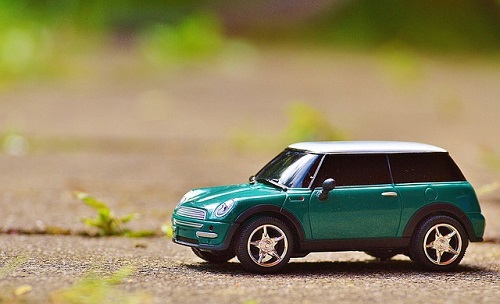
BMW’s Mini Cooper is one of popular models loved by many people. It has a sense of design regardless of its external shape or internal situation, while the radio system is one of amazing design.

Normally, the original car radio of BMW Mini Cooper is the combination of a large circular display meter and button-operated CD player, which in fact is with simple function and no special feature. With the innovation of car stereo technology, now we can find many new car stereos that come with various features and functions in the market to upgrade the old radio. This post is about how to remove old radio and install a touchscreen multifunctional radio in the (2006-2013) Mini Cooper. Let’s check whether you can do it yourself.

The original car stereo system.

The removal and installation steps

Preparation: New car stereo system (the one we used is a Seicane Android car stereo navigation system). Tools include plastic pry tools, screwdrivers. Power off the car before moving anything.

Step 1, Remove the two plastic pieces from the top air outlet

Step 2, Remove the fixing screws inside (one on each side)

Step 3, Use a pry tool to pry open the trim panel at the instrument position of the steering wheel, keep it loose.

Step 4, Press to open the right trim panel (arrow) by hand, and pry to remove the small plastic sheet (circle) at the right air vent position.

Step 5, Remove the fixing screws on the left and right sides of the air vents, take down the frame structure, and disconnect the plug.

Step 6, Remove all the screws that fix the trim board shown in the picture to make it loose.

Step 7, Pry to remove the fixed panel on the right side of the radio system.

Step 8, Unscrew the screws that fix the panel under the steering wheel, remove the panel.

Step 9, Then pry to remove the fixed panel on the left side of the radio system.

Step 10, Remove screws that fixed the start button panel to make it loose.

Step 11, To remove the button panel of the radio system: Firstly, remove the fixing plastic sheet at the bottom of the panel and unscrew the screw inside; Then unscrew the screws that fix the whole button panel on the left and right sides; Take out the panel and unplug its all connected plugs.

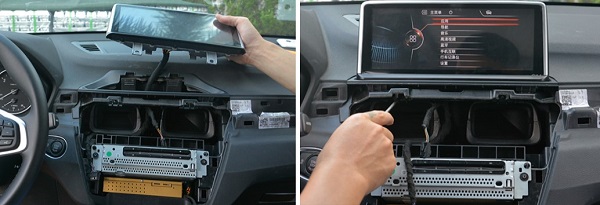
Step 12, Remove all the screws that fix the display meter and the CD player.

Step 13, Take down the display meter and the CD player, unplug all the connectors.

Step 14, Remove the black frame that fixed the display meter and the CD player. The frame will be used for the new stereo system.

Step 15, Check the wiring harness and other accessories of the Seicane car stereo system.

Step 16, Fix the screen and CD unit of the new car radio system with the black frame.

Step 17, Use the new cables to connect the new radio system (screen and CD unit) to the car. Being carefully and taking a look at the radio user manual will be great help.

Step 18, Next, turn on the car to test the working condition of the new car radio system.

Step 19, If it is confirmed that the new stereo system is working normally, install all the original car accessories including screws and panels back. If there is problem, check again the wiring condition to see if ok.

Brief introduction of Seicane car stereo navigation system

It comes with a 7 inches touchscreen that easy to operate and see information clearly. The most fantastic design of the product is it can support the fuel consumption display and Harmon Kardon Sound System, so it’s easy to plug and play for the installation.

With this multifunctional car radio, whenever and wherever you drive, you’ll get lot fun on the road. Not only can you listen to music, receive radios channels, you can also watch videos, surf the Internet via 3G/WIFI network. Most importantly, you won’t get lost by checking the latest navigation information to your destination provided by this radio. Besides, it helps you drive safer. For example, making Bluetooth calls instead of answering the phone with your hands; Easily to park and reverse the car with the help of rear images shown on display when there is rear view camera connected to the radio system.

In short, this Seicane Bluetooth car stereo system help improve your driving experience.

Seicane Touchscreen Radio System to Upgrade BMW X1 F48 2016-2017 NBT System

Perhaps for many people, owning a BMW is one of their life goals. This is also my dream, and it’s worth celebrating that I finally got a BMW ten months ago, even it’s just a second-hand 2016 BMW X1 F48. I love it so much and often drive it for picnic, camping, road trips etc.

A few weeks ago, I made up my mind to make my BMW better, while the first thing I done was to upgrade the original radio screen. I just finished the installation with the help of my brother last week. You can find all the instructions in following content. 

After doing some researches online, I purchased the Seicane touchscreen android radio system for my car. To do the installation, we need to prepare plastic pry tools and screwdrivers. Below is the original radio system of my car.

Part 1, Removal

Step 1, Use the plastic pry tool to remove the button panel.

Step 2, Take down the button panel, disconnect the plugs.

Step 3, Remove screws that fixed the CD unit, take out the unit, and unplug the connectors.

Step 4, Pry the A/C vent panel, take it down and unplug the connectors.

Step 5, Remove screws that fixed the car radio screen, take down the screen and disconnect the plugs.

Part 2, Installation

Step 6, Before the installation, have a check for the wiring harness of the Seicane radio screen system to make sure everything is good. Also have the radio user manual in your hand to avoid inconvenience.

Step 7, Use the new wiring harness to connect the car plugs and the original CD unit.

Step 8, Install the CD unit to the dashboard.

Step 9, Connect the new radio screen and install it back. Then turn on the car to test the new radio system. If it works well, you can move to Step 10; If there is problem, please check whether the cables are connected correctly.

Step 10, Install the A/C vent panel back.

Step 11, Install the button panel back. The whole installation done.

Seicane touchscreen radio system for BMW X1 F48 2016-2017 NBT System provides with you plenty of amazing features and functions. The 10.25 inches IPS touchscreen is designed with exquisite look and 1280*480 resolution, giving you a very smooth and stable operation. Since the new radio system can support all the original car functions, you won’t have special troubles to use it, keeping you comfortable along the road.

The product also expands more functions. For example, it’s able to support Carplay, so you can use phone applications freely on the radio screen with this function. On the other hand, it also support rear view camera, and the rear images will help you park and reverse car easily. You will have a more happy drive with this Seicane radio navigation system.

How to Install an Android Radio Screen with Bluetooth in BMW 3 Series?

All we know that BMW is one of famous and popular car brands in the world. Most people dream of having a car from BMW.

Three years ago, I was lucky enough to get a BMW 3 Series car from my uncle. I love the car so much, and always try my best to take care of it. If there was a bigger touchscreen radio system, it must be perfect. So I decided to find a way to upgrade the original radio system. Just last month, I got a 10.25 inches Android touchscreen radio system from Seicane and had it install in my BMW. Now at this article, I share the upgrade guide as well as the use of Seicane radio system.  

Part 1, Upgrade the BMW 3 Series car screen 

A new radio screen for BMW 3 Series, plastic pry tools and screwdrivers are needed for the upgrade work. As there will involve the power plugs in the process, cut off the car power at the beginning is must.

Original car radio system

Step 1, Remove the air conditioning vent: Use the plastic pry tool to pry the A/C vent, take it down and unplug the connector.

Step 2, Remove these two screws that fixed the original radio screen, take down the screen and unplug the connector.

Step 3, Remove screws that fixed the CD button panel, take down the panel and unplug the connector.

Step 4, Remove screws that fixed the original CD unit, take down the unit and unplug the connectors.

Step 5, Check the wiring harness and other accessories of the new radio screen.

Step 6, Connect the new radio screen and original CD unit with the new wiring harness. You’d better check the user manual of the new radio screen if you are not sure the cable interfaces.

Step 7, Turn on the power to test whether the new radio functions normally. If there is no problem, install all the accessories including CD button panel and A/C vent back. If it doesn’t work, please check whether cables are connected correctly.

Part 2, The Seicane Bluetooth touchscreen radio for BMW 3 Series

Based on Android 10.0 system, the 10.25 inches IPS touchscreen looks very exquisite and provides users with smooth operation. It does make huge differences compared to using the original screen, especially when you navigate.

Apart from supporting all original car functions, this new radio system with large screen expands more functions such as Bluetooth music and phone, Carplay, rear view camera image etc. With Bluetooth technology, drivers are able to stream music wirelessly from the phone and answer hand-free call while keeping safe drive. On the other hand, for those who always have difficulties in parking, with rear view camera installing, there will be rear images shown on the unit display, thus they can see the rear situation clearly and park the car easily.

The product also designed with various wonderful UI displays, greatly improving user experience.

How to Install An Apple Carplay Aftermarket Radio in Subaru WRX?

Obviously, the application of Apple CarPlay or Android Auto provides drivers with the easiest and safest way to use their phones while driving. Just connect the phone to the car radio, drivers can use the phone apps at the radio screen easily, such as to use Siri and Apple Maps, select the tunes, make phone calls etc. And to achieve this, there should be a radio supporting Carplay in your car. If you still use a standard factory radio, it’s high time for you to install an Apple Carplay aftermarket radio in your car. At this post, we’re going to assist you to replace your Subaru WRX factory radio by yourself.

Removal and installation steps of Subaru WRX radio

The tools for removal and installation are basic pry tools and screwdrivers. As to the new radio, it’s a touchscreen Seicane navigation radio with Carplay. Before working, it’s necessary to cut off the car power to keep safety since we will work on different power plugs.

Step 1, Remove the panel device: Use the pry tool and feed it down the side until the panel device pried up, then you can take it out.

Step 2, Unplug connects of the vent and the AC controllers on the panel device.

Step 3, Remove the tabs, vents, AC controllers of the panel as we need to use them on the new aftermarket radio.

Step 4, Remove six screws that fixed the original radio unit.

Step 5, Take down this metal slat, pull out the radio unit and unplug its connectors.

Step 6, Have a check for the cables and other accessories of Seicane car radio with Carplay.

Step 7, Install the tabs, vents, AC controllers in the new radio system.

Step 8, Correspondingly connect the harness cables between the new radio and the car. If you are not sure about the interfaces, check with the radio user manual.

Step 9, Turn on the car to test whether the new radio can work normally; if not, check again the cables whether connected correctly.

The Seicane aftermarket car radio with Apple Carplay

Since the product comes with a 9 inches large touchscreen, everything you do on it is easier and more convenient. There is comfortable and clear navigation UI for you to see information, allowing you to go everywhere quickly and safely. With the built-in DSP sound system, you are able to enjoy quality sound effects when listen to music, watch videos etc.

In Seicane Apple Carplay aftermarket radio, there are two methods of using Carplay, by wired and wireless, both are easy to do, giving drivers new way to use their phones while keeping a safe drive. With this fantastic design, you get to make phone calls, use phone maps, enjoy phone songs on radio screen freely.

The Seicane radio also helps increase driving safety when you add DVR, rear view camera, TPMS and so on to it. The DVR can record the whole process of traffic accidents, take photos for front of vehicles and store the video in real-time while driving. After installing the rear view camera, the radio screen will automatically display rear situation when you reverse the car, to assist you park it easily. The TPMS can report real-time tire-pressure information via a pictogram display or a simple low-pressure warning light to help you save fuel consumption, extend the tire life.

How to Install A New Car Audio Navigation System in 2009-2012 Mazda 3?

Did your Mazda 3 come with an audio system with touchscreen, Bluetooth, GPS navigation and more? If not, it’s high time for you to upgrade its factory audio system for a new one since it allows you to complete a lot of tasks at the same time while driving. Now in the aftermarket, there are plenty of car audio systems you can opt, with difference in car models, audio functions and prices.

After getting your new car audio, you may want to install it by yourself since the Mazda 3’s factory radio is easy to remove. If you are not sure whether you can do, take a look at this tutorials guide in advance.

Audio SystemSeicane Car Audio Navigation System with Bluetooth WIFI
Needed ToolsA hard card, screwdrivers; User manual of Seicane audio system
PrecautionsMust disconnect the car power before doing anything.

Steps to remove Mazda 3 factory audio

This is the original audio system in the dashboard.

Step 1, To remove the air outlet: Insert a hard card into the seam of the air outlet, slide the card and use some force to pry the outlet, then you can remove it.

Step 2, Remove the screws fixing the original audio unit.

Step 3, Pull out the audio unit and unplug the connectors.

The removal of the factory radio is done. Following we will guide you to install the Seicane car audio system to your Mazda 3.

Steps to install Seicane car audio navigation system

Step 4, Have a check for the wiring harness and other accessories of the Seicane audio system to make sure a smooth work.

Step 5, Then connect cables between Seicane car audio and car plugs. In this step, it requires your patient and carefulness to recognize plug interfaces, thus have your user manual handy.

Step 6, Fix the new audio unit, turn on your car to test the product whether functions normally.

Step 7, If everything of the product work well, then install the air outlet back. The whole replacement job is finished. If the new unit doesn’t functions, please double check whether the cables are connected correctly.

Comparison of factory radio and Seicane android car audio system

Obviously, the factory radio system was the old-fashioned button-operated radio that you can only listen to music and broadcast, there is less function and no special features.  

For the new Seicane audio navigation system, it comes with a large touchscreen that make everything operated easier. What an awesome experience when you see navigation information and videos on such a big screen. Besides, this audio is not limited quantity of songs, it’s feasible to search for the latest album of your favorite singers on this android car audio system.

One of good reasons to use this Seicane audio system is smartphone integration. The product is able to support CarPlay and Android Auto, this gives you ability to connect your smartphone and play its applications including contact books, dialing, navigation app, music etc. freely on the audio display.

You can also choose to add optional functions to the system, such as DVR, AHD night vision parking camera, external OBDⅡ, TPMS and so on, to keep your drive safer and more convenient. I believe you won’t regret investing in Seicane car audio system.

An Easy Way to Upgrade Your Citroen C4L Factory Stereo

To look for the comfortable and quality in-car life, some car owners sell their old cars to purchase a new one, while for those who can’t afford a new car now, are planning to upgrade their old car parts, such as the tires, the paint, the interior, and the factory stereo.

When it comes to fun in-car life, having a quality car stereo is must. With the multifunctional car stereo navigation system, you get various entertainment like listening to newest music and radio, watching some movies, using the navigation to arrive your destination, playing Carplay etc. And the stereo helps you keep safe drive when connect some car cameras to it.

Actually, upgrading the car stereo is not so difficult, we can do the job ourselves. In this article, we’ll tell you how to replace the Citroen C4L factory stereo.

Removal and installation guide of Citroen C4L stereo system

First of all, get your toolbox. A couple of screwdrivers and a plastic pry tool are most common. You can also prepare some wire strippers, electrical tape. Before the replacement job, make sure you cut off the car power to avoid accident.

1 Remove the plastic baffle under the radio system.


2 Use a plastic pry tool to remove the A/C outlet.


3 Take off the two trim panel around the radio screen.


4 Remove six screws which fixed the radio system.


5 Take off the radio and unplug its connectors.


6 Remove the two screws that fixed the host, then take off the host and unplug the connector.


7 Remove this frame that fixed the host.


8 Check whether all the accessories of the new car stereo navigation system are complete.

9 Corresponding connect the cables between the new car stereo system and the car.

10 Now you can turn on the car to test whether the new stereo is working normally.

11 If there is no problem, fix well the stereo and all the car accessories.

Why to upgrade your factory stereo?

If your car is new enough, I am sure it used the latest technology in the stereo. You don’t need to make any change to it. But for most old cars, they only come a standard factory stereo with simple functions and no special features. To enjoy better in-car life, it’s time to replace your factory stereo. Some of aftermarket car stereo systems are worth to buy as they are designed awesome.

Generally speaking, to provide users with best viewing angle and smooth operation, most of the aftermarket car stereos are made of large touch screen, so users are easily to operate every function with their fingers. On the other hand, there are more entertainment methods to choose in these stereos, such as connecting to the Internet, users are able to search the latest music or watch online movies. What’s more, for stereos who support Carplay, users can connect their smartphone to the stereo, then they can use the smartphone applications freely on the stereo display.

These multifunctional aftermarket car stereos are not just designed for entertainment, they also have the ability to provide safety to our drive. For example, with the navigation application, we find the best route to our destinations. Besides, when adding some car cameras such as the rear view camera to the stereo, every time when we reverse the car, it switch to the rear view image to show us the rear situation, then we can park the car easier.

What are you waiting for to upgrade your factory radio system? Find the suitable one to replace it now.

The Ultimate Guide Helping You Replace 2006-2011 Honda Civic (LHD) Factory Radio System Quickly

To get better in-car life, car owners try their best to improve the unsatisfied parts of the car, such as installing comfortable seats, using soft carpet, and the most important is having a quality easy to operate and multifunctional car radio.

Most modern cars come with decent radio systems yet the older vehicles are not. For those old car owners, thankfully the aftermarket has a wide selection of car radio upgrades available. And they can replace the factory radios by themselves since there are lots of tutorial videos and posts online can help them.

As a car enthusiast and DIY lover, I also upgraded my 2007 Honda Civic (LHD) radio last month, and you will get the replacement instructions here. (This is the factory radio.)

Steps to replace (2006-2011) Honda Civic (LHD) factory radio

I purchased the Seicane car radio navigation system for my car. Before the replacement job, you should prepare tools like plastic pry tool and screwdriver and make sure the car power is cut off in the process of upgrade.

#1 Use a plastic pry tool to pry the board under the radio, and remove the two eight millimeter bolts of the plastic trim


#2 Pull out the panel under the steering wheel


#3 Remove the screws that fixed the whole top panel, then pull out the whole top panel and unplug its connector


#4 Pull out the original radio and unplug all the connectors


#5 Check the cable accessories of the new Seicane car radio system


#6 Take down the HVAC control board, air outlet and related accessories of the old radio panel, and install them to the new car radio


#7 Remove these white and black small chips of the original head unit and install them on the new radio unit


#8 Correspondingly connect cables between new car radio system and the car


#9 Turn on the car to test whether the new car radio unit work normally


#10 If there is no problem, fix the new radio in the dashboard, and install all the panel accessories in the original position

Lets take a look at Seicane car radio system for 2006-2011 Honda Civic (LHD)

Compared to the factory radio, this Seicane car radio is made of 10.1 inch IPS touchscreen and used the latest Android system, which not only provides us with large viewing angle but very super fast to response. The smooth operation, high sensitivity and abundant interaction greatly improve user experience.

On the other hand, the Seicane GPS radio system comes with diverse features and functions, such as supporting high speed 3G&Wifi internet, Bluetooth, 3D navigation, HD digital TV, DVR, rear view camera etc, adding more entertainment as well as helping us drive safer on the road.

Since it’s built-in Carplay, it’s easy to synchronizes our mobile phones with this stereo system trough WiFi or USB, which enables us to gain access to smartphone’s applications on the unit to play music, watch videos, make calling etc. With this amazing car stereo navigation system, I am sure your in-car life must be rich and colorful!

The Removal and Replacement Instructions for 2016 Jeep Renegade Car Stereo GPS System

Actually, for most cars, they are not equipped with the optimal car stereos from the factory. That’s because lots of manufacturers use cheap materials and lousy design for stereos, speakers and subwoofers to cut off costs and increase efficiency. As a result, you can use the stereo to listen to music, but you are unable to use it to watch videos, surf the Internet, setup Carplay etc.


To improve the car stereo components that manufacturers don’t produce well and to better your using experience, there are thousands of products on the market you can invest. One of good ways is to replace the factory stereo for a new awesome one.


Just in last month, my brother and I helped replace the factory radio of my father’s 2016 Jeep Renegade. He loves to drive to different places for fun, and a good car stereo would add more entertainment as well as improve driving safety. Now I am sharing the replacement guide here.


Part 1 Jobs to do to replace the 2016 Jeep Renegade car stereo system

We purchased the Seicane bluetooth car stereo system for the 2016 Jeep Renegade, which is versatile and affordable. The main tools you need are a plastic pry tool and a screwdriver. Do forget to cut off the car power before the replacement work.


Step 1 Use a plastic pry tool to pry the external frame that fixed the original stereo, then take it out.


Step 2 Remove the four screws that fixed the original stereo in the dashboard.


Step 3 Take off the factory radio and unplug its connectors.


Step 4 Make sure the wiring accessories of the new stereo system are complete.


Step 5 First of all, place the USB cable in the storage box in order to use it easily.


Step 6 Then put and fix the internal frame of the new stereo in the dashboard.


Step 7 Take down the plastic buckle from the original radio external frame, and install them to the new Seicane Car Stereo GPS System.


Step 8 Connect the new stereo radio system to the car plugs.


Step 9 Before fixing the new stereo, turn on the car to test whether it works well.


Step 10 If the product functions properly, then fix it in the dashboard.


Part 2 Keep your eyes on the 2016 Jeep Renegade car stereo GPS system from Seicane

Made of high configuration including intelligent pure android 10.0 operation system, 8-core CPU, 4GB RAM and 64 ROM, this car stereo has stable performance and smooth operation.


In addition, since the product supports Carplay/Android Auto, that means you are easily to connect your phone to this stereo to use your phone applications, such as quickly checking the address book and making bluetooth calls.


As my father often drives to different places, the GPS navigation helps him a lot. In the Seicane car stereo, it used the latest navigation technology which is able to support the latest map apps and offer accurate 3D navigation information. What’s more, with adding the rear view camera, my father has no trouble to park and reverse the car.


There are lots of amazing features and functions of the Seicane car stereo with GPS system, you can check for the proper one on its Official Website for your loved car.

Seicane Guide: How to Replace the 2008-2016 Volvo XC60 Factory Radio?

The fact is buying a car cost less than maintaining a car. After you purchasing the car, following comes maintenance, depreciation, insurance, repair and surely the upgrade fee, which all can’t be avoided and the longer you use the car, the more fee occurred.


No car is perfect 100%, what we can do is to improve the worst part, such as the quality of car stereos. We should know that the stereo is the most useful assistant in our driving, while today’s cars have factory radios that can not meet many of our needs. Some car radios isn’t touch screen, can’t watch videos, are unable to display GPS navigation, not to mention supporting Carplay. That’s why we drivers tend to look for the aftermarket car stereos to replace the factory radios.


In fact, it’s not so hard to replace the factory radio by ourselves, if you have a 2008-2016 Volvo XC60, I am sure you are able to finish the replacement job with the help of this guide.


Steps of replacing the 2008-2016 Volvo XC60 factory radio

New Radio: Seicane Android Car Radio System with GPS Navigation Carplay

Needed tools: Plastic pry tool, screwdriver

Precautions: Ensure cut off the power of the car during the replacement work.


The factory radio of 2008-2016 Volvo XC60

Volvo XC60 Radio


Step#1, Remove the screws of the frame that fixed the original radio


Step#2, Use the plastic pry tool to pry the frame and take it off


Step#3, Remove the screws that fixed the original audio system


Step#4, Take off the control panel of the audio and unplug its connector


Step#5, Remove screws of the original audio screen and unplug the cables


Step#6, Remove the screws that fixed the original audio unit and take it out, unplug all the connectors


Step#7, Have a check for the cables and accessories of the new Seicane car audio unit

Step#8, Connect the new Seicane car stereo GPS navigation system to the original car port


Step#9, Plug the special port of the new audio screen to the original port


Step#10, Double check the connectors to make sure they are correct, then turn on the car to test the new audio system whether functions normally. If yes, fix it well.


How can the new 2008-2016 Volvo XC60 car stereo improve your driving experience?

Used the latest Android system (version 10.0), this Seicane car stereo for 2008-2016 Volvo XC60 is able to support the latest apps in the market, you can freely use them. The radio comes with built-in RDS and DSP, which means you are given a high quality of sound effect when listening to music, watching videos. With the help of the accurate 3D navigation it offered, drivers can go everywhere they want in a quickly and safer way.


On the other hand, since there is built-in wireless CarPlay and Android Auto in the car radio, users can connect their phones to the radio and use phone applications without trouble. What’s more, its big viewing angle IPS touch screen with fast and smooth operation, will greatly improve your visual experience.


Bluetooth, WIFI, FM/AM/RDS radio etc. are integrated in this fantastic stereo, you have lots of choices for car entertainment, and easily to switch different pages with the split screen display function. You can also add AHD camera, DVR, TPMS to this radio to increase driving safety.

Detailed Instructions for 2014 Peugeot 2008 Car Radio GPS Navigation System Upgrade

In modern society, one of the most common phenomenon we would find is that there are more cars on the roads, accompanied with the rapid development of automotive electronics at the same time.


Almost every family has a car, however, not every car can fully meet people’s needs. Some of car owners have realized the importance of in-car life since they need to spend lots of time in car everyday, so what we should do to make our in-car life better and more funny? The best answer is to upgrade the car, and the first work is replacing your old-fashioned car radio for a new one.


If you are searching for the way to upgrade your 2014 Peugeot 2008 Car Radio, You came to the right place here. Scroll down to get the detailed installation instructions. (The picture shows the original car radio.)


Car Stereo Brand: Seicane Car Audio System with Carplay GPS Navigation

Important Tools: Plastic pry tool, Screwdriver


Steps to Remove and Install Seicane Car Audio for 2014 Peugeot 2008

1 Use a plastic pry tool to open the panel and unplug its connector.


2 Remove two fixing screws of the original radio screen.


3 Take out the screen and unplug the connectors.


4 Remove four screws that fixed the frame of the radio and then take it out.


5 Pull out the old radio unit and unplug its connectors.


6 Check the wiring accessories of the new Seicane car radio system.


7 Correspondingly connect cables of new radio to the car plugs.


8 Fix well the new radio and turn on the car to test whether the new radio system works or not.


9 If everything is ok, the installation is finished, otherwise, double check the cable wiring.


Capability of 2014 Peugeot 2008 Car Audio GPS Navigation System by Seicane


About Configuration – Used the latest Android 10.0 operating system, with 8-core CPU as well as 4G RAM and 64G storage.


About Carplay – There is built-in Carplay, and customers are given two methods to connect it, by wired and wireless, offering the best way to use your Smartphone’s applications on the radio.


About Screen – It’s the 10.1 inch IPS screen, provides you with large viewing angle and there is no light reflecting under direct sunlight as well as no watermarks when touch.


About GPS Function – The car stereo is equipped with worldwide real-time navigation function of high accuracy. With dual zone function, the music from radio/AV/TV etc can be played behind the scene under GPS mode and it will switch to the GPS voice automatically.


Others – This Seicane car audio system for 2014 Peugeot 2008 has features of picture in picture and split screen display, and are able to support car DVR, backup camera, OBD II, HD digital TV, thus giving you better driving experience.