A step by step removal and installation for 2003-2007 Honda Accord 7 car GPS Navigaiton .
The direct purpose of this tutorial article wrote today is about the removal and installation for 2003-2007 Honda Accord 7 car radio. If your would like to get a lasted touchscreen dvd player with various capabilities in stead of your outdated or no longer functioning factory car head unit.Please check the details below, probably you could work it out by yourselves. Good luck.
Precautions:
1.Please disconnect the power before the removal and installation.
2.Please prepare a lever and a screwdriver in advance.
3.Please keep all the separate parts from the car and take care of the dashboard to avoid scratching it during its detachment and installation.
4.For your convenience, link below is the recommended tools for removal and installation from Seicane, please check for details: http://www.seicane.com/car-dvd-dismantling-device-srd-400
The removal and installation for 2003-2007 Honda Accord 7 car radio
Step 1: Remove the upper panel with a flat pry and disconnect anything, just put the panel side.
Step 2: Remove the small plastic piece and then pull backwards the gearshift while dropping the key on in the hole.
Step 3: open the ashtray under dash and remove the rubberized little top layer.
Step 4: Take off the gearshift trim by using a sticker screwdriver and unplug the seat-warmer buttons.
Step 5: Then remove the second layer pry up on there and off the 2 screws as marked.
Step 6: You can remove the ashtray panel after offing the screws.
Step 7: Off the 2 screws as picture show and take out the part under dash.
Step 8: Now it looks like as below. Remove 5 screws as A and B guided.


Step 9: Gently take out the unit from dash and disconnect connectors behind.
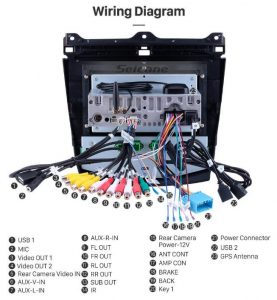
Step 10: Install a new radio from Seicane and make the cables and antennas be connected correctly refer to the wiring diagram instructions .
Step 11: Install a new radio from Seicane by following step 1 to 8 in revers order. If you still have any confusion,please ask a dealer or professional for help.
Hopefully you can figure it out about the removal and installation process. Besides, it’s essential for you to make sure you have a suitable head unit for your car, so that it can be seamlessly installed in your car. If you don’t have one, a recommended car radio for 2003-2007 Honda Accord 7 car stereo. Please check the link below for more information:
The radio product for 2003-2007 Honda Accord 7 car DVD Player comes with the latest Android Radio, RAM 4GB \ ROM 64GB \ CPU 8-core \ Build-in Carplay \ 2.5D IPS Screen, Support RDS, SWC, XM radio APP etc.The GPS navigation system can provide voice prompts for you to help you avoid the traffic congestion, so that you can easily get to your destination. Certainly you will have a wonderful & safe driving experience and also various ways to get entertainments with above multifunctional car head unit.


My honda accord 2006 2.4 car, Seicane DVD is from a couple of days it keeps restarting also I am unable to do the factory reset. kindly help me to fix the issue ASAP. Thanks
“Dear,
so sorry for the inconvenience.
In order to give you a fast solution,we suggest you asked our after sales staff for help.
The email is Sales1@seicane.
Have a good day!”
“Dear,
so sorry for the inconvenience.
In order to give you a fast solution,we suggest you asked our after sales staff for help.
The email is [email protected]
Have a good day!”