Do you want to get more new features in your car? Do you want to enjoy the convenience and entertainment from the most up-to-date car stereo? If you want, it’s time for you to replace your factory car radio. Here is a step-by-step installation guide for a 2009-2012 MAZDA 5 car stereo from Seicane. If you are the car owner of MAZDA 5, you can take it as reference and wish it can help you.

Some tips before the installation:
1.Please disconnect the power before the installation.
2.Please prepare a lever and a screwdriver before the removal and the installation.
3.Please keep all the separate parts from the car. Please take great care of the dashboard to avoid scratching it during its detachment and installation. Please keep handy any parts from the car and make use of all the original screws from the car as much as possible. so each related part of the unit can be fixed securely.
4.For your convenience, here’s the recommended tools for removal and installation from Seicane, please check for more details: http://www.seicane.com/car-dvd-dismantling-device-srd-400
2009-2012 MAZDA 5 car stereo installation guide
1. Unclip and remove the cup holder panel in the center console.
2. Unclip and remove the small pocket panel on the back of the center console behind shifter.


3. Remove (2) 8mm bolts under cup holder panel holding the back half of the center console to the front half.
4. Unscrew and remove the shift knob.
5. Unclip and remove the shifter trim panel.
6. Unclip and remove the shifter trim panel.


7. Unclip and pull back the panels at the lower front sides of the center console.
8. Remove (2) Phillips screws from both sides (total of 4) of the front lower half of the center console.


9. Unclip and remove the vent panel including the hazard switch above the factory radio.
10. It’s easier to remove 2 screws by setting this piece on the top of the dash.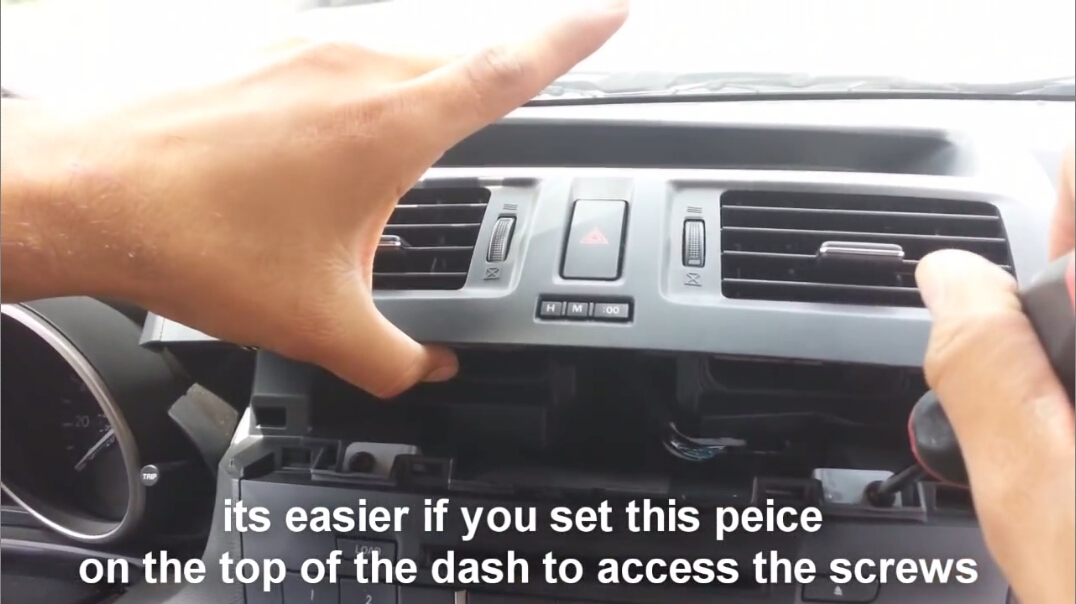
11. Remove 2 screws from behind the shifter trim.
12. Pull center console toward, this will help gain access to 2 screws under the climate controls.
13. Remove 2 screws.
14. Unclip harness and pull rear center console backwards.
15. Press in shifter release trigger and pull shifter down, make sure to have e brake on.
16. Press in side prongs to release climate controls.
17. Remove one screw and one (10mm) bolt.
18. Pull factory stereo out to release clips, then unplug original radio’s connectors.
19. Check all the accessories for the new Seicane car radio.
20. Connect the harnesses to the back of the new Seicane car radio.
21. Connect the Seicane car radio to your original car radio ‘s plugs.
22. Turn on the new Seicane radio to have a careful check if everything works well. If it doesn’t, please check whether all the cables are connected correctly.
23. Put the new Seicane radio into the dash.
24. Put everything into their original place. All the installation is done.
That’s all the step-by-step installation guide for a 2009-2012 MAZDA 5 car stereo and wish you can get some help from it. If you don’t have any experience or problem, please go to the dealer or professional ask for help or arrange them to install it directly. Moreover, the most important thing before the installation is to find a right car stereo which can work well in your car. If you are still looking for one, here I’d like to introduce a wonderful 2009-2012 MAZDA 5 car stereo from Seicane to you:
This great 2009-2012 MAZDA 5 car stereo coming with intelligent pure android 5.1.1 operation system, 8 inch HD 1024*600 multi-touch screen with smooth operation, High Speed 3G&WiFi Internet, Bluetooth functions, 3D Navigation, CD DVD player, 32GB USB/SD Connection and so on. It can meet most of your needs after you install it in your car. Just purchase it and enjoy your driving from now!
WHY IS IT SO DAMN HARD TO REMOVE A STERIO RADIO WITHOUT TAKING HALF OF THE CAR APART 0N MAZDA 5. I WOULD LIKE TO SEE JUST 4 SCREWS TO PULL THE RADIO FACIA OUT. THESE JAPANESE ARE BONKERS SOMETIMES. I WILL DO WHAT EVER IT TAKE TO MODIFY IT TO A 4 SCREW PULL OUT.with the old cars in the bygone era everything was simple you dont need a brain to do most things and taking out radio was 2 min job.
Dear,
Sorry for the trouble caused to you.
To help you quickly, we will forward your email to our after-sales colleague, they will reply you today later.
Here is the email address: [email protected]
You can also contact them. Don’t worry, we are responsible for your order.
Have a nice day.