As far as I am concerned, an ideal car radio should not only come with practical features to bring convenience for a car owner but also meet the car owner’s entertainment needs to offer him a pleasant driving experience. If you think your old radio is not ideal enough, it is wise of you to quit it and install a new multifunctional one. This article mainly introduces some steps to upgrade a 2011 2012 2013 2014-2016 Honda CITY car radio. If you are interested in it, you can read it carefully.
2011 2012 2013 2014-2016 Honda CITY car radio after installation
Precautions for this installation:
1. Before you start up any work, park your car well and unplug the negative power cable to avoid any danger.
2. Please make sure that all fastened wires are isolated with electrical tape.
3. Please make sure the ignition is off to avoid short circuit.
4. Please prepare a lever and a screwdriver before the removal and the installation.
2011 2012 2013 2014-2016 Honda CITY car radio installation instruction
1. The original car radio.
The original car radio
2. Remove screw below the radio and then pry the panel with a plastic removal tool.
Remove screw below the radio and then pry the panel with a plastic removal tool
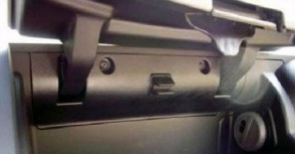
3. Remove the storage pocket and then unscrew two hidden screws with a screwdriver.
Remove the storage pocketand then unscrew two hidden screws with a screwdriver
4. Pry the panel with a plastic removal tool and then remove it.
Pry the panel with a plastic removal tool and then remove it
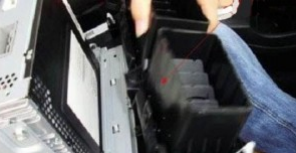
5. Take out the original radio and disconnect the connectors at the back of the radio.
6. Check all the accessories for the new Seicane car stereo.
Check all the accessories for the new Seicane car stereo
7. Connect the harnesses to the back of the new Seicane car stereo.
Connect the harnesses to the back of the new Seicane car stereo
8. Connect the Seicane car stereo to your original stereo’s plugs.
9. Turn on the new Seicane car stereo to have a careful check if everything works well. If it doesn’t, please check whether all the cables are connected correctly.
10. Put the new Seicane car stereo into the dash.
11. Put everything into their original place. All the installation is done.
If you comes across any problems, please don’t hesitate to consult your dealer, communicate with someone experienced or turn to a professional for help. Or if you are afraid of making damage to either your car radio or your car, you can directly arrange a professional technician to help you install the new car radio. As for the selection of an ideal car radio, if you have no ideas, here I would like to share a remarkable 2011 2012 2013 2014-2016 Honda CITY car radio from Seicane with you. For more details, please click:
This car radio comes with a wide range of practical and entertainment features, mainly including 3D GPS navigation system, FM/AM radio, Bluetooth hands-free phone calls, Bluetooth streaming music, SD card or USB connection, file management, etc.
Under the wireless Bluetooth technology, you can connect your Bluetooth-enabled mobile phone to this car radio so as to get access to both Bluetooth hands-free phone calls and Bluetooth streaming music without taking your hands off the steering wheel. Besides, thanks to this unit’s built-in high-end 3D GPS navigation system, you are able to easily know your current locations and find the right way to reach any locations you would like to go to under the guidance of the turn-by-turn directions and voice prompts. And this unit’s dual zone function enables you to listen to your favorite music while navigating.
Wish you like this remarkable car radio and good luck to you!
What would you if you want to improve your in-car environment and take your driving experience up a notch? If I were you, I will remove the factory radio and install a new aftermarket car radio, which comes with both practical and entertainment features. If you also plan to replace your factory radio, you can refer to a correct installation guide to help you. This article mainly aims to introduce a 2003 2004 2005 2006-2007 Honda Accord 7 car radio installation guide from Seicane. If you own the same or similar dashboard, you can refer to this guide carefully.
2003 2004 2005 2006-2007 Honda Accord 7 car radio after installation
Some tips before the installation:
1. Please disconnect the power before the installation.
2. Please prepare a lever and a screwdriverbefore the removal and the installation.
3. Please keep all the separate parts from the car. Please take great care of the dashboard to avoid scratching it during its detachment and installation. Please keep handy any parts from the car and make use of all the original screws from the car as much as possible. so each related part of the unit can be fixed securely.
2003 2004 2005 2006-2007 Honda Accord 7 car radio installation guide
1. Use a plastic removal tool to pry the panel on the top of the car radio.
Use a plastic removal tool to pry the panel on the top of the car radio
2. Pull up the panel and put it aside.
Pull up the panel and put it aside
3. Use the plastic removal tool to remove the trim part around the gear shifter, and then unplug the connectors or wires at the back.
Use the plastic removal tool to remove the trim part around the gear shifter, and then unplug the connectors or wires at the back3-1
4. Get the gear shifter removed to thelower position and then remove the small plastic part whichis shown below. Then use a screw driver to unscrew all screws that fix the whole plastic part and then remove it.
Get the gear shifter removed to thelower position and then remove the small plastic part whichis shown below. Then use a screw driver to unscrew all screws that fix the whole plastic part and then remove it4-14-2
5. Remove screws that fix the compartment on the bottom of the original car radio and then remove the compartment.
Remove screws that fix the compartment on the bottom of the original car radio and then remove the compartment5-1
6. Remove all screws that fix the original car radio.
Remove all screws that fix the original car radio
7. Gently take out the original car radio and unplug the connectors and cables at the back of the radio.
Gently take out the original car radio and unplug the connectors and cables at the back of the radio
8. Check all the accessories for the new Seicane car radio.
Check all the accessories for the new Seicane car radio
9. Connect the harnesses to the back of the new Seicane car radio.
Connect the harnesses to the back of the new Seicane car radio
10. Connect the Seicane car radio to your original stereo’s plugs.
11. Turn on the new Seicane car radio to have a careful check if everything works well. If it doesn’t, please check whether all the cables are connected correctly.
12. Put the new Seicane car radio into the dash.
13. Put everything into their original place. All the installation is done.
Now do you have a understanding of 2003 2004 2005 2006-2007 Honda Accord 7 car radio installation? If you have any doubts, you can contact your dealer, communicate with someone experienced or turn to a professional for help. If you still think it hard for you to install a new car radio, you can straightly go to a car radio upgrade center and ask a professional technician to help you install the new car radio. While for the selection of an ideal car radio, you can refer to the following link which is a 2003 2004 2005 2006-2007 Honda Accord 7 car radio from Seicane. For more details, please click:
With this car radio installed in your car, you can freely get access to a wide range of practical and entertainment features, mainly including 3D GPS navigation system of high precision, FM/AM radio tuner, Bluetooth hands-free phone calls, Bluetooth streaming music, file management, SD card or USB connection, etc.
With the assistance of the worldwide real-time GPS navigation system, you can easily locate where you are currently and find the right way to get to any locations you would like to go to according to the turn-by-turn directions and voice prompts. And thanks to this unit’s dual zone function, you can also listen to your favorite music while navigating.
Additionally, this unit comes with built-in Bluetooth module, which enables you to dial, answer, reject and mute Bluetooth hands-free phone calls as well as listen to Bluetooth streaming music from your phone music playlists for both convenience and enjoyment.
If you are interested with this car radio, just install it and enjoy your driving accompanied by it. Good luck!
If you think your factory radio is too outdated to be compatible with some upgraded and modern features, it will be wise of you to upgrade it with a new aftermarket stereo which can be ideal enough to be compatible with a wide of comprehensive features. Now I’d like to share an easy-to-understand 2013 2014 2015 2016 KIA K3 car stereo installation instruction from Seicane with you. If you have the same or similar dashboard and would like to replace your factory radio, you can refer to the following installation instruction.
2013 2014 2015 2016 KIA K3 Car Stereo after installation
Before and during installation, you should notice:
1. Before connecting, please make sure the ignition is off to avoid short circuit.
2. Ensure connect the yellow and red power cable at last.
3. Ensure that all loose wires are isolated with electrical tape
4. Ensure don’t tangle the wire when tighten the moving parts(Such as seat rails).
5. Ensure that all ground is connected to the same place.
6. Using the improper fuse may cause damage of fire, so when replace the fuse, please consult the professional.
2013 2014 2015 2016 KIA K3car stereo installation instruction
1. Use a plastic removal tool to pry the panel below the AC control and remove the panel.
Use a plastic removal tool to pry the panel below the AC control and remove the panel1-1
2. There is one screw on the left bottom, remove it with a screwdriver.
There is one screw on the left bottom, remove it with a screwdriver2-1
3. Remove the radio trim panel with the plastic removal tool and then unplug the connector at the back of it.
Remove the radio trim panel with the plastic removal tool and then unplug the connector at the back of it3-13-23-3
4. Unscrew the screws that are holding the radio on the dashboard.
Unscrew the screws that are holding the radio on the dashboard
5. Softly pull out the original car radio.
Softly pull out the original car radio
6. Disconnect connectors and cables at the back of the radio.
7. Check all the accessories for the new Seicane car radio.
Check all the accessories for the new Seicane car radio
8. Connect the harnesses to the back of the new Seicane car radio.
Connect the harnesses to the back of the new Seicane car radio
9. Connect the Seicane car radio to your original radio’s plugs.
10. Turn on the new Seicane car radio to have a careful check if everything works well. If it doesn’t, please check whether all the cables are connected correctly.
11. Put the new Seicane car radio into the dash.
12. Put everything into their original place. All the installation is done.
Wish you can get some inspiration from the above installation instruction. If you have any doubts about the new car radio or the car radio installation process, then you can contact your dealer, communicate with someone experienced or turn to a professional for help.
Besides, it is essential for you to pick an ideal car radio for your beloved car. If you have no ideas, you can refer to a remarkable 2013 2014 2015 2016 KIA K3 car radio from Seicane. Here comes the link, please click:
This unit is modern enough to be compatible with a wide range of comprehensive features, so this unit can be regarded as one of the best replacements for your factory radio.
When you drive around unfamiliar places, even you have no good sense of directions, you can easily locate where you are currently and find the right way to get to your desired destinations under the guidance of the turn-by-turn directions and voice prompts. So you don’t have to worry about getting lost in unfamiliar places. Besides, you can freely listen to your favorite music behind the scene under GPS mode, and the music will automatically switch to GPS voice.
Additionally, you can simply connect your Bluetooth-enabled mobile phone to this car radio so as to enable you to dial, receive, reject and mute hands-free phone calls as well as freely enjoy your favorite music streaming from your phone music playlists without taking your hands off the steering wheel.
Would you like to enjoy more features from an ideal car radio in your car? If your answer toward this question is “yes”, then you can consider replacing your factory radio with a new multifunctional car radio. If you own a 2011 2012 2013 2014-2015 KIA K2 and plan to install a new car radio to replace your factory radio, then you can take the following 2011 2012 2013 2014-2015 KIA K2 car radio installation guide from Seicane as a reference. Wish it is helpful for you to some extent.
2011 2012 2013 2014-2015 KIA K2 Car Radio after installation
Tips about the installation:
1. Please disconnect the power before the installation.
2. Please prepare a lever and a screwdriver before the removal and the installation.
3. Please keep all the separate parts from the car. Please take great care of the dashboard to avoid scratching it during its detachment and installation. Please keep handy any parts from the car and make use of all the original screws from the car as much as possible. so each related part of the unit can be fixed securely.
2011 2012 2013 2014-2015 KIA K2 car radio installation guide
1. The original car radio.
The original car radio
2. Use a plastic removal tool to release the top panel.
Use a plastic removal tool to release the top panel
3. Pry the trim panel of the radio with a plastic knife and remove it.Unplug the connector at the back of it.
Pry the trim panel of the radio with a plastic knife and remove it.Unplug the connector at the back of it3-1
4. Unscrew the screws that are holding the radio on the dashboard.
Unscrew the screws that are holding the radio on the dashboard
5. Take out the radio gently.
Take out the radio gently
6. Unplug the connectors and cables at the back of the radio.
Unplug the connectors and cables at the back of the radio
7. Check all the accessories for the new Seicane car radio.
Check all the accessories for the new Seicane car radio
8. Connect the harnesses to the back of the new Seicane car radio.
Connect the harnesses to the back of the new Seicane car radio
9. Connect the Seicane car radio to your original radio’s plugs.
10. Turn on the new Seicane car radio to have a careful check if everything works well. If it doesn’t, please check whether all the cables are connected correctly.
11. Put the new Seicane car radio into the dash.
12. Put everything into their original place. All the installation is done.
Now do you have a general understanding of a 2011 2012 2013 2014-2015 KIA K2 car radio installation process? If you have any questions, please don’t hesitate to seek help from your dealer, someone experienced or a professional. Besides, it is very essential for you to pick an ideal car radio for your car. If you have no ideas, here I would like to share an amazing 2011 2012 2013 2014-2015 KIA K2 car radio from Seicane with you. For more details, please click:
There is no doubt that you will gain a brand new in-car life since this unit is loaded with the advanced Android 6.1 operation system and quad-core CPU processor.
Under the guidance of the turn-by-turn directions and voice prompts provided by the high-end 3D GPS navigation system, you are able to easily locate where you are and have the most suitable route option to reach any locations you would like to go to. Besides, thanks to this unit’s dual zone function, this unit enables you to listen to your favorite music behind the scene under GPS mode and the music will automatically switch to GPS voice.
Besides, this unit also support Bluetooth function. As long as you pair your Bluetooth-enabled mobile phone with this multifunctional car radio, you are able to dial, receive, reject and mute Bluetooth hands-free phone calls as well as listen to Bluetooth streaming music from your phone playlists.
What are you waiting for? This unit is at a very competitive price now. If you like it, just add it to your shopping cart!
If you are not satisfied with your factory radio since it cannot be compatible with some modern or upgraded features, it is suggested that you can replace your factory radio with a new aftermarket car radio. If you wonder how to install a 2007 2008 2009 2010-2013 Honda Fit car radio, then you can carefully read the following installation instruction on a 2007 2008 2009 2010-2013 Honda Fit car radio. Wish it is helpful for you.
2007 2008 2009 2010-2013 Honda Fit Car Stereo after installation
Before and during installation, you should notice:
1. Before connecting, please make sure the ignition is off to avoid short circuit.
2. Ensure connect the yellow and red power cable at last.
3. Ensure that all loose wires are isolated with electrical tape
4. Ensure don’t tangle the wire when tighten the moving parts(Such as seat rails).
5. Ensure that all ground is connected to the same place.
6. Using the improper fuse may cause damage of fire, so when replace the fuse, please consult the professional.
2007 2008 2009 2010-2013 Honda Fit car radio installation instruction
1. Open the glove box at first.
Open the glove box at first
2. Remove the four screws of gloves box as these pictures show.
Remove the four screws of gloves box as these pictures show2-22-32-4
3. Unscrew the two bolts under the radio.
Unscrew the two bolts under the radio3-2
4. Take out the original car radio.
Take out the original car radio
5. Remove the original car radio.
Remove the original car radio
6.Disconnect all connectors at the back of the original car radio.
Disconnect all connectors at the back of the original car radio
7. Remove screws of air condition as these pictures show.
Remove screws of air condition as these pictures show7-27-37-47-5
8. Pull out the air outlet of air condition.
Pull out the air outlet of air condition
9. Remove the hazard warning switch light.
Remove the hazard warning switch light
10. Install the air outlet with the unit.
11. Check all the accessories for the new Seicane car radio.
Check all the accessories for the new Seicane car radio
12. Connect the harnesses to the back of the new Seicane car radio.
Connect the harnesses to the back of the new Seicane car radio
13. Connect the Seicane car radio to your original car radio’s plugs.
14. Turn on the new Seicane radio to have a careful check if everything works well. If it doesn’t, please check whether all the cables are connected correctly.
15. Put the new Seicane radio into the dash.
16. Put everything into their original place. All the installation is done.
If you have any doubts, please feel free to consult your dealer, communicate with someone experienced or turn to a professional for help. If you still think it hard to finish the whole installation process, you’d better arrange a professional technician to help you install the new car radio straightly. Besides, if you don’t know how to select a suitable car stereo for your car, I’d like to recommend an amazing 2007 2008 2009 2010-2013 Honda Fit car radio from Seicane to you. For more details, please click:
This powerful car radio is running on the stable Android 6.1 operation system and high-quality quad-core CPU processor.
Even though you are not good at identifying directions, the high-accuracy 3D GPS navigation system is specially built in to offer you some help. With the help of the worldwide real-time navigation, you can get access to features like current location, 3D street view, landmark building display, turn-by-turn voice directions, etc. So you can be accurately guided to arrive at your desired destinations.
Additionally, under the wireless Bluetooth technology, without taking your hands off the steering wheel, both Bluetooth hands-free phone calls and Bluetooth streaming music are available as long as you pair your Bluetooth-enabled mobile phone with this unit.
Wish you like this multifunctional car radio and good luck to you!
If you plan to upgrade your factory radio so as to reduce budget by yourself, it is suggested that you should find a correct installation instruction and follow it to deal with the car radio removal and installation. The following is a 2006 2007 2008 2009-2011 Honda Civic car radio installation instruction. If you own the same or similar dashboard, you can take this instruction as a reference. Wish it is helpful for you to some extent.
2006 2007 2008 2009-2011 Honda Civic Bluetooth GPS Car Radio after installation
Before and during installation, you should notice:
1. Before connecting,please make sure the ignition is off to avoid short circuit.
2. Ensure connect the yellow and red power cable at last.
3. Ensure that all loose wires are isolated with electrical tape
4. Ensure don’t tangle the wire when tighten the moving parts(Such as seat rails).
5. Ensure that all ground is connected to the same place.
6. Using the improper fuse may cause damage of fire,so when replace the fuse, please consult the professional.
2006 2007 2008 2009-2011 Honda Civic car radio installation instruction
1. The original car radio.
The original car radio
2. Pry the cover of the slot below the CD player with a lever and remove it.
Pry the cover of the slot below the CD player with a lever and remove it
3. Remove two screws inside the slot with a ninety-degree screwdriver.
Remove two screws inside the slot with a ninety-degree screwdriver
4. Pry the lower panel with a lever, loosen it with your hands at the same time, after that, remove the panel.
Pry the lower panel with a lever, loosen it with your hands at the same time, after that, remove the panel
5. Remove one screw in the dash.
Remove one screw in the dash
6. Remove the vent panel.
Remove the vent panel
7. Unplug the connectors beneath the panel.
Unplug the connectors beneath the panel
8. Pry the edges along the panel of the original radio, then remove it, after that, take the original car radio out of the dash.
Pry the edges along the panel of the original radio, then remove it, after that, take the original car radio out of the dash
9. Unplug the connectors at the back of the original radio.
Unplug the connectors at the back of the original radio9-1
10. Disconnect the antenna and the other connector on the other side of the original radio.
Disconnect the antenna and the other connector on the other side of the original radio10-1
11. Check all the accessories for the new Seicane car stereo.
Check all the accessories for the new Seicane car stereo
12. Connect the harnesses to the back of the new Seicane car stereo.
Connect the harnesses to the back of the new Seicane car stereo
13. Connect the Seicane car stereo to your original car radio’s plugs.
14. Put the new Seicane car stereo into the dash.
15. Turn on the new Seicane car stereo and check whether the unit is working properly.
Wish you can get some help from the above installation guide. If you have any doubts, please don’t hesitate to contact your dealer, communicate with someone experienced or turn to a professional for help. Besides, if you still think the installation process is too complicated, you can directly arrange a professional from Seicane to help you. Anyway, before installation, you should select an ideal car radio for your beloved car. If you have no ideas, here I would like to recommend a remarkable 2006 2007 2008 2009-2011 Honda Civic car radio from Seicane to you. Here comes the link, please click:
Loaded with the advanced and stable Android 6.1 operation system and a powerful quad-core CPU processor, this car radio has greatly enhance its capabilities and performance. So with this car radio, you can gain a much smoother, faster and easier operation experience.
Under the guidance of the turn-by-turn directions and voice prompts provided by the worldwide real-time GPS navigation system of high accuracy, it will be much easier for you to locate where yo are currently and have the most suitable route option to reach your desired destinations.
Additionally, as long as you connect your Bluetooth-enabled mobile phone to this car radio, you are able to get access to Bluetooth hands-free phone calls as well as listen to streaming music for more convenience and enjoyment without taking your hands off the steering wheel.
If you like this unit, just add it to your shopping cart. Good luck!
There is no doubt that you may feel tired or bored if you have been driving for a long time, and in that case, you must want to refresh yourself. Under this circumstance, you can listen to your favorite music, watch TV programs or play videos in your car. And your factory radio may not support these entertainment features, so you can consider replacing your factory radio with a new aftermarket car radio. The following is a 2007 2008 2009 2010 Toyota OLD Corolla car radio installation guide from Seicane. If you own the same or similar dashboard, you can refer to it carefully.
2007 2008 2009 2010 Toyota OLD Corolla GPS Sat Nav Bluetooth Car Radio after installation
Before and during installation, you should notice:
1. Before connecting, please make sure the ignition is off to avoid short circuit.
2. Ensure connect the yellow and red power cable at last.
3. Ensure that all loose wires are isolated with electrical tape
4. Ensure don’t tangle the wire when tighten the moving parts(Such as seat rails).
5. Ensure that all ground is connected to the same place.
6. Using the improper fuse may cause damage of fire, so when replace the fuse, please consult the professional.
2007 2008 2009 2010 Toyota OLD Corolla car radio installation guide
1. Remove the bottom panel (air conditioning) with plastic knife.
Remove the bottom panel (air conditioning) with plastic knife1-1
2. Pry the top of the original car CD panel with plastic knife.
Pry the top of the original car CD panel with plastic knife
3. Remove the four screws with a screwdriver.
Remove the four screws with a screwdriver
4.Take the original radio out of the dash.
Take the original radio out of the dash
5.Pull the plug of the original radio.
Pull the plug of the original radio
6. Check all the accessories for the new Seicane car radio.
Check all the accessories for the new Seicane car radio
7. Connect the harnesses to the back of the new Seicane car radio.
Connect the harnesses to the back of the new Seicane car radio
8. Socket docking with the original radio directly, instead of cutting the original plug off.
Socket docking with the original radio directly, instead of cutting the original plug off
9. Put the original radio plug into our Seicane radio.
Put the original radio plug into our Seicane radio
10. Put the new Seicane radio back into the dash.
11. Turn on the new Seicane radio to check if all functions work well. If it doesn’t, please check whether all the cables are connected correctly.
12. Install four screws and panels into their original place.
Wish you can learn something useful from the above installation steps. If you come across any problems you don’t know how to deal with, you can seek help from your dealer, someone experienced or a professional. If you still think it hard to install the new car radio, you can directly arrange a professional technician to install the new car radio.
This all-in-one car radio is running on the stable Android 6.1 operation system and a powerful quad-core CPU processor to enhance its capabilities, configuration and performance, so it can be regarded as one of the best replacements for your factory radio. Besides, it also comes with a wide range or practical and entertainment features, mainly including built-in 3D GPS navigation, Bluetooth hands-free phone calls, Bluetooth streaming music, FM/AM radio tuner, file management, USB or SD card connection, etc.
With the assistance of the turn-by-turn directions and voice prompts provided by the high-end 3D GPS navigation system, you are able to locate where you are and navigate to your desired destinations. And this unit’s dual zone function enables you to listen to your favorite music while navigating.
What’s more, through the Bluetooth connection between your Bluetooth-enabled mobile phone and this car radio, both Bluetooth hands-free phone calls and Bluetooth streaming music are available for you to gain more convenience and enjoyment.
If you like this unit, just add it to your shopping cart.
There is no doubt that among lots of ways to upgrade your car’s capabilities and performance, the most popular way is to remove your factory radio and install a brand new multifunctional car radio in your car. With such an ideal car radio in your car, you can get access to a wide range of practical and entertainment features so as to enrich your in-car life. The following is a 2010 2011 2012 2013 2014 2015 Mitsubishi ASX Peugeot 4008 car radio installation guide from Seicane, which can be taken as a reference for you if you have the same or similar dashboard.
2010 2011 2012 2013 2014 2015 Mitsubishi ASX Peugeot 4008 Car Radio after installation
Before and during installation, you should notice:
1. Before connecting,please make sure the ignition is off to avoid short circuit.
2. Ensure connect the yellow and red power cable at last.
3. Ensure that all loose wires are isolated with electrical tape
4. Ensure don’t tangle the wire when tighten the moving parts(Such as seat rails).
5. Ensure that all ground is connected to the same place.
6. Using the improper fuse may cause damage of fire,so when replace the fuse, please consult the professional.
2010 2011 2012 2013 2014 2015 Mitsubishi ASX Peugeot 4008 car radio installation guide
1. The original car radio.
The original car radio
2. Use a plastic knife to pry the trim panel and remove it.
Use a plastic knife to pry the trim panel and remove it2-12-2
3. Remove screws that are holding the radio.
Remove screws that are holding the radio
4. Take out the original car radio.
Take out the original car radio
5. Disconnect the connectors and cables at the back of the radio.
Disconnect the connectors and cables at the back of the radio
6. Check all the accessories for the new Seicane car radio.
Check all the accessories for the new Seicane car radio
7. Connect the harnesses to the back of the new Seicane car radio.
Connect the harnesses to the back of the new Seicane car radio
8. Connect the Seicane car radio to your original radio’s plugs.
9. Turn on the new Seicane car radio to have a careful check if everything works well. If it doesn’t, please check whether all the cables are connected correctly.
10. Put the new Seicane car radio into the dash.
11. Put everything into their original place. All the installation is done.
That’s all about how to remove and install the new car radio for 2010 2011 2012 2013 2014 2015 Mitsubishi ASX Peugeot 4008. If you meet any problems before or during the installation, please don’t hesitate to contact your dealer, communicate with someone experienced or turn to a professional for help. If you are afraid of failing in the installation, you can directly arrange a professional technician to help you install the new car radio. Anyway, it is very essential for you to pick an ideal car radio for your beloved car. Here I would like to share an amazing 2010 2011 2012 2013 2014 2015 Mitsubishi ASX Peugeot 4008 car radio from Seicane with you. You may click the following link for more details.
This car radio is running on the most advanced Android 6.0 operation system and a powerful quad-core CPU processor to enhance its capabilities and performance. Therefore, with this car radio installed in your car, you will be able to embrace much smoother, faster and easier operation experience.
With this car radio installed in your car, you will enjoy a lot of practical and entertainment features, mainly including high-end 3D GPS navigation system, FM/AM radio tuner, Bluetooth hands-free phone calls, Bluetooth streaming music, file management, etc. Thanks to these features, you are able to have a more convenient and relaxing driving experience.
Under the guidance of the turn-by-turn directions and voice prompts provided by the high-end 3D GPS navigation system, you are able to easily locate where you are and find the right way to reach any locations you would like go to go without getting lost any longer. And while navigating, you can also listen to your favorite music.
If you like this unit, just add it to your shopping cart right now. Good luck!
If you would like to pursue a more comfortable and convenient in-car life, it will be one of the most prevailing ways for you to replace your factory radio with a new aftermarket car radio which comes with a wide range of practical and entertainment features. If you know how to install a new ca rradio, you may find it very easy for you to upgrade a car radio. The following is a 2004 2005 2006 2007-2009 Mazda 3 car radio installation instruction from Seicane. If you own the same or similar dashboard, then you can refer to this instruction carefully.
2004 2005 2006 2007-2009 Mazda 3 Radio after installation
Precautions for this installation:
1. Before you start up any work, park your car well and unplug the negative power cable to avoid any danger.
2. Please make sure that all fastened wires are isolated with electrical tape.
3. Please make sure the ignition is off to avoid short circuit.
2004 2005 2006 2007-2009 Mazda 3 car radio installation instruction
1. Remove the trim panel with a plastic removal tool.
Remove the trim panel with a plastic removal tool1-1
2. Remove two screws that fixed the car radio on the dashboard.
Remove two screws that fixed the car radio on the dashboard
3. Take out the original car radio.
Take out the original car radio
4. Unplug connectors at the back of the original car radio.
Unplug connectors at the back of the original car radio4-1
5. Check all the accessories for the new Seicane car radio.
Check all the accessories for the new Seicane car radio
6. Connect the harnesses to the back of the new Seicane car radio.
Connect the harnesses to the back of the new Seicane car radio
7. Connect the Seicane car radio to your original radio’s plugs.
8. Turn on the new Seicane car radio to have a careful check if everything works well. If it doesn’t, please check whether all the cables are connected correctly.
9. Put the new Seicane car radio into the dash.
10. Put everything into their original place. All the installation is done.
Now do you have a general understanding of the above installation steps? If you meet any problems about either the car radio installation process pr the car radio, please don’t hesitate to contact your dealer, communicate with someone experienced or turn to a professional for help. You can straightly go to a car radio upgrade center and get the new car radio installed by a professional technician.
Besides, it is especially significant for you to pick an ideal car radio for your beloved car. If you have no ideas, you can check out the following link which is an amazing 2004 2005 2006 2007-2009 Mazda 3 car radio from Seicane. For more details, please click:
With this car radio installed in your beloved car, you will definitely embrace a brand new driving experience so as to enjoy more convenience and enjoyment.
Under the guidance of the turn-by-turn directions and voice prompts provided by the high-end 3D GPS navigation system, you are able to easily locate where you are and navigate to any locations you would like to go to without getting lost any more.
Additionally, under the wireless Bluetooth technology, you can make your Bluetooth-enabled mobile phone pair with this car radio. By doing so, you can dial, answer, reject and mute Bluetooth hands-free phone calls as well as listen to Bluetooth streaming music from phone without taking your hands off the steering wheel control.
There is no doubt that a car radio can play a very significant part in driving experience. If you are not so satisfied with your outdated factory radio due to its simple functions, it is suggested that you should upgrade your factory radio by installing a new aftermarket car stereo. To achieve the whole installation process, you need a detailed installation instruction to guide you. Here I would like to share an easy-to-understand installation instruction on a 2004 2005 2006 2007-2010 Toyota Sienna car stereo from Seicane with you. Wish you can get some help from this instruction.
2004 2005 2006 2007 -2010 Toyota Sienna Car Stereo after installation
Some tips before the installation:
1. Please disconnect the power before the installation.
2. Please prepare a lever and a screwdriver before the removal and the installation.
3. Please keep all the separate parts from the car. Please take great care of the dashboard to avoid scratching it during its detachment and installation. Please keep handy any parts from the car and make use of all the original screws from the car as much as possible. so each related part of the unit can be fixed securely.
2004 2005 2006 2007-2010 Toyota Sienna car stereo installation instruction
1. The original car radio for 2004-2010 Toyota Sienna.
The original car radio for 2004-2010 Toyota Sienna
2. Use a flat-head screwdriver or a flat pry tool to pry up the vertical panels of the right and left side of the original car radio and climate control system.
Use a flat-head screwdriver or a flat pry tool to pry up the vertical panels of the right and left side of the original car radio and climate control system
3. Disconnect the wiring from the side panels. There are two wiring connectors on the left panel and only one connector on the right panel. Please carefully press the tab to release the connectors.
Disconnect the wiring from the side panels. There are two wiring connectors on the left panel and only one connector on the right panel. Please carefully press the tab to release the connectors3-1
4. Remove the center channel speaker grill panel above the car radio. Please use a pry tool or a flat head screwdriver to pry up the top (center channel speaker) panel above the car radio and then remove it.
Remove the center channel speaker grill panel above the car radio. Please use a pry tool or a flat head screwdriver to pry up the top (center channel speaker) panel above the car radio and then remove it4-1
5. Remove the center speaker. There are two 10mm hex head nuts securing the center speaker, so you need to use a 10-mm Hollow-Shank nut screwdriver to remove these two bolts.
Remove the center speaker. There are two 10mm hex head nuts securing the center speaker, so you need to use a 10-mm Hollow-Shank nut screwdriver to remove these two bolts
6. Disconnect the speaker wiring harness. Please press the tab down so as to release the wiring connector, and then set the speaker and bolts aside.
Disconnect the speaker wiring harness. Please press the tab down so as to release the wiring connector, and then set the speaker and bolts aside
7. Remove the 4 10mm hex head nuts from the car radio. There are 4 bolts holding the car radio in the dash (2 on each side). Please use a screwdriver to remove these four bolts.
Remove the 4 10mm hex head nuts from the car radio. There are 4 bolts holding the car radio in the dash (2 on each side). Please use a screwdriver to remove these four bolts7-1
8. Gently pull the original car radio out of the dash and then disconnect the wiring from the original car radio. Then put the original car radio aside.
Gently pull the original car radio out of the dash and then disconnect the wiring from the original car radio. Then put the original car radio aside8-1
9. If necessary, please remove the left and right radio mounting brackets to install on the new Seicane car radio.
If necessary, please remove the left and right radio mounting brackets to install on the new Seicane car radio
10. Check all the accessories for the new Seicane car radio.
Check all the accessories for the new Seicane car radio
11. Connect the harnesses to the back of the new Seicane car radio.
Connect the harnesses to the back of the new Seicane car radio
12. Connect the Seicane car radio to your original car radio’s plugs.
Connect the Seicane car radio to your original car radio’s plugs
13. Gently place the new Seicane car radio into the opening of the dash and test it.
14. Re-seat the stereo in the dash and reinstall the 4 bolts.
15. Carefully reconnect the center speaker and reinstall the 2 bolts.
Carefully reconnect the center speaker and reinstall the 2 bolts
16. Carefully reinstall top center channel speaker grill panel.
Carefully reinstall top center channel speaker grill panel
17. Reconnect all the electrical connectors and then reinstall the left and right side panels.
Don’t worry if you encounter any problems before or during the installation. To deal with these problems, you can try to seek help from your dealer, someone experienced or turn to a professional for help. If you still think it hard for you to remove your factory radio and install the new car radio, you can directly go to a car radio upgrade center and arrange a professional technician to help you install the new car radio. Anyway, it is essential for you to select an ideal car radio before installation, if you have no ideas, here I would like to recommend a remarkable 2004 2005 2006 2007-2010 Toyota Sienna car stereo from Seicane to you. Wish you will like it. For more details, please click:
With this remarkable car radio installed in your car, your driving experience will absolutely be taken up a notch. This car radio is loaded with the most advanced Android 8.0 operations system and a powerful eight-core CPU processor, which will enables you to have a much smoother, faster and easier operation experience.
Under the guidance of the turn-by-turn directions and voice prompts provided by the worldwide real-time GPS navigation system, this unit enables you to easily locate where you are and help you find the right way to get to any locations you would like to go to. And this unit also comes with dual zone function, which enables you to listen to your favorite music while navigating.
Additionally, you are able to dial, receive, reject and mute Bluetooth hands-free phone calls as well as listen to Bluetooth streaming music from your phone music playlist as long as you connect your Bluetooth-enabled mobile phone to this unit.


Recent Comments