Top 3 step-by-step guide of installation of Backup camera in 2022

Are you willing to add more fun to your in-car life? Have you ever considered to replace your backup camera in your car? Backup Camera are available as car aftermarket component that everyone can install on old vehicles by themselves. With a good quality backup camera ,which displays a small, live view from behind the car when the vehicle is put into reverse, you can get  a clearer picture of what’s behind you and helps to recognize any unsafe massage from your tires. Nevertheless, many people who seek for the DIY installation of backup camera don’t get good response from outer resource and today the following step-by-step guide installation of backup camera will help you walk through this difficult process.

Before installation, you should pay attention to some important tips. First of all, you need to make sure vehicle is turned off and prepare some tools such as a wire feeder, cordless drill, automotive multimeter, wire connectors(Posi-Taps), wire strippers and other removal tools. Secondly, you should Safely disconnect the vehicle’s battery terminals and remove the license plate if necessary.Last but not least, you should take some measures to guarantee your safety by preparing the mechanic gloves, long-sleeve shirt to protect your arms and safety glasses.

Installation Guide of Backup Camera

Step 1: Attach the camera to the vehicle either through the supplied hardware or the hardware you purchased separately.

Step 2:Link the positive camera wire to the positive light wire and the negative camera wire to the negative with a splice or a Posi-Tap connector.

Step 3: If Posi-Taps can’t work out, then you will need to splice your wires together(military splice are recommended).

Step 4: Identify a signal source under the help of your friend first , then Pair the signal wire with the video wire.

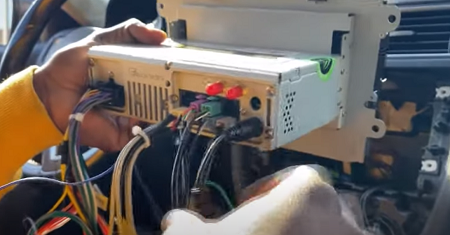
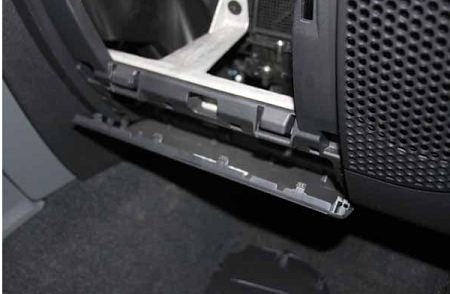
Step 5: Routing the wiring by removing any trim pieces and reattaching them again.

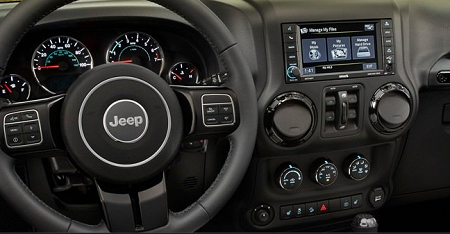
Step 6:Connect the Display to power, video, and the signal wire.

Step 7: Safely reconnect the battery terminals and put the car in reverse to check whether the camera can be turned on correctly.

In fact, the concrete details of installation couldn’t end up with these steps above but you have step forward to further your goal of installation. Here are some tips that you should keep in mind. The first one is to remember to prepared with tools and bring your friend who can help you as much as possible that can make the process easier. The second suggestion is to use puller to get those wires through tough spots.Furthermore, do not expect that the usage of a new camera can last once and for all.The lifetime of the camera depends on many factors, even the best one which works for over 10 years, you’ll want to upgrade to a nicer one with a clearer picture in the future.If you consider to purchase a new one, you can visit the new released Seicane’s backup Camera, which can give you the clearest image all day and night. Want to know more details?please visit it now.

How do you repair your audio gear when you meet their problems?

As the frequent user of car radio, there is no doubt that some inevitable problems will come out from time to time. Certainly, a high quality stereo can decrease the risk of being broken but it doesn’t mean that it can always guarantee its permanent usage for once and for all. According to the data shown by 2022, almost 2/3 families in the USA would replace their head unit every 3 years. It seems that replacement of the touch screen radio has become a common thing as it can’t perform well all the time. So what are the main factors leading the problems in your audio gear? Have you tried to fix it by yourself? To answer these questions, the following essay have presented a list of the most common problems of the audio system as well as the relevant solutions.

Before we started to point out the ways of dealing with the problem, we should find out the most usual cause of the problems occurred in our audio gear.The real reasons causing the worse problems of audios can varies different and it can’t be concluded in a simple word. And the real reason has to depend on the real scenario that you have at the time, such as the incorrect connected cables or the bad quality of the bass, wrongly speaker replacement etc. Here we can take a look at some common radio system issues and the ways to deal with them.

5 Usual problems of the Audio gear&solutions

1.Deformed radios with pops and crackles or no sound.

If you found there is no sound from your in-car audio gear, you should check your source audio first and see whether you have selected the right one. Then check the using cable and pay attention to the cabling between your amplifier (or an all-in-one system like an AV receiver) and speakers. In some cases, there is a wire that radio use to latch into a small port behind the speaker. And you can try cleaning the wire to remove any carbon deposits.Next, you can try removing and re-attaching the cables, and then jostling them slightly to see if that makes a difference. If you find above steps can’t work out, you should try out new speaker-amplifier interconnect cables.

2.Bad performance of the stereo or wrong surround sound directions.

The most effective way to deal with this problem is to check the speakers and the user manual to see which speaker goes where. You can carefully trace the wires back to see whether the port leads to the correct speaker. Another helpful way towards poor sound quality is to see whether one of the component supports the right surround sound format (Dolby Audio, DTS,  or Dolby Atmos).

3.Buzzing sound in the speakers

In terms of the humming sound, here are the basic steps that you can do. And the first step is to put your radio and source on the same power point with a surge protector. Then, isolate the components one by one to find out the location of the problem and try out new cables with better shielding. Next, check whether any grounding wires in your audio are correctly connected to the amplifier. Last, if you find amplifier has been broken and you may need extra professional support.

4.Rowdy radio volume

If you facing with the situation that your radio sound become too loud, what you should do is to  raise the volume of the quietest scenes and see if it can help first. Otherwise,you should see whether the problem is related to the cables, connections, or placement of the speakers, where you can solve it easily. But if you find that the problem is related to the speaker’s driver or internal components, which means you should consult the advice of the experts.

5.No treble or bass in music

In terms of the lack of treble or bass in music, there are some ways to deal with it and the first one way is to check the placement of your radio systems by user manual.

The other one is to  Check any equalizer controls and the cables. If you find that your tweeters and woofers has been broken, you have to get them repaired.

These are all the most common problems and the solutions that people usually meet in their radio system. If you find that your audio has a good sound, which means you can save some money and time to confront these issues. But if you think that you meet some problems that you can’t solve, you should ask for the technical help from the expert or consider to upgrade your car stereo. There is a link of the top rated car stereo from Seicane, which covers multiple functions and good online after-sale service with 3-year warranty. If you are willing to visit a new CD player, it will be the best option.

7 step Guide of VW Jetta Radio Upgrade with Bluetooth Carplay Android Auto

Still be worried about your infotainment system and seek for a new one to replace it? Have you ever consider to upgrade your old factory radio by yourself even though you are the first-timers? Honestly, a good quality sound system can bring much fun to your driving experience and that’s why many people would charge their bills to get the best touch screen unit. Indeed, the cost is not cheap but it can work out to some extent. Nevertheless, some people would like to install the new stereo on their own in order to reduce the budget as well as lower the chance of contracting the Covid-19. Therefore, if you are here to learn something that helps to achieve your goals of DIY Replacement of VW Jetta Radio, you have come to the right place as the following guide has present this task in a clear and precise way.

Before installation, you should keep in mind by reading some important tips. First of all, you can turn off your car engine and prepare some removal tools such as lever and screwdrivers before the installation. Secondly, you should keep all the separate parts from the car and take great care of the dashboard to avoid scratching it during its detachment and installation.

Last but not least, you should keep handy any parts from the car and make use of all the original screws from the car as much as possible so that each related part of the unit can be fixed securely.

2016-2018 VW Volkswagen Jetta car radio installation guide

Step 1:  Take out the radio’s front casing carefully by using removal tool.

Step 2:Use screwdriver to remove the screws nuts and bolts that fasten the factory radios.

Step 3:pull the old factory radios out from its seating position.

Step 4: disconnect the radio from the Wires Behind carefully until they just come right out without any issues.

Step 5: Mount The New Radio system and make sure whether the wires have been accurately connected.(some systems do not require any wire conversions)

Step 6:Replacing the speakers system with removal tools.

Step 7: Check whether the new adapters are compatible with the new radio and test the functions of the new touchscreen.

All in all, it doesn’t take you too much time to complete the task, but the whole upgrading process of VW Jetta doesn’t end with these steps mentioned above. There are some other measures you can take to further your upgrade goals. One of the highly recommended way is to consider changing the rear door and front speakers, adding bass etc, which can ensure a complete radio system on all sides. After all, when the sound system is upgraded to the latest, anyone who takes a ride in your vehicle will enjoy its driving time.

If you want to reduce the time of installation, you can try to pick out a perfect stereo with decent outlook and stable settings under your affordable level. Actually, the different products in the market vary significantly in quality from one brand to another. In terms of the service, one of the best product about VW Jetta Radio from Seicane should be included into its option list as it is designed with bluetooth Carplay and Android auto function, which can make you get the most up-to-date data and simplify your control at the same time. Interestingly, conventional wisdom is that Different strokes for different folks. If you want to get more details about stereos and car accessories, you can e-mail or contact us anytime. We are always here at your service.

How to install aftermarket radio and speaker system in your JEEP Wrangler by 13 steps?

As the owner of Jeep Wrangler, it’s never too late to install the stereo and speaker system by yourself if you wish to improve your sound quality in your car in a low-cost way. But the fact is that the process of installing this stuff usually fraught with many problems. If you want to avoid this problem once and for all, it’s necessary for you to read the following easy to install guide of Jeep Wrangler aftermarket stereo and speaker system, which can help you to reduce some redundant risk.

Before installation, you should pay attention to some important tips. First of all, you can disconnect the power and prepare some tools such as lever before the removal and the installation. Secondly, you should keep all the separate parts from the car and take great care of the dashboard to avoid scratching it during its detachment and installation.

Last but not least, you should keep handy any parts from the car and make use of all the original screws from the car as much as possible so that each related part of the unit can be fixed securely.

2011-2017 JEEP Wrangler car radio installation guide

Step 1. Remove top tray and bolt underneath.

Step 2. remove another bolt behind the switches

Step 3. Pry off the panel below the steering wheel column to access the two more bolts on either side.

Step 4. Remove the four bolts around the head unit.

Step 5. Pry off the side panels.

Step 6. Remove glove box and lower panel (passenger’s side).

Step 7. Front speaker removal (passenger’s side).

Step 8. Unbolt the lower dash panel then pull out speaker from below (driver’s side).

Step 9. Replacing the tweeters.

Step 10. Sound bar speaker removed and polyfill fiber inserted.

Step 11. Power wire and fuse connected to the battery.

Step 12. Bolting down the ground wire.

Step 13. Amplifier and subwoofer installed to the trunk.

To be honest, you should have a clearer idea about how to replace your stereo according the 13 steps above if you read them thoroughly and carefully. But if you still have some doubt or want to look for outer assistance, you can ask for your car dealer for help or go to the neighbor stores to buy their services. But I still want to remind you that it’s best for you to go to the internet under the pandemic prevailing conditions so that you can reduce the chance of contracting.After all, it’s up to you to decide which way to choose.

As far as I am concerned, I prefer to search some information from the website such as Seicane, where radios replacement and other relevant car accessories are on sale all the time and won the good reputation abroad. If you want to know more details about how to install your receiver or other relevant product like subwoofer and amplifier, you can visit the our page of Jeep wrangler stereo with bluetooth Carplay, which will bring you the most helpful offers online as well as the most relevant content.