A step by step removal and installation for 2003-2007 Honda Accord 7 car GPS Navigaiton .

A step by step removal and installation for 2003-2007 Honda Accord 7 car GPS Navigaiton .

The direct purpose of this tutorial article wrote today is about the removal and installation for 2003-2007 Honda Accord 7 car radio. If your would like to get a lasted touchscreen dvd player with various capabilities in stead of your outdated or no longer functioning factory car head unit.Please check the details below, probably you could work it out by yourselves. Good luck.

Precautions:

1.Please disconnect the power before the removal and installation.

2.Please prepare a lever and a screwdriver in advance.

3.Please keep all the separate parts from the car and take care of the dashboard to avoid scratching it during its detachment and installation.

4.For your convenience, link below is the recommended tools for removal and installation from Seicane, please check for details:  http://www.seicane.com/car-dvd-dismantling-device-srd-400


The removal and installation for 2003-2007 Honda Accord 7 car radio

Step 1: Remove the upper panel with a flat pry and disconnect anything, just put the panel side.

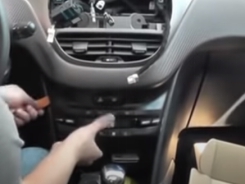
Step 2: Remove the small plastic piece and then pull backwards the gearshift while dropping the key on in the hole.

Step 3: open the ashtray under dash and remove the rubberized little top layer.

Step 4: Take off the gearshift trim by using a sticker screwdriver and unplug the seat-warmer buttons.

Step 5: Then remove the second layer pry up on there and off the 2 screws as marked.

Step 6: You can remove the ashtray panel after offing the screws.

Step 7: Off the 2 screws as picture show and take out the part under dash.

Step 8: Now it looks like as below. Remove 5 screws as A and B guided.

A. Remove the 3 screws on top of head unit.
B. Off anther 2 screws under the head unit

Step 9: Gently take out the unit from dash and disconnect connectors behind.

Step 10: Install a new radio from Seicane and make the cables and antennas be connected correctly refer to the wiring diagram instructions .

Step 11: Install a new radio from Seicane by following step 1 to 8 in revers order. If you still have any confusion,please ask a dealer or professional for help.


Hopefully you can figure it out about the removal and installation process. Besides, it’s essential for you to make sure you have a suitable head unit for your car, so that it can be seamlessly installed in your car. If you don’t have one, a recommended car radio for 2003-2007 Honda Accord 7 car stereo. Please check the link below for more information:

https://www.seicane.com/android-2003-2007-honda-accord-7-radio-bluetooth-gps-sistema-de-navegac-o-com-retrovisor-do-carro-camera-wifi-mirror-link-obd2-1080p-video-volante-controle-s3801


The radio product for 2003-2007 Honda Accord 7 car DVD Player comes with the latest Android Radio, RAM 4GB \ ROM 64GB \ CPU 8-core \ Build-in Carplay \ 2.5D IPS Screen, Support RDS, SWC, XM radio APP etc.The GPS navigation system can provide voice prompts for you to help you avoid the traffic congestion, so that you can easily get to your destination. Certainly you will have a wonderful & safe driving experience and also various ways to get entertainments with above multifunctional car head unit.


How to upgrade 2010-2016 Jeep Compass and 2016 Jeep Patriot factory car stereo to the latest one ?

How to upgrade 2010-2016 Jeep Compass and 2016 Jeep Patriot factory car stereo to the latest one ?

If you fed up with your car radio,you can consider to replace it with a upgraded one which has various functions to level up the driving experience. However many people think that its too hard to install the car head unit by ourselves.The purpose of the article wrote here is to lead you to remove and install Car GPS Navigation for 2010-2016 Jeep Compass and 2016 Jeep Patriot. BTW it still works for your jeep patriot car stereo installation by following the compass removal details here,cause the Jeep Patriot has exact same procedure as Jeep Compass. 

2010-2016 Jeep Compass after Installation
2010-2016 Jeep Compass original dashboard

Warnings:

1.Please disconnect the power before the installation.

2.Please prepare a lever and a screwdriver before the removal and the installation.

3.Please keep all the separate parts from the car well. Please take great care of the dashboard to avoid scratching it during its detachment and installation.

4.For your convenience, here’s the recommended tools for removal and installation from Seicane, please check for more details: http://www.seicane.com/car-dvd-dismantling-device-srd-400


2010-2016 Jeep Compass and 2016 Jeep Patriot car radio removal and installation

Step 1: Remove the fascia with a pry stick. Step 2: Off the 4 screws with a screwdriver. Step 3: Nicely take the head unit out of the dash and disconnect the connectors behind. Step 4: Make cables and antennas be connected correctly to the new radio from Seicane refer to the wiring diagram. Step 5: Put into the new radio and you will notice that Its line up the exact same 4 screws in same locations. Install back the screws and then fascia that you will get a new touchscreen radio for your car.


Once the installation is done you will get a awesome 2010-2016 Jeep Compass and 2016 Jeep Patriot car DVD Player. If there is any confusion,please no doubt to ask a dealer or a professional guy for support. Meanwhile a recommended fitful car radio model for 2010-2016 Jeep Compass and 2016 Jeep Patriot would be the required one if your car has no ideal one to install yet. Please check the link below for more information:

https://www.seicane.com/2010-2016-jeep-bussola-android-gps-navegac-o-hd-touchscreen-radio-bluetooth-espelho-link-wifi-usb-suporte-controle-de-volante-3g-carplay-retrovisor-h6135


The above car radio for 2010-2016 Jeep Compass and 2016 Jeep Patriot Car GPS Navigation comes with the latest Android Radio, RAM 2GB \ ROM 32GB \ Quad core , Support Carplay,RDS, SWC, XM radio APP etc.It offers the newest operations you might have not enjoyed before . Also the DVR function is used for recording the whole process of traffic accidents, taking photos for front of vehicles and storing the video in real-time while driving. Hopefully you have a safe driving.

How to upgrade your car radio for 2003-2012 Toyota Corolla E120 BYD F3 ?

How to upgrade your car radio for 2003-2012 Toyota Corolla E120 BYD F3 ?

As we know,the car can service us for many years since we got it.At the same time,we’re facing some kinds of disadvantages from old model cars such as no advanced GPS system,no DVD player,no latest Android and no touchable screen,etc.That’s the reason i write down this article which related to the Car GPS Navigation removal and installation for 2003-2012 Toyota Corolla E120 BYD F3. The upgraded car head unit will bring us lots of entertainments and convenience.

Precautions:

  1. Please apply the parking brake and remove the negative cable on the vehicle battery before the removal to ensure safety.
  2. A lever and a screwdriver need to be prepared before the installation.


The Car GPS Navigation removal and installation for 2003-2012 Toyota Corolla E120 BYD F3.

Step 1 : Remove the dashboard and disconnect the connectors.

1-1
1-2
1-3
1-4
1-5

Step 2 : Use removal tool to take the A/C console gently and unplug the cables backwards.

2-1
2-2

Step 3 : Connect the marked red cable to rearview camera cable.

The Rearview camera cable is Optional selection, Please check link below for details:

https://www.seicane.com/ahd-night-vision-rearview-camera-waterproof-parking-assistance-system-for-car-radio-big-screen-sc92

Step 4 : Off the Door trim strip and A cylindrical panel.

Step 5 : Tap the GPS cable in proper place and get it out of A/C console position through inner way.

5-1
5-2

Step 6 : Place back the Door trim strip and A cylindrical panel well.

Step 7 : Carefully make the antennas and cables connected step by step as installation instructions

show. 

Step 8 : Put the new head unit into the dash and hold it in trim panel with screws.

Step 9 : Follow steps 1-2 in reverse order to install back the remaining parts.

Step 10 : Check if everything is going well with your car.


Hope this article helps you a lot with the installation for 2003-2012 Toyota Corolla E120 BYD F3.If you still have problem about it, please feel free to contact a dealer or professional for support. Surely you can check the link below for more information: https://www.seicane.com/hd-touchscreen-radio-android-gps-navegac-o-para-2006-2012-toyota-corola-e120-byd-f3-com-bluetooth-music-usb-audio-aux-wi-fi-mirror-link-volante-control-s6934g

This 2003-2012 Toyota Corolla E120 BYD F3 GPS Navigation comes with the latest Android Radio, RAM 4GB \ ROM 64GB \ CPU 8-core \ Built-in Carplay \ 2.5D IPS Screen, Support RDS, SWC, XM radio APP,support Split Screen Display etc. It replaces your factory radio with android based system of great utility and extendability. You can download any applications in the android market for access to games, Skype, MSN, YouTube, twitter, E-Book, G-mail etc. This system also supports installation or removal of apps on RAM or SD optionally. With this car radio you will have a various ways to enjoy your driving with friends and family.


The steps of removal and installation introduction for 2014 Peugeot 2008 Car Stereo

For new generations,its a little bit hard to afford a car if they just graduate from campuses. That’s why they prefer to select the car brand with high effectiveness-cost. The 2014 Peugeot 2008 is the recommended car brand which is affordable,modern,suitable to become the transport vehicle for new members of society. To have a upgraded car radio is smart way to have much fun during the on/off business ways but also lots of entertainments for trips. This article is about the removal and installation introduction for 2014 Peugeot 2008 Car Radio.


Important Tips:

1.Please park your car well and unplug the negative power cable to avoid any danger before you start up any work.

2.Please make sure that all fastened wires are isolated with electrical tape.

3.Please make sure the ignition is off to avoid short circuit.


The steps of removal and installation introduction for 2014 Peugeot 2008 Car Stereo.

1st step: Remove the panel with plastic removal tool (1-1) and unplug the connectors back of it (1-2).

1-1
1-1
1-2
1-2

2nd step : Take the head unit out (2-1) and disconnect the connectors backwards (2-2).

2-1
2-1
2-2
2-2

3rd step : Off the screws with screwdriver (3-1) and remove the frame(3-2).

3-1
3-1
3-2
3-2

4th step : Pull the harness gently towards your side as picture show and put it aside.

4-1
4-1
4-2
4-2
4-3
4-3

5th step : Remove the A/C console (5-1) and unplug the connectors (5-2).

5-1
5-1
5-2
5-2

6th step : Follow the steps 5-1 in reverse order to replace a new car radio.

7th step : Check if the everything of the car radio is going well.


Hope this article helps you a lot with the installation for 2014 Peugeot 2008 DVD Player .If you still have problem about it, please feel free to contact a dealer or professional for support. Surely you can check the link below for more information: https://www.seicane.com/for-2014-peugeot-2008-radio-android-hd-touchscreen-with-aux-bluetooth-gps-navigation-system-carplay-support-1080p-video-h2590

This 2014 Peugeot 2008 GPS Navigation  comes with the latest Android Radio, RAM 4GB \ ROM 64GB \ CPU 8-core \ Built-in Carplay \ 2.5D IPS Screen, Support RDS, SWC, XM radio APP,support Picture in Picture / Split Screen Display etc. The car stereo is equipped with worldwide real-time navigation function of high accuracy. With current location, speed, mileage, landmark building display, 3D street view, destination search and turn-by-turn voice directions, it will be your perfect road companion.

https://www.seicane.com/android-gps-navegac-o-radio-para-2014-2016-peugeot-2008-com-hd-touchscreen-bluetooth-usb-wi-fi-aux-suporte-carplay-swc-tpms-h6270

Above 2014-2016 Peugeot 2008 car stereo comes with RAM 2GB \ ROM 32GB \ CPU Quad-core \ Plug and play \ Support RDS, SWC,Carplay Android Auto Support,support Picture in Picture / Split Screen Display etc. Certainly this one will also fit for your car if related car brand and bring you lots of enjoyable time with driving.

Sharing 2003+ VW Volkswagen Golf GTI MK6 GPS Navigation installation and removal guide

Sharing 2003+ VW Volkswagen Golf GTI MK6 GPS Navigation installation and removal guide

2003+ VW Volkswagen Golf GTI MK6 GPS Navigation installation and removal guide


More and more people wanna own a car to have wonderful time with friends or families during trips and holidays because of living life improvements.As a result, its important and prior solution that people would like to get a upgraded and multifunctional car radio. With experience of car stereo installation and removal for 2003+ VW Volkswagen Golf GTI MK6, i am pleasant to share all you guys the process details about it.

First of all, please note:

1.Please park the car in safe area and remove the negative cable on the vehicle battery before the removal.

2.A lever and a screwdriver need to be prepared before the installation.

3.Put things aside well to avoid to have negative impact for later operation.


2003+ VW Volkswagen Golf GTI MK6 GPS Navigation installation and removal guide

1.Use a lever to pry along the plastic panel and remove the dashboard.

1-1
1-1

1-2                                                                      1-2
2.Remove the screws holding the radio in placewith a screwdriver.


3.Take the factory radio out of the dashboardand Unplug the back connectors of the a/c control unit.


4.Make the new head unit connectors backwards and the factory harness antennas and cables connected step by step as instructions show.(Please note the image 4-1 and 4-2)

4-1
4-1
4-2
4-2
4-3
4-3

5.Put the new Seicane unit into your dashboard and check whether your connections are correct, once it’s done, you’d better to have a tidy for the cables.


6.Check if the new Seicane unit is working well.

This touchscreen entertainment system features a built-in navigation system to guide you to those hard-to-find locations. In addition, the auxiliary input along with USB ports can provide a wide variety of input options. This DVD player can support steering wheel control,air condition system information,vehicle setting information display, and also the car parking system and original car camera. If you are interested,please check the link below for more information:

https://www.seicane.com/en/aftermarket-oem-autoradio-gps-estereo-para-2003-2011-vw-volkswagen-scirocco-golfe-polo-passat-jetta-tiguan-touran-sharan-sagitario-cadaver-cupra-assento-toledo-leon-alhambra-com-hd-touch-screen-obd-espelho-radio-dvd-player-s12840

This 2003+ VW Volkswagen Golf GTI MK6 DVD Player comes with the latest Android Radio, RAM 4GB \ ROM 64GB \ CPU 8-core \ Build-in Carplay \ 2.5D IPS Screen, Support RDS, SWC, XM radio APP etc. You can still keep the steering wheel control working perfectly after the installation of this fantastic stereo.


Meanwhile you also can check another link as following with little different parameters but still match car radio 2003+ VW Volkswagen Golf GTI MK6.

https://www.seicane.com/android-hd-1024-600-touch-screen-radio-for-2010-2011-vw-volkswagen-amarok-with-gps-navigation-wifi-bluetooth-music-mirror-link-steering-wheel-control-1080p-video-s129698e

Above 2003+ VW Volkswagen Golf GTI MK6 car stereo comes with RAM 2GB \ ROM 32GB \ CPU Quad-core \ Plug and play \ Support RDS, SWC,Carplay Android Auto Support etc. Certainly this one will works for your car and bring you joyful time with driving.

Car GPS Navigation Review for 2008 2009 2010 2011 2012 Subaru Forester car radio

Car GPS Navigation Review for 2008 2009 2010 2011 2012 Subaru Forester car radio

       2008 2009 2010 2011 2012 Subaru Forester car radio after installation


Today i would like to share the head unit product from Seicane which matches the car of 2008 2009 2010 2011 2012 Subaru Forester. If you still do not get the fitful car stereo for installation. Hopefully this car radio review of 2008 2009 2010 2011 2012 Subaru Forester can satisfy you.

Firstly the unit is much easier to plug into the dashboard. The multi-touch screen with smooth operation is pretty and bright,its size looks nice as well. Normally the most used apps show on the front screen. Meanwhile unable to delete apps on front screen with long press that avoid to delete the app that you are used to select.

The multifunctional applications can match your variety of hobbies and habits. The Google system works great with the Maps.Spotify is super simple to mange when you are navigating. The Maps guides your directions that you will not get lost. Furthermore, you won’t miss the intersection because the maps app shows the time and distance for next turn.

High quality speaker makes you have wonderful experience when you listen to music,watch videos or on-calls. Built-in digital FM/AM radio tuner brings you lots of entertainments and fun during your trips. Surely you can use loudness adjustments to figure out your sound style.The multimedia supports charging your iPod/iPhone via the usn cable. Besides, DAB can not only automatically tune to all the available stations, offering a list for you to select from, but also provide real-time information such as song titles, music type and news or traffic updates. It’s the best choice for radio lovers and music enthusiasts.


In a word,this is really awesome car radio for 2008 2009 2010 2011 2012 Subaru Forester, if you are interested, please check the link below for details :

https://www.seicane.com/android-subaru-forester-hd-touchscreen-cabeca-unidade-gps-radio-gps-sistema-de-navegac-o-bluetooth-telefone-wifi-apoio-volante-controle-de-controle-camera-h659e

The product data for 2008 2009 2010 2011 2012 Subaru Forester DVD Player from Seicane as following: Android 10.0, 2G+32G, Quad-core CPU, Plug and play, SWC, Support CarPlay Android Auto, IPS Screen, Support RDS.  Certainly you can freely enjoy the time on your way and ensure safety with it.


How to install the 2004-2008 Chrysler 300C radio with USB SD AUX Rearview Mirror Camera MP3


Now, it doesn’t cost a lot of money to upgrade some things in the car, while the radio is the main entertainment center of the car, many car owners want to replace the factory radio to improve their driving comfort.Next, I will tell you how to install new head unit, I will take 2004-2008 Chrysler 300C as an example to tell you the detailed installation steps. If your dashboard is the same as the picture below, then you can refer to the following introduction.


Tips:

  1. Remember to disconnect the power supply before installation.
  2. Before removing and installing, remember to prepare a lever and screwdriver.
  3. Keep all parts separate from the car. Please take care to avoid scratches during the disassembly and installation of the dashboard,use the original screws in your car as much as possible to ensure that the parts are securely attached.
  4. If you need it, here are the recommended tools for removal and installationfrom Seicane, Please purchase according to your needs.
    https://www.seicane.com/car-dvd-dismantling-device-srd-400


installation instructions for 2004-2008 Chrysler 300C radio 

  1. Use a lever to remove the ornaments above the cup holder
  2. Remove the two screws behind the trim panel
  3. Gently pry open the side of the trim with a lever and remove the trim
  4. Remove the 4 screws that hold the factory radio
  5. Take out the factory radio
  6. Disconnect the small wire harness behind the factory radio

  7. Connect the Seicane car radio to the plug of your original car radio.
  8. A small wire harness attached to the back of a new radio
  9. Put the new Seicane radio back on the dashboard.
  10. Install four screws and trim plates
  11. Install two screws on and behind the trim panel
  12. Turn on the new radio and do a full test
  13. Pack up your things in the car,all installation steps are complete


I hope this installation instruction will help you install the radio. If you still can’t install it, you can go to the car Radio Upgrade center for installation or seek professional help. If you have any other problems, you can consult your dealer.

If you haven’t found a suitable radio for your car, Why not try to buy our 2004-2008 Chrysler 300C radios, please click the link below.

https://www.seicane.com/for-2004-2008-chrysler-300c-radio-android-gps-navigation-system-with-bluetooth-hd-touchscreen-carplay-support-digital-tv-h353

This Chrysler 300C radio is equipped with Android 10.0 operation system and High quality 8 – Core 1.5 GHz Coretex-A53 processor and 4GB RAM 64G ROM 2.5D IPS Screen Built-in Carpaly with great performance,This modern radio comes with a number of useful features and entertainment options for you to upgrade your factory radio,which includes High Speed 3G&4G&WiFi Internet,3D Navigation,FM/AM radio tuner,File Management,Steering wheel control,etc.What are you waiting for? Buy now to experience more comfortable driving environment.


How to change the Boot logo on Seicane H5 series GPS Navigation Radio

Recently, many Seicane users asked us how to change the boot logo of H5 series GPS Navigation Radio, so today this blog will teach you how to make boot animation documents.

Boot logo can be divided into 2 types: static LOGO and dynamic LOGO.

①Static Logo is to make a 1024*600 Logo image, the image is stored in BMP format, Windows file format, and the depth is 32 bits.


②Dynamic LOGO need to make a boot animation document, you have to generate a dedicated ZIP file.The zip animation has two parts, part0 and part1. In general, part0 is typically played once, and part1 is typically played in a loop until the system has been booted.

Now Let’s take a look at the steps to make the animation file.

Firstly,Create a new Boot Animation folder and inside the Boot Animation create two new directories, part0, Part1 and a text file desc.txt.

Secondly,Make animated picture frames. If you want to make your animation more beautiful, you can use Flash to make your own animation video at first, then use SWF2Video Pro to export Flash images into PNG format by frame, and then use PhotoShop to save the exported PNG images into PNG-24 format such as 1. PNG, 2. PNG, 3. PNG… Finally, place the action sequence into parts 0 and 1. It is certainly possible to have two different sets of animated images in part0 and part1.

Thirdly,Desc.txt is saved in ANSI format to set the animation pixel size, frame number, flicker times, folder name, etc. Here is an example of a desc.txt file: 1024 600 25 p 1 0 part0 p 0 2 part1.


It must be noted here that part1 in the example must be followed by The enter key, otherwise part1 will not be recognized, resulting in only the picture of part0 being played.

Let’s take a brief look at the meaning of each parameter in the file:hat part1 in the example must be followed by The enter key, otherwise part1 will not be recognized, resulting in only the picture of part0 being played.

1024 600 25: Represents images playing at 1024×600 resolution, 25 images per second.

P 1 0 part0: P is a symbol which means to play the pictures in Part0 in order once, with an interval of 0 frames.

P 0 2 part1: play the picture in part1 zero times (in a loop) until the system is booted. The amount of time it takes two frames between loops.

Fourthly,Go to the boot animation directory and package part0, Part1, and desc.txt as boot animation.zip

notice:If you are using tools to package in Windows system, you can choose “Store” directly.

The bootanimation.zip generation is complete as shown in the picture.


After all the files have been produced, Please copy the file to the USB flash drive, enter the Settings screen, setting-> Logo settings-> ANIMATION SELECT UDISK1. See the video below for detailed instructions.


Click on the link below to know about the latest Seicane  H5 series GPS Navigation Radio

https://www.seicane.com/polegadas-tudo-em-um-android-gps-sistema-de-navegac-o-para-2004-2012-bmw-x3-com-touch-screen-tpms-dvr-obd-ii-camera-aux-usb-sd-controle-de-volante-3g-wifi-video-radio-bluetooth-s089906

How to determine whether the original car is equipped with fiber amplifier and which products are suitable for my car?

My Dear, when you are buying optical fiber decoder for your car, have you ever felt confused and do not know how to choose when facing various optical fiber decoder on the market. Today this blog is to introduce our SC95 and SC96 series of fiber decoder and suitable car models as well as suitable car GPS Navigation Radio if you want.

So, How to determine whether the original car is equipped with fiber amplifier.

If your car is one of the following models,and your car has such a plug a according to the pictures Then our SC95 series products are applicable.

①Mercedes-Benz SL Class R230 SL350 SL500 SL55 SL600 SL65

Year: 2001, 2002, 2003, 2004, 2005, 2006, 2007, 2008

②Mercedes-Benz SLK Class W171 R171 SLK200 SLK280 SLK300 SLK350 SLK55

Year: 2004,2005, 2006, 2007, 2008, 2009, 2010, 2012

③Mercedes-Benz G-Class W463 G550 G500 G400 G320 G270 G55

Year: 2001, 2002, 2003, 2004, 2005, 2006, 2007, 2008

④Mercedes-Benz CLK-W209

Year: 2005, 2006

⑤Mercedes-Benz CLS-W219 CLS350 CLS500 CLS55

Year: 2004, 2005, 2006, 2007, 2008, 2009, 2010, 2011, 2012

⑥Mercedes-Benz E-Class W211 E200 E220 E230 E240 E270 E280 E300 E320 E350 E420 E500 E550 E55 E63

Year: 2002, 2003, 2004, 2005, 2006, 2007, 2008, 2009, 2010, 2011, 2012


If you are interested SC95 series product, please click the link below to buy it.

https://www.seicane.com/2001-2008-mercedes-benz-sl-r230-sl350-sl500-sl55-sl600-sl65-car-optical-fiber-decoder-most-box-interface-bose-harmon-kardon-digital-audio-dac-amplifier-sc02-01c

And also If you still need a Car GPS Navigation Radio, you can know more about our products,  Please click on the following link.

https://www.seicane.com/android-gps-navegac-o-radio-para-2001-2010-mercedes-benz-e-classe-w211-cls-w219-clk-w209-g-w463-com-hd-touchscreen-carplay-bluetooth-support-obd2-swc-h2287


If your car is one of the following models,and has such a plug according to the pictures .Then our SC96 series products are applicable.

①Mercedes-Benz R Class W251 R280 R300 R320 R350 R63 SL600 SL65

Year: 2005, 2006, 2007, 2008, 2009, 2010, 2011, 2012, 2013

②Porsche Cayenne SL600 SL65

Year: 2003, 2004, 2005, 2006, 2007, 2008, 2009, 2010, 2011, 2012

③Mercedes-Benz GL Class X164 GL300 GL320 GL350 GL420 GL450 GL500 GL550 SL600 SL65

Year: 2005, 2006, 2007, 2008, 2009, 2010, 2011, 2012

④Mercedes-Benz ML Class W164 ML280 ML300 ML320 ML350 ML420 ML450 ML500 ML550 ML63 SL600 SL65

Year: 2005, 2006, 2007, 2008, 2009, 2010, 2011, 2012


And If you are interested in SC96 series product, please click the link below to buy it

https://www.seicane.com/2005-2013-mercedes-benz-r-class-w251-r280-r300-r320-r350-r63-car-optical-fiber-decoder-most-box-bose-harmon-kardon-audio-decode-dac-optic-interface-sc69

Also, if your car is one of these above models and you need a car, click on the link below

https://www.seicane.com/2003-2010-porsche-cayenne-hd-touch-tela-android-radio-gps-sistema-de-navegac-o-wi-fi-bluetooth-music-mirror-link-obd2-1080p-video-s6941g

H5M-O series GPS Radio,The choice you will not regret

For those of you reading this blog, you must be struggling with your choice of car GPS Navigation Radio, well, you have found a treasure that because you don’t have to worry about how to choose a suitable car gps radio, this H5M-O series GPS Navigation Radio will be the one you will neve regret.


Now here are main information about H5M-O series

Product specifications

Product feature: 8-cord; Android 9.0; 4G+64; 4G full Netcom+360 panoramic view+carplay+2.5DIP screen+RDS+DSP

System: Android 9.1

Processor Core: 4+4 frequency: 2.5 GHz

RAM: 4GB DDR4

Display: IPS screen

Touch screen: 2.5D tempered curved screen

360 degree camera: AC825X

Resolution: 1024*600, 1280*480, 768*1024, 800*1280, 1280*720, up to 1920*1080 Full HD

Radio: FM1; FM2; FM3;

Satellite navigation system: MT6631 GPS+Beidou/Glonass/Galileo/Japan Quasi-Zenith


Product Function

Support GPS: Built in GPS module, support both online and offline navigation app from Google Play app market

Bluetooth:It upgrades your car with Bluetooth module for hands-free calls and music streaming
with ring-tones and voice coming out from the car speakers.


Support DVR:It can record video only to storage in GPS slot card/SD slot card/NAND FLASH/USB storage.

FM/AM/RDS RADIO:It integrated with High-Sensitive radio IC with good reception, supports worldwide analog radio channels reception.


Support Rear view Camera:Supports RCA AV connector type rear camera signal input automatically switch to parking image when reversing gear engaged.

Support 36EQ DSP:It has real 36 EQ adjustable segments and can adjust the delay, cut the frequency adjust the volume of each channel, turn over each RCA phase separately.


Built-in Carplay:This Carplay USB dongle can support the CARPLAY USB product Support all Android car DVD products, the original car voice control,the original car screen touch.

Support OBD:(Optional Function)With this OBDIl Scanner, you can connect it to your cars DLC port and open the unit’s Bluetooth for monitoring the car’s fuel consumption, water temperature, revolving speed, environment temperature, intake pressure, throttle position, air flow computer load, car speed etc in the OBD interface.It compatible with most of ELM327 OBDll dongle with 4 digits pair code on the market.both Bluetooth WiFi type are supported, read and sync the real-time data from your car computer.

2.5D Curved Touch Screen:With 2.5D curved-display screen this device looks very exquisite and it is seamless. Its screen feels very smooth and flawless. Just enjoy a visual feast on this display with 1024×600 pixels


Click the link below to learn more about H5M-O product information

https://www.seicane.com/hd-touch-screen-android-gps-navegac-o-radio-para-2006-2011-honda-civic-com-bluetooth-wifi-obd2-usb-audio-aux-1080p-retrovisor-camera-s0411