A detailed installation guide for a 2005-2010 Toyota Fortuner head unit with 3G WIFI Radio GPS navigation DVD TV USB

2005-2010 Toyota Fortuner head unit after installation

In our daily life, the network is becoming more and more important. Without the network, we can’t get the latest news and communicate with people immediately. Do you want to surf the internet and download the apps freely in your car? If you want, the best choice for you is to upgrade old factory radio to a multifunctional new head unit. Here, I’d like to share a detailed installation guide for a 2005-2010 Toyota Fortuner head unit from Seicane. You can take it as reference.

2005-2010 Toyota Fortuner head unit after installation

Precautions for this installation:

1.Before you start up any work, park your car well and unplug the negative power cable to avoid any danger.

2.Please make sure that all fastened wires are isolated with electrical tape.

3.Please make sure the ignition is off to avoid short circuit.

4.For your convenience, here’s the recommended tools for removal and installation from Seicane, please check for more details: http://www.seicane.com/car-dvd-dismantling-device-srd-400


2005-2010 Toyota Fortuner head unit installation guide

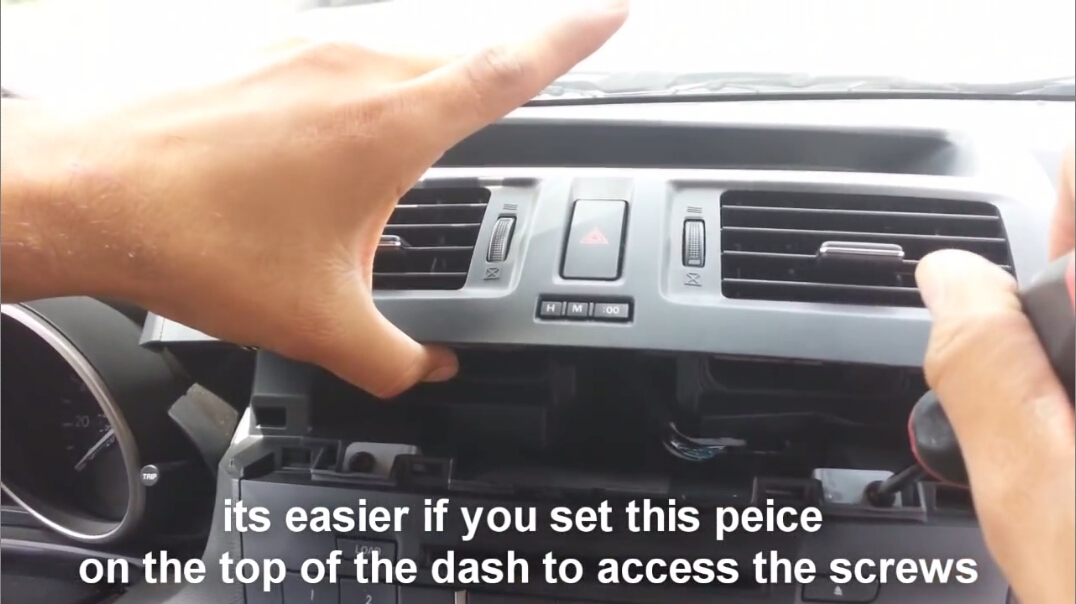
1. Remove the panel with a lever on the both side and disconnect the wire.

1-1. Remove the panel with a lever and pull it away from dash
1-2
1-2

2. Unscrew the four bolts holding the original car radio.

Unscrew the four bolts holding the original car radio

3. Take out the car radio and disconnect the wire harness at the back of the unit.

3-1. Take out the car radio and disconnect the wire harness at the back of the unit
3-2
3-2

4. Check all the accessories for the new Seicane car radio.

Check all the accessories for the new Seicane car radio

5. Connect the harnesses to the back of the new Seicane car radio.

Connect the harnesses to the back of the new Seicane car radio

6. Connect the Seicane car radio to your original car radio ‘s plugs.

7. Turn on the new Seicane radio to have a careful check if everything works well. If it doesn’t, please check whether all the cables are connected correctly.

8. Put the new Seicane radio into the dash.

9. Put everything into their original place. All the installation is done.


All above is the detailed installation guide for a 2005-2010 Toyota Fortuner head unit from Seicane. If you don’t have any experience of installation, it suggests you arrange the dealer or profession to install it directly.

In addition, the first thing for you to do is find a suitable head unit for your car. If you are looking for one, this is a link of newest 2005-2010 Toyota Fortuner head unit from Seicane for your reference:

http://www.seicane.com/2005-2010-toyota-fortuner-android-radio-gps-navigation-dvd-player-touch-screen-obd-dvr-rearview-camera-tv-usb-sd-3g-wifi-bluetooth-cpu-mirror-link-ipod-s166957

This multimedia 2005-2010 Toyota Fortuner head unit supports surfing internet via 3G or WiFi. You can perform Google search on the road with quick search box, play online games, watch videos, download online data and check emails by connecting to any WiFi hotspot in range or 3g internet. Wish you like it!

How to upgrade a 2009-2013 Toyota PRIUS right head unit with Bluetooth touch screen OBD DVR Backup camera TV USB SD 3G WIFI IPOD

2009-2013 Toyota PRIUS right head unit after installation

How can I improve my car interior environment? How can I get extraordinary driving experience? The best way for you is to upgrade your old factory radio. It’s not only improve your car interior environment, but also bring convenience and entertainment feature to you. So, the detailed installation instruction is necessary for the car owner. I’d like to share a detailed installation instruction for a 2009-2013 Toyota PRIUS right head unit from Seicane with you and you can take it as reference.

2009-2013 Toyota PRIUS right head unit after installation

Precautions for this installation:

1.Before you start up any work, park your car well and unplug the negative power cable to avoid any danger.

2.Please make sure that all fastened wires are isolated with electrical tape.

3.Please make sure the ignition is off to avoid short circuit.

4.For your convenience, here’s the recommended tools for removal and installation from Seicane, please check for more details: http://www.seicane.com/car-dvd-dismantling-device-srd-400

Toyota PRIUS right head unit installation instruction

1. Remove the shift panel right of the steering wheel. The panel simply pulls free of the dash with medium force from a trim pry tool.

Remove the shift panel right of the steering wheel. The panel simply pulls free of the dash with medium force from a trim pry tool

2. Remove the dash panel below the stereo. Grab the panel by the right edge and pull with significant force to detach the plastic pin that holds the panel in place. Grab the bottom edge of the panel and pull it from the dash.

Remove the dash panel below the stereo

3.Remove the vent panel to the right of the stereo as you did the left panel. It is only connected with clips that can be pulled free with moderate force.

Remove the vent panel to the right of the stereo as you did the left panel. It is only connected with clips that can be pulled free with moderate force

4. Disconnect the wiring.

Disconnect the wiring

5. Remove the stereo by removing the four screws near the corners of the stereo mounting bracket with a Phillips-head screwdriver.

Remove the stereo by removing the four screws near the corners of the stereo mounting bracket with a Phillips-head screwdriver

6. Pull the radio toward you slowly.

Pull the radio toward you slowly

7. Pull the stereo from its dock and pull the wire groups from the back of the stereo. Grab the groups by the white plastic wire binders, not the wires themselves.

Pull the stereo from its dock and pull the wire groups from the back of the stereo. Grab the groups by the white plastic wire binders, not the wires themselves

8. Check all the accessories for the new Seicane car radio.

9. Connect the harnesses to the back of the new Seicane car radio.

10. Connect the Seicane car radio to your original car radio ‘s plugs.

11. Turn on the new Seicane radio to have a careful check if everything works well. If it doesn’t, please check whether all the cables are connected correctly.

12. Put the new Seicane radio into the dash.

13. Put everything into their original place.

That’s all the detailed installation instruction for a 2009-2013 Toyota PRIUS right head unit. If you find it is hard to install by yourself, it suggests you to the dealer ask for help or arrange the professional to install it. If the picture shown above is different from your dashboard, please rest assured that the instruction is much same. Besides, you have to find the suitable head unit for your car. If you don’t have one, here is the wonderful 2009-2013 Toyota PRIUS right head unit from Seicane to recommend.

http://www.seicane.com/android-in-dash-car-dvd-player-radio-gps-navigation-system-for-2009-2013-toyota-prius-right-with-bluetooth-touch-screen-obd-dvr-backup-camera-tv-usb-sd-3g-wifi-ipod-mirror-link-s168004r

This hot 2009-2013 Toyota PRIUS right head unit is loaded with a powerful 1.6 GHz Cortex A9 Quad-core to enhance the processing ability for users. The hard disc capacitance up to 16G allows more information and database to be processed in this head unit. You will be accurately guided to anywhere you like with its 3D precise GPS and enjoy yourself with a multiple entertainment options supported by it while you are driving. Enjoy a good time with it from now!

A step-by-step installation guide for a 2009-2012 MAZDA 5 car stereo with GPS navigation DVD player Radio Mirror link multi-touch screen

Do you want to get more new features in your car? Do you want to enjoy the convenience and entertainment from the most up-to-date car stereo? If you want, it’s time for you to replace your factory car radio. Here is a step-by-step installation guide for a 2009-2012 MAZDA 5 car stereo from Seicane. If you are the car owner of MAZDA 5, you can take it as reference and wish it can help you.

2009-2012 MAZDA 5 after installation

Some tips before the installation:

1.Please disconnect the power before the installation.

2.Please prepare a lever and a screwdriver before the removal and the installation.

3.Please keep all the separate parts from the car. Please take great care of the dashboard to avoid scratching it during its detachment and installation. Please keep handy any parts from the car and make use of all the original screws from the car as much as possible. so each related part of the unit can be fixed securely.

4.For your convenience, here’s the recommended tools for removal and installation from Seicane, please check for more details: http://www.seicane.com/car-dvd-dismantling-device-srd-400

2009-2012 MAZDA 5 car stereo installation guide

1. Unclip and remove the cup holder panel in the center console.Unclip and remove the cup holder panel in the center console

2. Unclip and remove the small pocket panel on the back of the center console behind shifter.

2-1. Unclip and remove the small pocket panel on the back of the center console behind shifter
2-1
2-2
2-2

3. Remove (2) 8mm bolts under cup holder panel holding the back half of the center console to the front half.Remove (2) 8mm bolts under cup holder panel holding the back half of the center console to the front half

4. Unscrew and remove the shift knob.Unscrew and remove the shift knob

5. Unclip and remove the shifter trim panel.Unclip and remove the shifter trim panel

6. Unclip and remove the shifter trim panel.

6-1. Unclip and remove the shifter trim panel
6-1
6-2
6-2

7. Unclip and pull back the panels at the lower front sides of the center console.Unclip and pull back the panels at the lower front sides of the center console

8. Remove (2) Phillips screws from both sides (total of 4) of the front lower half of the center console.

8-1. Remove (2) Phillips screws from both sides (total of 4) of the front lower half of the center console
8-1
8-2
8-2

9. Unclip and remove the vent panel including the hazard switch above the factory radio.Unclip and remove the vent panel including the hazard switch above the factory radio

10. It’s easier to remove 2 screws by setting this piece on the top of the dash.Its easier to remove 2 screws by setting this piece on the top of the dash

11. Remove 2 screws from behind the shifter trim.Remove 2 screws from behind the shifter trim

12. Pull center console toward, this will help gain access to 2 screws under the climate controls.Pull center console toward, this will help gain access to 2 screws under the climate controls

13. Remove 2 screws.Remove 2 screws

14. Unclip harness and pull rear center console backwards.Unclip harness and pull rear center console backwards

15. Press in shifter release trigger and pull shifter down, make sure to have e brake on.Press in shifter release trigger and pull shifter down, make sure to have e brake on

16. Press in side prongs to release climate controls.Press in side prongs to release climate controls

17. Remove one screw and one (10mm) bolt.Remove one screw and one (10mm) bolt

18. Pull factory stereo out to release clips, then unplug original radio’s connectors.Pull factory stereo out to release clips, then unplug original radio’s connectors

19. Check all the accessories for the new Seicane car radio.

20. Connect the harnesses to the back of the new Seicane car radio.

21. Connect the Seicane car radio to your original car radio ‘s plugs.

22. Turn on the new Seicane radio to have a careful check if everything works well. If it doesn’t, please check whether all the cables are connected correctly.

23. Put the new Seicane radio into the dash.

24. Put everything into their original place. All the installation is done.

That’s all the step-by-step installation guide for a 2009-2012 MAZDA 5 car stereo and wish you can get some help from it. If you don’t have any experience or problem, please go to the dealer or professional ask for help or arrange them to install it directly. Moreover, the most important thing before the installation is to find a right car stereo which can work well in your car. If you are still looking for one, here I’d like to introduce a wonderful 2009-2012 MAZDA 5 car stereo from Seicane to you:

http://www.seicane.com/2009-2012-mazda-5-android-gps-navigation-system-with-dvd-player-radio-mirror-link-multi-touch-screen-obd-dvr-rear-view-camera-tv-3g-wifi-usb-sd-bluetooth-ipod-s168005

This great 2009-2012 MAZDA 5 car stereo coming with intelligent pure android 5.1.1 operation system, 8 inch HD 1024*600 multi-touch screen with smooth operation, High Speed 3G&WiFi Internet, Bluetooth functions, 3D Navigation, CD DVD player, 32GB USB/SD Connection and so on. It can meet most of your needs after you install it in your car. Just purchase it and enjoy your driving from now!