How to replace a 2006-2019 Chevy Chevrolet Aveo/Lova/Captiva/Epica/RAVON Nexia R3/Gentra car GPS navigation

How excited it is when you get a almost 100 percent perfect car radio product not only at a good price but also with expected foundations you exactly require.Meanwhile the installation would be the big challenge if you have no any experience related. If your car matches any among 2006-2019 Chevy Chevrolet Aveo/Lova/Captiva/Epica/RAVON Nexia R3/Gentra car stereo. The following article is just for you which can lead you to remove and install properly. Go ahead and check steps once you’re ready.

Tips :

  1. Please apply the parking brake and remove the negative cable on the vehicle battery before the removal to ensure safety.
  2. A lever and a screwdriver need to be prepared before the installation.


2006-2019 Chevy Chevrolet Aveo/Lova/Captiva/Epica/RAVON Nexia R3/Gentra GPS Navigation removal and installation Guide

  1. Please off the trim from the dashboard with a removal tool as marked.
  2. Take off the screws with a screwdriver.
    2007-2011 Daewoo Gentra head unit installation step 2
  3. Gently take out the head unit as picture shows.
    2007-2011 Daewoo Gentra head unit installation step 3
  4. Disconnect the connectors behind the factory unit.
    2007-2011 Daewoo Gentra head unit installation step 4
  5. Install the new Seicane product refer to the instructions and also follow the wiring diagram to make the antennas and connectors be connected correctly.
    2007-2011 Daewoo Gentra head unit installation step 5
  6. Put back the trim to the dash. Carefully check the new stereo if everything is working well.
    Please ask the dealer or professional for support.


That’s all the step-by-step installation guide for a 2006-2019 Chevy Chevrolet Aveo/Lova/Captiva/Epica/RAVON Nexia R3/Gentra car radio . Wish you can get some help from it. If you have any question, you can turn to your dealer or a professional for help. Besides, it’s essential for you to make sure you have a suitable head unit for your car, so that it can be seamlessly installed in your car. If you don’t have one, a recommended car radio for 2006-2019 chevy Chevrolet Aveo/Lova/Captiva/Epica/RAVON Nexia R3/Gentra from Seicane,  please click:

https://www.seicane.com/android-gps-navigation-system-for-2006-2011-chevy-chevrolet-epica-captiva-with-1080p-capacitive-touch-screen-3g-wifi-tpms-dvr-obd2-rear-camera-aux-steering-wheel-control-usb-bluetooth-mirror-link-s087693f

This 2006-2019 Chevy Chevrolet Aveo/Lova/Captiva/Epica/RAVON Nexia R3/Gentra DVD Player comes with come with the latest Android Radio, RAM 4GB \ ROM 64GB \ CPU 8-core \ Built-in Carplay \ 2.5D IPS Screen, Support RDS, SWC, XM radio APP ,etc. The GPS navigation system can provide voice prompts for you to help you avoid the traffic congestion, so that you can easily get to your destination. Certainly you will have a wonderful & safe driving experience and also various ways to get entertainments with above multifunctional car head unit.

How to upgrade a 2001-2011 NISSAN FRONTIER radio with Pure Android 4.4.4 AUX DVD player touch screen GPS navigation

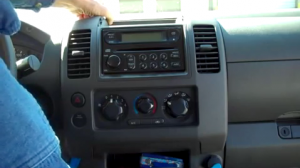
You may think it a bit troublesome to remove and install a new car stereo in your car, therefore, you keep your factory radio with its single function for a long time. As a matter of fact, it’s quite easy to install a new stereo in your car. it can be done within about half an hour. The picture below is a top 2001-2011 NISSAN FRONTIER radio after installation from Seicane, if you have a similar or exactly same dashboard, you can take the step-by-step NISSAN FRONTIER radio installation guide as a reference.

2001-2011 NISSAN FRONTIER radio after installation


Precautions:

  1. Please apply the parking brake before the installation.
  2. For your safety, please disconnect the negative cable on the vehicle battery.
  3. Please prepare a lever and a screwdriver for the installation.


2001-2011 NISSAN FRONTIER radio installation guide

Step 1:

Use a screwdriver to remove two screws above the Nissan Frontier radio.

2001-2011 NISSAN FRONTIER radio installation step 1


Step 2:  Remove the trim panel.

Please wedge a flat tip screwdriver under the trim panel and pry up on it to remove the trim panel. To protect the trim from being accidentally scratched, you can use a clean rag while prying up on the trim panel.

2001-2011 NISSAN FRONTIER radio installation step 2


Step 3: Unscrew the four screws which are holding the factory radio in place with a screwdriver. Then gently take the factory radio off the panel.

2001-2011 NISSAN FRONTIER radio installation step 3


Step 4: Disconnect the radio antenna in the back of the factory radio and unplug the electrical plugs running to the back of the radio.

2001-2011 NISSAN FRONTIER radio installation step 4


Step 5: Connect the antenna in the back of the new Seicane radio and plug the electrical plugs running to the back of the radio. If you have any question on how to connect the antenna to new radio, please take the user manual as a reference or turn to the dealer for a wiring diagram.


Step 6: Turn on the new Seicane radio to have a careful check if it works well with your car. If it doesn’t, please check whether all the cables are connected correctly.


Step 7: After the test, please put the new Seicane radio into the dash.


Step 8: Install all the screws and the trim panel into their original place.


Wish the above installation guide can be helpful for you. If you find the dashboard in the picture above is different from yours, you can rest assured because it won’t have much impact on the installation which is similar on the whole. If you have any questions, please don’t hesitate to ask your dealer or a professional for help.


Besides, you need to make sure you have a right radio for your car so that it can work well after installation. If you don’t have one, you can take the following 2001-2011 NISSAN FRONTIER radio from Seicane as a reference, which is equipped with high configurations and great capabilities, please click:


http://www.seicane.com/seicane-s127005-quad-core-pure-android-4-4-4-universal-bluetooth-dvd-in-dash-car-navigation-system-with-3g-wifi-am-fm-radio-mirror-link-obd2-16g-flash-backup-camera-hd-1024-600-multi-touch-capacitive-screen-aux


With the software upgraded and the firmware improved, this NISSAN FRONTIER radio is the best replacement for you to replace your factory radio. A wide range of entertainment formats are supported to provide you with tons of fun and enjoyment, such as DVD/VCD/CD/MP3/MPEG4/DIVX/CD-R/WMA/JPEG, etc.


The functionality of Bluetooth allows for hands-free calls and streaming music is also included. Utilize the GPS function, you’ll get the most accurate direction to arrive at your destination.

Go and enjoy your best journey with this amazing NISSAN FRONTIER radio all the time from now on! Good luck to you!


How to replace a 2001-2011 VW Volkswagen MK5 car stereo with Car stereo RDS 3G WiFi Quad-core CPU DVD player

No matter you are keeping up with trend or want to pursue a comfortable life in your car, it’ s a great idea for you to upgrade your factory car stereo with a new aftermarket car stereo which can be compatible with a lot of up-to-date features. Look at the picture below, it’s an intelligent 2001-2011 VW Volkswagen MK5 car stereo from Seicane. If you have the same dashboard, you can read this passenger carefully to help with the installation of your new stereo.

2001-2011 VW Volkswagen MK5 car stereo after installation


Some tips before the installation:

  1. Please disconnect the power before the installation.
  2. Please prepare a lever and a screwdriver before the removal and the installation.
  3. Please keep all the separate parts from the car. Please take great care of the dashboard to avoid scratching it during its detachment and installation. Please keep handy any parts from the car and make use of all the original screws from the car as much as possible. so each related part of the unit can be fixed securely.


2001-2011 VW Volkswagen MK5 car stereo installation guide

  1. The original CD player.

    2001-2011 VW Volkswagen MK5 car stereo installation step 1
    2001-2011 VW Volkswagen MK5 car stereo installation step 1


  1. Insert two removal keys into the small port of two sides of the CD player.

    2001-2011 VW Volkswagen MK5 car stereo installation step 2
    2001-2011 VW Volkswagen MK5 car stereo installation step 2


  1. Gently remove the original CD player out of the dashboard.

    2001-2011 VW Volkswagen MK5 car stereo installation step 3
    2001-2011 VW Volkswagen MK5 car stereo installation step 3


  1. Press the removal key on the side of the CD player and release the key. Then do the same on the other side.

    2001-2011 VW Volkswagen MK5 car stereo installation step 4
    2001-2011 VW Volkswagen MK5 car stereo installation step 4


  1. Disconnect the harness at the back of the CD player.
    2001-2011 VW Volkswagen MK5 car stereo installation step 5-1
    2001-2011 VW Volkswagen MK5 car stereo installation step 5-1

    2001-2011 VW Volkswagen MK5 car stereo installation step 5-2
    2001-2011 VW Volkswagen MK5 car stereo installation step 5-2
  2. Connect the harnesses to the back of the new Seicane car stereo.
  3. Connect cables of the new Seicane car stereo as the user manual shows.
  4. Turn on the new Seicane car stereo to have a careful check if everything works well. If it doesn’t, please check whether all the cables are connected correctly.

9.Put the new Seicane car stereo into the dash.

  1. Put everything into their original place.


That’ s the step-by-step installation guide for a 2001-2011 VW Volkswagen MK5 car stereo. If you have any questions, you can ask your dealer or a professional for help. Make sure you are clear about every step before you install it. If you don’t have enough confidence to do it on your own, you can go to a car stereo upgrade center to install it.


Before the installation, it’s also crucial for you to make sure you have a suitable car stereo for your car. If you are still looking for one, I’d like to recommend this amazing Seicane VW Volkswagen MK5 car stereo to you, here’s the link, please click:


http://www.seicane.com/seicane-s127648-android-4-4-4-in-dash-gps-dvd-bluetooth-system-for-2001-2011-vw-volkswagen-mk5-with-radio-rds-3g-wifi-mirror-link-obd2-quad-core-cpu-16g-flash-hd-1080p-video-steering-wheel-control-mp3


What makes this VW Volkswagen MK5 car stereo special is its powerful RK3188 1.6 GHz Cortex A9 Quad-core CPU which greatly smoothes the operation. The large 7 inch multi-touch screen with 1024*600 pixel resolution also creates a visually radiant display to watch the videos. You can utilize the precise GPS navigation system and the Bluetooth technology which allows you to have hands-free calls and stream audio to reach your destination safely and pleasantly.


Wish you like this great VW Volkswagen MK5 car stereo and have a wonderful time with it on all trips from now on!