Specific instructions to upgrade Nissan X-Trail Radio with 3G WiFi mirror link

Dear friends,do you know how to upgrade Nissan X-Trail radio support 3G WiFi mirror link?

Nowadays, cars have become a normal family transportation in modern society, and Nissan X-Trail is also a very popular one. And what do you think of a car radio?The fact is that car radio should be a very necessary part to car except its driving part.Therefore more and more drivers are willing to replace their original radio with a new one.And before learning that ,let’s have a look at following picture: radio after installation for Nissan X-Trail.
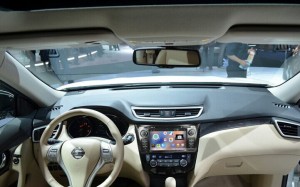
Nissan X-Trail Radio after installation

Nissan X-Trail radio removal

1)Take out the decoration bar with pry tools, better to put some tapes on both panels

Nissan X-Trail radio removal step 1

2)Take out the air-condition consoler

Nissan X-Trail radio removal step 2

3)Remove the dash covers

Nissan X-Trail radio removal step 3

4)Take out the screws fixed on the original Radio

Nissan X-Trail radio removal step 4

5)Take out the original Radio

Nissan X-Trail radio removal step 5

6)Disconnect the original harness

Nissan X-Trail radio removal step 6

Nissan X-Trail radio installation

1)Connect the original harness with new aftermarket radio cable adapter

2)Lay the GPS antenna cable into a pillar

3)Remove the holder kits from the original radio

4)Fix the holder kits on new aftermarket radio with screws

5)Connect the original harness with cable adapter cable, connect the GPS antenna and radio antenna adapter

6)Fix new unit into the dash with screws

7)Put the dash cover back

8)Put the air-condition consoler back

9)Put the decoration bar back to the place


Some Safety notes:

  1. Before connecting, please make sure the ignition is off to avoid short circuit.
  2. Ensure connect the yellow and red power cable at last.
  3. Ensure that all loose wires are isolated with electrical tape
  4. Ensure don’t tangle the wire when tighten the moving parts(Such as seat rails).
  5. Ensure that all ground is connected to the same place.
  6. Using the improper fuse may cause damage of fire, so when replace the fuse, please consult the professional.


So what, do you have a good aftermarket radio for your Nissan X-Trail? If you don’t know which unit is better, I’d like to share a good aftermarket Nissan X-Trail Radio with you:

http://www.seicane.com/seicane-s128007-8-inch-android-4-4-4-gps-radio-bluetooth-multimedia-navigation-system-for-nissan-x-trail-with-cd-dvd-player-3g-wifi-mirror-link-touch-screen-obd2-steering-wheel-control-auto-a-v-usb-sd-quad-core-cpu-16g-flash-s128007


This unit has many great functions such as High Speed 3G&WiFi Internet, App download, 3D Navigation, Radio Tuner, Bluetooth, IPod/IPhone Charging and so on. You can enjoy your car life with this new aftermarket radio.


Wish this essay can benefit you, you can upgrade your original radio in spare time. So, do it yourself with us. Then have fun with Nissan X-Trail Radio.

10 steps to install 2013 aftermarket Toyota RAV4 Radio

The Toyota RAV4 has been loved by many fans of it, some of you might be owners of it. If you love your Toyota RAV4. And in order to enjoy your car life with Toyota RAV4, you must want to install a great aftermarket radio instead of the factory one. But you still haven’t do this for some reason. You might have no idea how to install it, or you might have no time to do it yourself. Today, I will share instructions of 10 steps to install 2013 aftermarket Toyota RAV4 Radio with you.


This image is the Toyota RAV4 Radio after installation. Do you think it’s wonderful? And can not wait to install it on your Toyota RAV4.

2013 Toyota RAV4 after installation

2013 Toyota RAV4 radio installation

1. Begin your installation by removing the negative cable from the battery.

2013 Toyota RAV4 radio installation step 1

2. Using an automotive trim tool,remove the upper dashboard trim panel. Set the panel aside once removed.

2013 Toyota RAV4 radio installation step 2

3. Next, gently pry the air conditioning vents on the left and right-hand sides of the factory touch screen unit away from the dashboard.

2013 Toyota RAV4 radio installation step 3

4. Gently pry the clock display and hazard lamp panel away from the dashboard and set it to the side.

2013 Toyota RAV4 radio installation step 4

5. Remove the four retaining screws attaching the factory touch screen unit to the dashboard.

2013 Toyota RAV4 radio installation step 5

6. Gently lift the touch screen unit away from the dashboard and lean it forward to gain access to the wiring harnesses on the reverse side.

2013 Toyota RAV4 radio installation step 6

7. Disconnect the touch screen by unplugging the individual harnesses.

2013 Toyota RAV4 radio installation step 7

8. Connect the wiring with new radio and put it into your Toyota RAV4.

9. Tighten the four screws.

10. Install the others panel.

During installation, you should notice:

  1. Before connecting, please make sure the ignition is off to avoid short circuit.
  2. Ensure connect the yellow and red power cable at last.
  3. Ensure that all loose wires are isolated with electrical tape
  4. Ensure don’t tangle the wire when tighten the moving parts(Such as seat rails).
  5. Ensure that all ground is connected to the same place.
  6. Using the improper fuse may cause damage of fire, so when replace the fuse, please consult the professional.


If you don’t have a new aftermarket Toyota RAV4 Radio yet. I’d like to share a good one with you:

http://www.seicane.com/seicane-s121063-quad-core-2013-toyota-rav4-android-4-4-4-gps-sat-nav-in-car-dvd-system-with-touch-screen-3g-wifi-am-fm-radio-bluetooth-music-usb-sd-1080p-video-mirror-link-obd2-backup-camera-dvr-steering-wheel-control-s121063


This unit has intelligent pure android 4.4.4 operation system and high quality RK3188 1.6 GHz Cortex A9 Quad-core processor with great performance. The biggest highlight is the 10.1 inch HD 1024*600 multi-touch screen with smooth operation.

It also has great functions such as High Speed 3G&WiFi Internet, App download, 3D Navigation, Radio Tuner, Bluetooth and so on.


Wish this essay can beneifit you when you have spare time to install your Toyota RAV4 Radio. So what? Enjoy your life with your Toyota RAV4 every day.

How to remove and install 2009-2015 BMW Mini Cooper Radio with aftermarket Andriod car stereo

As we all know, BMW Mini Cooper is more and more popular now. If you’re a Mini Cooper owner, you can have your BMW Mini Cooper radio installation by yourself, even if you have no previous experience. Some of you may have no idea about how to remove and install the radio of Mini Cooper. But you want to have a new aftermarket radio with more functions and enjoy your car life with Mini Cooper. Don’t worry, believe yourself. I’d like to share specific instructions of 2009-2015 BMW Mini Cooper radio installation with you. Look at this image, this is Mini Cooper radio  after installation. Isn’t it very smart?

2009-2015 BMW Mini Cooper radio after installation

2009-2015 BMW Mini Cooper radio removal

1)Pry downward on the top edge of the driver’s-side knee panel with a panel tool, on both sides of the steering wheel. Let the panel hang down when the top is loose

BMW Mini Cooper radio removal step 1

2) Remove two screws from the panel on the left side of the radio with a screwdriver. Open the glove box and remove two screws from the panel on the right side of the radio

BMW Mini Cooper radio removal step 2

3)Pull out the panel on the radio

BMW Mini Cooper radio removal step 3

4) Remove the screws around the dashboard

BMW Mini Cooper radio removal step 4

5)Pull out the dashboard and disconnect the wiring

BMW Mini Cooper radio removal step 5

6) Remove the screws around the radio

BMW Mini Cooper radio removal step 6

7) Take out the radio and disconnect the wiring

BMW Mini Cooper radio removal step 7

The factory BMW Mini Cooper radio has been removed. And we can install a new aftermarket radio next.

Before installation, if you still don’t have a new aftermarket radio.I’d like to share a good one with you:

http://www.seicane.com/top-2011-2012-2013-2014-2015-bmw-mini-cooper-touch-screen-gps-radio-navigation-audio-system-tv-dvd-player-bluetooth-music-usb-sd-aux-backup-camera-steering-wheel-control-ipod-mp3-t7127

2009-2015 BMW Mini Cooper radio pre-installation

1)Ensure connect the yellow and red power cable at last.

2)Ensure that all loose wires are isolated with electricaltape

3)Ensure don’tangle the wire when tighten the moving parts(Such as seat rails).

4)Ensure that all GND is connected to the same place.

5)Using the improper fuse may cause damage of fire,so when replace the fuse,please consult the professional.

2009-2015 BMW Mini Cooper radio installation

1)Before connecting,please make sure the ignition is off to avoid short circuit.

2)Make antennas and cables connected step by step as installation instructions show,and you should be very careful when you are doing this for it will affect whole procedure.

3)Connected the new aftermarket radio to Mini Cooper,I’d like to advice you checking your connections are correct,the new unit is in right position,and you’d better have a tidy for the cables.

4)When everything is ok,you can turn on your new aftermarket radio.If it works with no problem,and then you can fix four screws on your new aftermarket radio.Finally put trim panel on the top of your new BMW Mini Cooper radio.

Everything have done, you can watch TV, play cd and DVD. You can use hands-free calls and music streaming by bluetooth. You can also use 3D navigation maps with voice cues, cursors, road planning and so on. Wish this essay can help you enjoy your car life with BMW Mini Cooper radio.

Instructions of 2013-2015 VW Santana radio removal and installation

As we all know,Santana has a long history.Most of you must be the fans of VW Santana.But most of you might have no idea about VW Santana radio removal and installation.Though Santana is pretty good.In order to have better experience,remove your factory radio and install a new aftermarket radio is necessary.Today I will tell you how to remove the factory radio and install a new one on your VW Santana.

Look at this picture,is it familiar to you?Right,this is 2013-2015 VW Santana radio after installation.Do you think it’s wonderful?

VW Santana radio after installation

Before factory radio removal and new radio installation,you should have a new aftermarket radio which is fit your VW Santana. If you have not bought the aftermarket radio.I’d like to share a good aftermarket radio with you.

http://www.seicane.com/8-inch-android-2013-2014-2015-vw-volkswagen-santana-radio-dvd-player-gps-navigation-system-with-mirror-link-hd-touch-screen-obd-dvr-canbus-bluetooth-usb-sd-rear-view-camera-tv-3g-wifi-ipod-s168007

This unit has 8 inch HD 1024*600 multi-touch screen with smooth operation, high sensitivity and abundant interaction for the better view of your road ahead.And High quality RK3188 1.6 GHz Cortex A9 Quad-core processor.The most attractive is it’s intelligent pure android 4.4.4 operation system with 1GB Samsung DDR3.

With a new suitable aftermarket radio.We can start remove factory radio of your VW Santana.

2013-2015 VW Santana radio removal

1)Remove the panel with plastic sled pry tool

2013-2015 VW Santana radio removal step 1

2) Use a hex screwdriver to remove four captive screws of the factory radio

2013-2015 VW Santana radio removal step 2

3) Pull out the factory radio

2013-2015 VW Santana radio removal step 3

4) Unplug connectors

2013-2015 VW Santana radio removal step 4

We finally removed the factory VW Santana radio.And next step is install a new aftermarket radio.

2013-2015 VW Santana radio installation

1)Make antennas and cables connected step by step as installation instructions show,and you should be very careful when you are doing this for it will affect whole procedure.

2)Connected the new aftermarket radio to VW Santana,I’d like to advice you checking your connections are correct,the new unit is in right position,and you’d better have a tidy for the cables.

3)When everything is OK,you can turn on your new aftermarket radio.If it works with no problem,and then you can fix four screws on your new aftermarket radio.Finally put trim panel on the surface of your new VW Santana radio.


This is the instructions of 2003-2015 VW Santana radio installation.Is it very easy?But I still have to give you some safety notes.

1)Before connecting,please make sure the ignition is off to avoid short circuit.

2)Ensure connect the yellow and red power cable at last.

3)Ensure that all loose wires are isolated with electricaltape

4)Ensure don’tangle the wire when tighten the moving parts(Such as seat rails).

5)Ensure that all GND is connected to the same place.

6)Using the improper fuse may cause damage of fire,so when replace the fuse,please consult the professional.


Wish you can learn something from this essay.Enjoy your car life with VW Santana radio.