How to install 2010 2011 2012 Peugeot 408 dvd gps radio with LCD Touch Screen Bluetooth Music

Head unit after installation,GPS radio with aftermarket sat nav system of 2010 2011 2012 Peugeot 408.You will see it in the following picture and can ensure that whether it’s suitable for your car.

Peugeot 408 dvd,GPS system of Peugeot 408,Peugeot 408 head unit

After judging match affair of this unit,next we need to solve the problem of how to install 2010 2011 2012 Peugeot 408 dvd gps radio with LCD Touch Screen Bluetooth Music.You may know a fact that Peugeot 408 radio installation is roughly identical from other cars’.

At first,you should make it clear that the audio you bought can be installed in your car.Next,we begin to set up a lot of things which concerns this Peugeot 408 dvd installation.

What actions can you do about it?Such as searching the Internet,for example,you can get more detailed information from next website: http://www.seicane.com/multimedia-dvd-gps-auto-a-v-system-for-2010-2011-2012-peugeot-408-with-lcd-touch-screen-bluetooth-music-am-fm-radio-tv-tuner-wifi-3g-aux-steering-wheel-control-c083.Or you can also ask a professional staff to check your original car series to see if everything is right.Because you’d better start your work under the condition that there is nothing wrong with factory stereo and then you can make a judgment whether your steps has errors,it’s good for you to make a adjustment when you find something wrong.

Next are the general steps for its installation,you can read them carefully and prepare some tools include pry tool and screwdriver and then you can start your work.

2010 2011 2012 Peugeot 408 cd player removal:

1.Open trim panel under the radio and remove it

Open trim panel under the radio and remove it


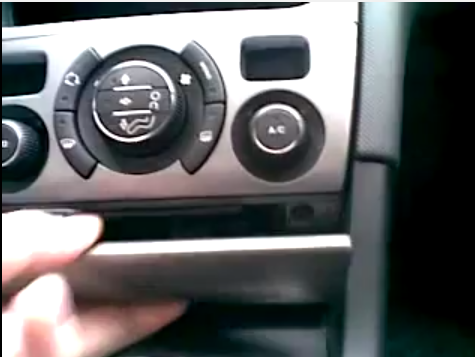
2.Remove 4 screws with a screwdriver,which has 2 on each side

Remove 4 screws with a screwdriver


3.Then you can remove trim panel of original CD radio

remove trim panel of original CD radio


4.Take this screw and the corresponding lower one out and two screws on the other side(total of 4)

Take this screw and the corresponding lower one out and two screws on the other side(total of 4)


5.Take CD player out and unplug cables behind it

Take CD player out and unplug cables behind it


6.Release and remove middle-position panel set

Release and remove middle-position panel set


7.Make two removal tools inserted into higher panel,fasten it and the same to the other side and then remove it

Make two removal tools inserted into higher panel,fasten it and the same to the other side and then remove it


This is removal process for Peugeot 408 audio,after this you still need continue to upgrade your radio stereo.

2010 2011 2012 Peugeot 408 dvd installation:

8.Please have a patient look at those wires and connectors,plug them one by one as right instructions show,which is very important to your installation

9.After correct cables connection,fix 4 screws to original place and install your dvd player into it

10.Fix 4 screws under the unit and install trim panels back to your car

11.With everything set well,turn on new radio and check all functions whether can operate properly

Precautions about the installation:

1.Before you install the unit,please have a check for radio appearance and its functions

2.It will arouse problem if you extend or shorten GPS antenna

3.Be careful not to make the GPS antenna winding the steering wheel and shift lever to avoid danger.

With help of Peugeot 408 dvd radio installation guide,and after you have noted these things and judge it’s safe to operate,then you can start to upgrade your stereo.If you feel difficulty doing some operations,you can also ask a professional worker to help you.


2006-2012 Toyota Rav4 stereo radio with bluetooth music touch screen installation

Before starting this article,here is an image for you:head unit after installation,stereo radio with gps navigation system of 2006-2012 Toyota Rav4.

head unit after installation,stereo radio with gps navigation system of 2006-2012 Toyota Rav4

You can have a careful look at its trim panel if you are someone who wants to upgrade the stereo of your Toyota Rav4.You should firstly make sure that this unit is suitable for your car and then you can go on think about the question of 2006-2012 Toyota Rav4 stereo radio with bluetooth music touch screen installation.

Some people ask dealers of the market to help them install the head unit,however there’s no need to do so for the installation can actually be one thing that can be accomplished by yourself.Of course,it’s under the condition that you have learned clearly about specific steps to mount a new stereo and act them according to right instructions.

Precautions before installation:

1.Have a check for your car head unit to see whether all factory equipment are well

2.Please remember to unplug negative power cable before you start any work,you really need to ensure it before installation

3.Please mind that you should be gentle during the following installation to avoid some damage to the unit and place things that are removed in a safe and visible place

Before we get to know detailed mount procedure for Toyota Rav4 radio,I think we can have a view at next video first:

2006-2012 Toyota Rav4 original radio removal:

1. Use an automotive tool to take the upper dashboard trim panel out,set the panel aside which was removed

Use an automotive tool to take the upper dashboard trim panel out


2.Pry the air conditioning vents gently  away from the dashboard,which are on the left and right-hand sides of the factory touch careen unit

gently prize the air conditioning vent away from the dashboard which is on the right-hand side of the factory unit


gently prize the air conditioning vent away from the dashboard which is on the right-hand side of the factory unit


3.Lever the clock display gently and remove lamp panel away from the dashboard and set it to the side

Lever the clock display gently and remove lamp panel away from the dashboard and set it to the side


4.Take the four retaining screws out which attaches factory unit to the dashboard

Take the four retaining screws out which attaches factory unit to the dashboard


5.Gently pull the touch screen unit  off  from trim panel and lean it forward to gain access to the wiring harnesses on the reverse side

Gently pull the touch screen unit  off  from trim panel and lean it forward to gain access to the wiring harnesses on the reverse side
Gently pull the touch screen unit off from trim panel and lean it forward to gain access to the wiring harnesses on the reverse side


6.Disconnect the individual harnesses to remove original cd radio

Disconnect the individual harnesses to remove original cd radio


7.Totally removed stereo

Totally removed stereo


2006-2012 Toyota Rav4 new radio installation:

8.After this,connect new radio’s cables to right wires of the car

9.Let the screws and trim panels back to their places and turn on your new radio to have a test for it

Whole installation guide for Toyota Rav4 gps radio has all been introduced in above part,if you still account other issues during this process,you can visit some websites which can help you solve them,for example:http://www.seicane.com/2006-2012-toyota-rav4-radio-dvd-audio-3d-gps-system-tv-tuner-wifi-3g-bluetooth-mp3-ipod-steering-wheel-control-dvr-aux-hd-1080p-pop-backup-camera-c018,or reflect them to someone who is more professional in this aspect.

Precautions after installation:

1.Please don’t pull the CD card of GPS out in case of data corruption

2.To avoid antenna problems please don’t shorten or lengthen the GPS antenna

3.Please try to protect touch screen well,do not use other things except touch screen pen for prolonged usage


FAQs for using car stereo autoradio

Nowadays installing a new upgraded stereo for car is become very popular among drivers.Many people choose the new unit because of its new entertaining functions and its nice appearance.Here is an image for it,a car stereo autoradio with gps bluettoth touch screen.

car stereo autoradio with gps bluettoth touch screen

After seeing it,we may know why there are so many people make that decision.It’s more advanced than original one and can bring people much convenient and make life in car more comfortable.But do you know how to use this stereo?

Faqs during usage of car stereo autoradio:

1.How to upgrade the map?

You know,this unit has gps nav system,it can support IGO,Tom-tom,Route 66,Papago etc.Thus you upgrade your radio by downloading map on the Internet

2.How to find the SD card?

Everything should be in the machine when you ordered from a shop,and the SD card are generally placed on the foam when you open up the package or inserted in the GPS a lot.If you still can’t find out it,please check it carefully again in the package

3.How to make GPS work?

Before you use GPS,please make sure that you have inserted the SD card into the GPS slot,this is very important.And you should also ensure that you have installed the GPS antenna and set the file path correctly before you start it up.

4.How to make the radio got channels?

If you find that there are no channels on radio,you need to check the radio antenna in the package to see whether it is correctly connected to your original car’s radio antenna,in addition,the radio area should be selected correspondingly to your location.With all these well done,you will surely find channels on the stereo

5.Where should the TV antenna place?

The TV antenna is suggested to be placed outside of your car to getting better signal

6.How to connect the rearview camera?

There are three pictures which will show you specific instructions for its connection,and mind that your rearview camera’s video input is supposed to be connected to this unit’s back-video-in.

connect the rearview camera


connect the rearview camera2


connect the rearview camera3


If you still meet some other questions or doubts,you can visit our website:http://www.seicane.com,there are more detailed information and solutions there.

After you have a new stereo autoradio,actually keeping it well is the most important thing in usage.But before this,of course,you should make sure that you have succeed finishing whole installation,next there won’t be any big problems in latter time on case that you don’t protect the unit well.

Therefore,please mind to protect your radio while you are using it.Here are some tips for you about using car stereo autoradio with nav system.

Precautions during using new stereo:

1.You should pay more attention to the screen when you are heavy raining days for moisture may gather on it.which may arouse damage to screen

2.Please use touch screen to operate the unit,without any other sharp objects

3.Please do not use any chemicals to wash the machine,if you really need to clean it up,you can use a clean cloth and gently tidy the surface the radio

4.Do not do any self-repairment or maintance when you have no experience on it,you’d better ask someone who is professional on this when something can’t work well,or it can be dangerous

Keeping you safe and then enjoy your life is the wisest choice we should make.

How to install 2004-2009 OPEL Astra gps radio with bluetooth music

Do you know how to install 2004-2009 OPEL Astra gps radio with bluetooth music?

Here is an image for car stereo after installation,dvd player with aftermarket navigation system bluetooth touch screen of 2004-2009 OPEL Astra.If the panel of your car radio is alike this one,it means that this unit can be installed in your beloved car.

car stereo after installation,dvd player with aftermarket navigation system bluetooth touch screen of 2004-2009 OPEL Astra

Recent car radio is upgrading with a very fast speed.Because the requirements of people to cars is getting higher,they hope that cars can bring them more entertainments when they are driving.So car radio become a main machine except the car itself.We know that factory stereo is operated mainly by button controls while car stereo nowadays has touch screen which can be worked with a touch screen pen.

More importantly,it has increased the gps navigation system.This is a very popular function that attracts a lot of people.Nowadays people have been accustomed to look for directions with sat nav system.When you entered in a destination,a map will occur on the screen and you only need to drive as the map points.

But what should we do to install this new radio with new functions?Don’t worry,we have general steps for this installation.

2004-2009 OPEL Astra car stereo removal and installation:

1.Insert removal tool into two holed on left side of car stereo

insert removal tool into two holed on left side of car stereo


2.Insert removal tool into two holed on right side of car stereo

insert removal tool into two holed on right side of car stereo


3.Grasp removal tools and pull car stereo from dash

grasp removal tools and pull car stereo from dash


4.Release trigger on connector to remove,remove antenna and car stereo

release trigger on connector to remove,remove antenna and car stereo


5.After that,you can remove under control buttons and disconnect the connector

remove under control buttons


6.remove the screw and the other corresponding one

remove the screw and the other corresponding one


7.remove trim panel by releasing the lower place first and then top of it

remove trim panel by releasing the lower place first and then top of it


You see the removal steps can be very simple with removal tools and right removal guide,then we still need to continue and install the new unit into your car.

8.Plug all connectors of new stereo to the car’ correctly and firm screws that were removed

9.Install removed panels to the car,with all things done you can turn on your new radio and check whether this new unit can work or not

I believe that everything will be ok only if you can act the OPEL Astra gps installation procedure according to right installation guide step by step.It’s neither a hard thing,nor a thing that can only be finished by professional person,you can also achieve it by yourself.Of course,you should be careful and patient enough during this process,such as putting removed panels and screws in a safe place,be gentle when you are removing something to avoid any damage.

After you have installed new unit successfully and willing to drive it to enjoy your labor work,you may be not very familiar with those new functions,so you can visit next website for more detailed information about this unit:http://www.seicane.com/sat-navi-radio-replacement-car-a-v-system-for-2004-2009-opel-astra-support-dvr-file-management-with-3g-wifi-dvd-recoding-function-c019-2.

Here are some notes for you to attention after your radio mount,

Precautions after installation:

1.Do not pay too much attention on it when you are driving especially on a crowded road,it’s very dangerous

2.To ensure it can be used longer,please remember to use touch screen pen to operate it

3.If you want to clean up it,please use a clean cloth and gently tidy the surface,no any other liquid on it


How to choose a right car dvd player

dvd player with a lot of functions

Do you have a DVD player like the above picture shows? Nowadays the CD player is gradually replaced by DVD player because the latter has some functions which are more convenient and entertaining.But how to choose a right car DVD player? Next there will be some advices for you.

There are mainly two types of car DVD players: DVD players with built-in monitor and those that require external monitors. You can always hook up additional monitors throughout the car even if your DVD head unit includes a built-in monitor.In addition, using your built-in monitor with a rearview backup camera will allow you to see  the behind you when you are backing in reverse or parallel parking.

1. DOUBLE DIN application

If you want to choose a right DVD player for your car, first of all, you must make it clear if the stereo will fit your car. Most in-dash DVD receivers are DIN-sized models, which will fit in regular DIN dash slots. However, certain are specifically designed as DOUBLE DIN models, they will fit in cars with DOUBLE DIN dash holes. Thus  you should check our DOUBLE DIN application to know your car’s dash slot size at first.

2. Security feature

Most DVD players have convenient playlist control for touchscreen. For example, if you use the screen to scan your favorite music, the screen will display the song and artist information. Some DVD players have motorized screens that you only need to press a button. This is a great security feature that you can pay attention to when you are buying the DVD player.

3.Important functions

Besides playing CDs, MP3s, and DVDs, some receivers also have Bluetooth compatibility, iPod controls, and are possible for Sirius or XM satellite radio. Certain DVD players also offer GPS navigation function, which is very convenient especially for people who are busy when he is driving.So choosing a dvd player of the car with gps nav system is a wise choice.On-screens maps and a computer generated voice will give you directions clearly.

4.Accounts about other passengers

Actually it’s according to your own interests about the various functions. When choosing a DVD player, you can look for great features such as dual-zone capability, built-in wireless FM modulators and so on.Dual-zone systems enable front seat passengers to listen to their music or station while the rear passengers watch a movie or listen to an alternative music. Built-in FM modulators and infrared transmitters allow your passengers to use wireless headphones, also can afford you peaceful silence on the road, you will enjoy yourself very well.

In a word,you should have a detailed look at the car dvd player to see whether it can installed in your car.And then, it’s about functions, choosing one that can make you feel satisfied is choosing the right one.