Step-by-Step replacement of a 2013 2014 Toyota Vios Bluetooth GPS Car Radio Installation

As the owner of Toyota vios, it is convenient for us to install a radio in the car as it can add much fun to our life including music, videos, broadcast etc. And if your Toyota stereo has failed and can’t work anymore, the best way to solve this problem is to replace it with a used radio that has the same part number or install an aftermarket Android Toyota unit.For most beginners, it is necessary to know the basic and easy steps of upgrading your touchscreen unit, and just as the following article shown.

Before installation, you should pay attention to some important tips. First of all, you can disconnect the power and prepare some tools such as lever before the removal and the installation. Secondly, you should keep all the separate parts from the car and take great care of the dashboard to avoid scratching it during its detachment and installation.

Last but not least, you should keep handy any parts from the car and make use of all the original screws from the car as much as possible so that each related part of the unit can be fixed securely.

2013-2016 Toyota Vios car radio installation guide

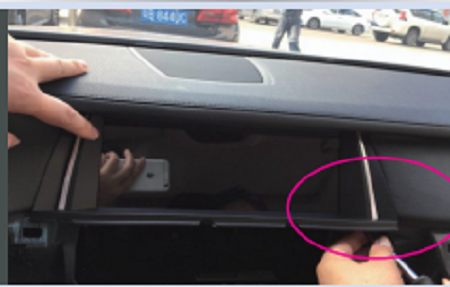
Step 1. Remove the panel with your hands,please use a plastic removal tool if necessary.

Step 2. Disconnect the connector at the back of the air vent.

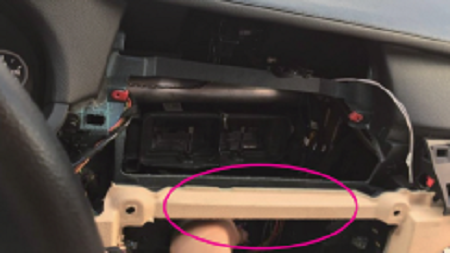
Step 3. Use a screwdriver to remove four screws that are holding the original car radio.

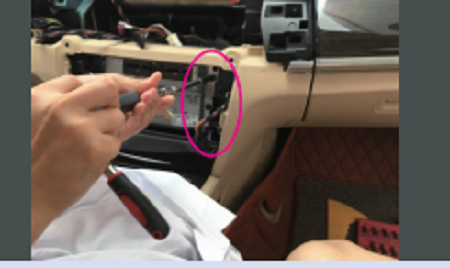
Step 4. Gently take out the original car radio from the dashboard.

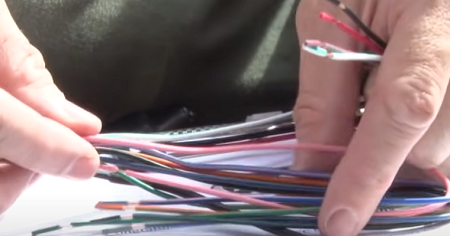
Step 5. Unplug the connectors and cables at the back of the original car radio.

Step 6. Check all the accessories for the new car radio.

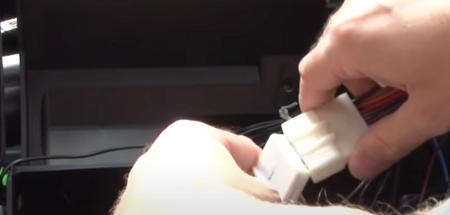
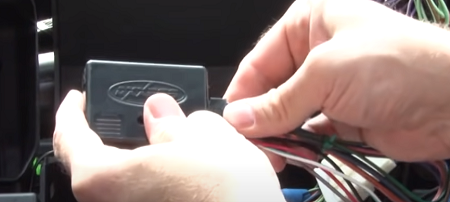
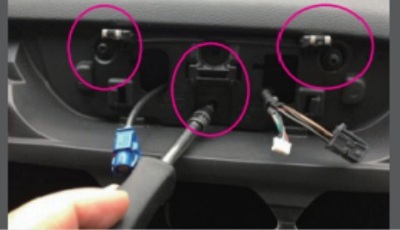
Step 7. Connect the harnesses to the back of the new Seicane car radio.

Step 8. Connect the car radio to your original car radio’s plugs.

Step 9. Put the new car radio into the dash.

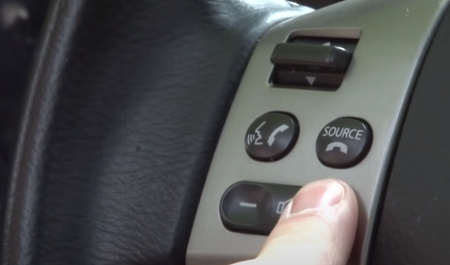
Step 10. Turn on the new car radio and have a comprehensive check if it works well.

Step 11. Install 4 screws back to their original position.

Step 12. Install the trim panel back to its original place.

After reading these steps, I believe you should be clear about how to install your new head unit in your Toyota vios, but don’t forget to test the functions after you complete the job. And if you think it is too hard for you , you can ask for a professional for help as he may give you technological support. One of the recommended way of solving your problem is to search the answers via Internet as there are full of variety of resources there and you can even download them without paying any money. Here I would like to share a link of Toyota Vios Aftermarket head unit from Seicane ,where you can find many car radios there. Some of the product here will have related tutorials available for everyone.

This unit is designed by 10.1 inch big screen and can support multiple functions including backup camera and Steering wheel control. During your driving trip, you can enjoy your favorite tv shows and listen to music from other countries. Plus, you can use car dvr to record every moment of your in-car life, take photos for front of vehicles and store the video in real-time while driving.

Moreover, it is operated by the latest Android 10.0 System and large memory, which will definitely offer you a smooth and stable performance. You can watch videos and make phone calls at the same time.

All in all, it deserves you to take a look now so don’t miss it anymore.

How to install Ford Edge Radio Navigation System with bluetooth Carplay easily?

Last week, my old radio has been broken, which make me have to install a new one to replace it. As the beginner of installing a new head unit by myself, it is definitely a rewarding project to record this difficult but interesting process. And what encourages me most is that I just spent less than 30 minutes to finish this job, saving money and time meanwhile. In order to make more people to know these easy steps and reduce their burden of replacement, the following article of Android Ford Edge Aftermarket Radio Replacement will take as a refer for someone who are in need.

Before installation, you should pay attention to some important tips. First of all, you can disconnect the battery and prepare some tools such as lever or a screwdriver before the removal and the installation. Secondly, you should keep all the separate parts from the car and take great care of the dashboard to avoid scratching it during its detachment and installation.

Last but not least, you should keep handy any parts from the car and make use of all the original screws from the car as much as possible so that each related part of the unit can be fixed securely.

2015-2018 Ford Edge Radio Installation Instruction

Step 1.Remove the trim using a dashboard removal trim.

Step 2.Remove all four 8mm bolts that hold the radio.

Step 3.Pull out the radio carefully so that you can access the cables on the back. 

Step 4.Disconnect the cables from the back. You will need to press small release tabs then pull them out.

Step 5.Install the new Ford Edge radio in reverse and Connect the wires on the back.   

Step 6. Push the radio all the way in.

Step 7.Fasten the four screws that hold the radio in place. 

Step 8.Reinstall the dashboard trim.

Until you finished these steps, you have basically complete this installation. But there are still some safety tips that you should know. The first one tip is that you can always wear gloves and safety glasses to protect yourself. Another one is to get wheel aliment alone every time you make changes to steering or suspension component.

And if you find you have make these jobs, you can check the functions of the new radio. No one can promise accurately that you won’t make any mistakes during this procedure, but you can try to reduce the problems as you wish. If you meet any difficulty when replace the stereo, you can ask for the car dealer for help, since they will offer you the good advice. Another useful way of solving this stuff is to search for answers from the website such as Seicane , which has made aftermarket unit for over 10 years. And here is a link of Ford Edge Stereo Replacement that you can visit, where the new product just come out recently.

It comes a vertical screen which is 9.7 inch in size, and it looks very glossy, plus an Android 10 system and 8-core CPU, certainly it must be operated very smooth and keeps stable performance.

If you want to know more information about the details, just click it now.

How to Install BMW X1 F48 navigaion GPS head unit in your car?

Definitely, it is lucky for those we own BMW as it has better function in the car but meanwhile it is also a challenge for those who have no knowledge about how to use it effectively. To increase some entertainment for our driving trip, installing a new head unit for BMW X1 F48 NBT system head unit is a good option as it is built in various function and maintain all original car’s function. But the difficult point lies on the steps of the whole installation process, which is why the following article has been written to take as a assistant tool for those we need help.

Before installation, you should pay attention to some important tips. First of all, you can disconnect the power and prepare some tools such as lever before the removal and the installation. Secondly, you should keep all the separate parts from the car and take great care of the dashboard to avoid scratching it during its detachment and installation.

Last but not least, you should keep handy any parts from the car and make use of all the original screws from the car as much as possible so that each related part of the unit can be fixed securely.

Installation guide of BMW X1 F48 2016-2017 NBT Radio

1.Lever button control assembly and Pull out it.

2.Disconnect the wiring and 2 connectors revealed.

3.Pry decoration trim and Unplug the wires here.

4.Take off 2 screws.

5.Pull out the frame of OEM screen and OEM screen.

6.Disconnect the wiring and Lever bottom panel of the screen.

7.Take off the panel and the 2 screws.

8.Pull out OEM head unit and Unplug the main power cable.

9.Lever the OEM buckle of fiber Optical and Unplug the fiber optical connector(if with OEM fiber optical).

10.Connect the unplugged fiber optical connector with new wiring (if with OEM fiber optical).

11.Install the CD unit and fix 2 screws.

12.Take off 4 metal buckles from OEM bottom panel and Put them on new bottom panel.

13.Install the new panel, then Connect the new wiring and original wiring to the new screen.

14.Install the new screen, then Fix 2 marked screws and Connect the wires.

15.Put the AC vent board back, then Connect wiring of the button assembly.

16.Install the assembly.

After reading the above steps, I believe you should have clear idea about how to upgrade your receiver, especially for those who decides to install it by themselves. As the first time to install the radio, you have to admit that you may probably meet some problems during this procedure. And you can search for help from your companion or go to the neighbor store to ask for the technology support, which will give you the quick response as long as you buy their service. If you think it is too hard for you to finish alone, you can visit some website from google and watch some relative tutorials. Here I would like to share a link of BMW X1 F48 Aftermarket stereo replacement, which has just new been released recently. And it has some installation videos and articles, which may help you in some degree.

One of powerful features of the product is it’s super easy to install, you just need to replace original car’s screen with this unit, no need to replace the whole radio system which takes many time as well needs some complicated steps.

It not only keeps all original car functions, but comes awesome features include original radio, DSP setting, supporting 4G network, ADH camera, OBDII and so on, adding more fun to your drive.

In a word, if you want to know more details about it, don’t wait to search the answer on our website and leave your comment there.

How to install a Steering Wheel Audio Control Adapter in your car?

Installing a new radio definitely can improve our driving life nowadays, However, sometimes when you install a new radio in your car, you will also lose the benefit of the handy controls built into the steering wheel.That’s because those are wired for the original stereo and you can’t just plug them into back of the new radio. To solve this problem, you can consider to install a special adapter by yourself, which will make those controls interface with the new stereo so that you can use them just like you did before. And the following overview of installing a Steering Wheel Control Adapter can take as the reference to help you to complete this task.

Before installation, you should pay attention to some important tips. First of all, you can disconnect the power and prepare some tools such as lever before the removal and the installation. Secondly, you should keep all the separate parts from the car and take great care of the dashboard to avoid scratching it during its detachment and installation.

Last but not least, you should keep handy any parts from the car and make use of all the original screws from the car as much as possible so that each related part of the unit can be fixed securely.

Installation Guide of Steering Wheel Control

Step 1: Popped off the top panel, then removed a couple of screws and pulled of the main dash panel exposing the radio.

Step 2:  Remove four more screws out from the side of the radio

Step 3: Open the wiring package and tape the wiring you need to use or cut them off

Step 4: Plug the black control cable and then connect one of those two brown wires to a wire on the back of your stereo.

Step 5: Use the Posi-Tap connectors to make all wiring connections between the adapter harness and your stereos.

Step 6:plug this stuff as shown back in.

Step 7: Plug our new adapter and wiring in this stuff as shown.

Step 8: Re-install your stereo and the adapter, then put the dash back together.

Step 9: Put the adapter out  through the bottom of the dash so you can see it.

Step 10: Programming the adapter by turning on the ignition first and then watch for the adapter to start flashing.

Step 11: hold down the volume button on the steering wheel and just wait as it run through its paces figuring out everything it needs to know.

Step 12: Wait until the adapter’s LED is stable (no longer flashing)

Once you’ve followed all these steps instruction above, you can test the buttons to make sure whether your radio and the adapter can work. If you still find it too difficult for you to finish it, you can ask for a professional to give you the proper advice. As far as I am concerned, I would like to search for Internet to find my answers as there are many free resources available here. And here I would like to share a link of wireless steering wheel controller, which can fit for most car DVD GPS Navigation System.

This controller, integrated with the features of steering wheel control and navigation remote control, is upgraded to be more advanced than ever before. It comes with soft buttons and supports wireless luminous steering wheel control.

If you want to know more details about Steering Wheel Control and its related product, please click and visit it at once!

Useful Installation Manual for BMW 7 Series F01 Head Unit with Carplay Android Auto

As the user of BMW, perhaps you have been familiar to take good care of your car as well as your collections, However, there is one decisive point that can play an important role in your driving life, which is the new head unit itself, bringing you pretty much fun during the driving experience. Therefore, many user of BMW would choose to upgrade their receiver for the high-vehicle car by themselves not only because it can save some budget but also it doesn’t take much time to complete it. Only a few people know exactly how to install their new touch screen and the following useful Installation guide of BMW 7 Series F01 Radio with Carplay Android Auto would definitely give you help and anyone without experience can take it as good reference.

Before installation, you should pay attention to some important tips. First of all, you can disconnect the power and prepare some tools such as lever before the removal and the installation. Secondly, you should keep all the separate parts from the car and take great care of the dashboard to avoid scratching it during its detachment and installation.

Last but not least, you should keep handy any parts from the car and make use of all the original screws from the car as much as possible so that each related part of the unit can be fixed securely.

Useful Installation of Navigation System for BMW 7 Series 2009-2012

1.Lever air outlet panel from the both right and the left sides.

2.Disconnect the wiring and take off the screws on both sides.

3.Pull out the frame of OEM screen and disconnect the wiring of the OEM screen.

4.Take off the screws on the both sides.

5.Lever AC panel from the left and to the right.

6.Unplug the connectors on the left side and take off the connectors on the right side.

7.Take off the screws on the both sides.

8.Pull out OEM head unit and Unplug the main power cable.

9.Unplug the fiber optical connector and connect the unplugged fiber optical connector with new wiring.

10.Connect OEM male connector with new female connector.

11.Connected the wiring behind the original radio.

12.Adjust all connectors and place them right.

13.Install the CD unit and fix the screws.

14.Plug the new wires of speakers on the screen and connect LVDS connectors.

15..Install the new screen and fix the screw on the both sides.

16.Connect all the cables and put the AC vent board back.

17.Fix the 2 screws and the AC panel.

Until now you should have been clear about how to replace your car audio in your BMW 7 Series and don’t forget to check the functions of your radios and see whether it can perform as the original one as well. If you have any doubt during this procedure, you should ask for a professional for help as they will give you the proper advice at once or you can go to the online service and buy it at your cost . As far as I am concerned, I would like to recommend one of the famous brand—Seicane,  which has been making Android  units over ten years in China, its new product of BMW 7 Series Installation can give you wonderful entertainment in your car.

There are two configurations you can opt for, one is with 4-core CPU, 2GB+32GB, 30EQ DSP; another is with 8-core CPU, 4GB+64GB, 16 EQ DSP, both are Android 10.0 system and can offer stable performance, just buy at your budget.

On the whole, don’t miss this chance if you love it and you will find more surprise than you can imagine !

How to upgrade 2012-2015 Ford Focus Android Units conveniently?

As we all know, a large touchscreen radio system adds value to our cars as well as improves our in-car life. When we are bored in a long drive, we can use the radio system to enjoy songs, videos. For those who can’t park car easily, with the help of clear rear images shown by the big radio screen, they will park the car easier than before. However, not every car comes with such amazing radio system, if your factory radio can’t do these, it’s high time for you to upgrade it. Upgrading the whole radio system sometimes will be a very difficult job, but if you are the owner of Ford Focus, there is a super easy way to upgrade your radio, that is to install an Android radio screen.

Before installation, you should pay attention to some important tips. First of all, you can disconnect the power and prepare some tools such as lever or a screwdriver before the removal and the installation. Secondly, you should keep all the separate parts from the car and take great care of the dashboard to avoid scratching it during its detachment and installation.

Last but not least, you should keep handy any parts from the car and make use of all the original screws from the car as much as possible so that each related part of the unit can be fixed securely.

2012-2015 Ford Focus Radio Installation Instruction

Step 1.Remove one bar under the radio with a plastic removal tool.

Step 2.Remove two screws that fixed the trim panel.

Step 3.Gently take out the trim panel.

Step 4.Remove screws fixed the radio.

Step 5.Pull out the original car radio.

Step 6.Unplug the connectors at the back of the car radio.

Step 7.Check all the accessories for the new stereo.

Step 8.Connect the harnesses to the back of the new audio.

Step 9.Connect the new car touch screen to your original radio’s plugs.

Step 10.Turn on the new car radio to have a careful check if everything works well. If it doesn’t, please check whether all the cables are connected correctly.

Step 11.Put the new unit into the dash and everything into their original place.

As the beginner, if you don’t have any idea about how to install your new radios, I believe you will learn a lot by these 11 steps above. After finishing it, please check all of the wires has been connected and all of the functions can be perform as well. If you meet some difficulties during this procedure, you can consult for a professional for help or search the tutorials from the websites. And there are some websites I would like to share with you , particularly for those who has purpose to buy some car audios online, Seicane always offer the fastest and safest service online and provide good package for many customers. Recently , the new double din dedicated Radio for 2012-2015 Ford Focus vehicles just been released and appeal to much attention at the same time. If you want to find a product to replace your original one, this one would be a good choice for you .

Equipped with an Android 10.0 system, 8-core CPU, being able to keep smooth operation and stable performance. If you want a Tesla style radio, this unit would be best choice, you can get it at affordable price within $250.

The fact is that an upgraded car radio helps improve our driving experience and no matter what’s your reason, you are always benefited from our car radios. Don’t hesitate to contact us whenever you need, just visit our pages and you will find many interesting receivers that meet your need.

How to replace the Radio in your BMW 5 Series?

In your BMW, the radio may no longer work if you’ve had the vehicle for a long time. While BMW makes high-quality automobiles, sometimes the radio receivers are the low-end versions of popular models. Once you’ve opted your new radio, you’ll need to know how to install it. Luckily, changing the radio will only take you just for not long time. And Here is the helpful installation guide of navigation system for BMW 5 Series 2013-2016 Stereo,hope anyone in need can take it as the reference.

Before installation, you should pay attention to some important tips. First of all, you can disconnect the power and prepare some tools such as lever before the removal and the installation. Secondly, you should keep all the separate parts from the car and take great care of the dashboard to avoid scratching it during its detachment and installation.

Last but not least, you should keep handy any parts from the car and make use of all the original screws from the car as much as possible so that each related part of the unit can be fixed securely.

Installation Instruction of Navigation for BMW Series 5 2013-2016

1.Lever air outlet panel from the both sides.

2.Pull out the whole AC panel and Disconnect the wiring.

3.Take off the right and the left bottom screws.

4.Pull out the frame of OEM screen.

5.Disconnect the wiring and take off the panel of the OEM screen.

6.Take off the screw on both sides.

7.Pry up panel and Unplug the two connectors on the back.

8..Take off the screw on both sides.

9.Pull out OEM head unit and Unplug the main power cable. 

10.Unplug the fiber optical connector (if with OEM fiber optical).

11.Connect the unplugged fiber optical connector with new wiring(if with OEM fiber optical).

12.Connect OEM male connector with new female connector.

13.Connected the wiring behind the original radio, then install the CD unit and fix the right side screws.

14.Fix the screw on the left side and Install the button assembly.

15.Connect the new wiring to new screen and Install the new frame.

16.Fix the 2 screws, then Connect the wires and put the AC vent board back.

After you finished the installation procedure, you can test the original car’s functions and see whether it can work well. As far as I am concerned, I would like to choose some optional function and check whether it can have good performance. But if you meet any problems during this process, you can ask for an experienced technician to help you to solve this tough task. And if you still find it too difficult for you to complete it, I want to recommend you to use the internet to search your answer such as Seicane, which has just new released a product of BMW 5 Series for 2013-2016 , and this new unit has got many customer’s attention since it has come out.

Made with a 10.25” IPS touchscreen, not only can you check information at a best view, but you can operate the product very conveniently. Since it only exchanges your original car TFT monitor, all original car functions are kept as before.

Being compatible with original camera and external camera is one of powerful functions of this unit. Moreover, the big screen shows super clear rear images to help you reverse and park the car safely.

To conclusion, if you really like it, please don’t hesitate to visit it now !

Efficient Installation Instruction for BMW Series 3 2013-2016 Stereo Navigation System with Bluetooth Carplay

Suppose you are driving the car on the highway, it is the best choice to set up a stereo navigation system as it can provide the best services including bluetooth, wifi and other various function. For the owner of BMW, there’s nothing better than installing a radio on their own as the consideration of budget. But for those who never have the installation experience before, what is the most efficient way to install their new car stereo in BMW? To solve this problem, maybe they can read the following detailed installation instruction of BMW Series 3 2013-2016 Stereo Navigation System as a reference.

Before installation, you should pay attention to some important tips. First of all, you can disconnect the power and prepare some tools such as lever before the removal and the installation. Secondly, you should keep all the separate parts from the car and take great care of the dashboard to avoid scratching it during its detachment and installation.

Last but not least, you should keep handy any parts from the car and make use of all the original screws from the car as much as possible so that each related part of the unit can be fixed securely.

Installation Instruction of Navigation for BMW Series 3 2013-2016

1.Lever decoration panel from the right side to the left.

2.Disconnect the 2 wires as shown and Lever the bottom decoration cover.

3.Pull the cover out and disconnect the wire.

4.Take off 4 marked screws, pull out the button assembly and put it aside.

5.Take off 4 marked screws on head unit and pull out the head unit.

6.Take off 2 screws as reveal and pull out the screen, unplug the wiring.

7.Pick up buckle of the cable and pull the main cable out.

8.Lever the OEM buckle of fiber optical (if with OEM fiber optical) and Unplug the fiber optical connector from OEM cable.

9.Connect the unplugged fiber optical connector with new wiring(if with OEM fiber optical) and check the connection.

10.Connect OEM male connector with new female connector and the new wiring with the back of original radio.

11.Adjust the place of all wiring and put the head unit back.

12.Connect new cable and OEM LVDS connector with new screen.

13.Fix the new screen and 2 screws at the bottom as well as the screws of head unit.

14.Fix 4 screws as revealed and put the AC vent assembly back.

15.Install the bottom decoration cover.

Once the installation finished, you can check if the new stereo can be used as normal. As long as you follow the correct steps above, you will definitely be on the right path of the installation of car radio. But if you still find some problems during these steps, you can ask a professional for help or consult your car dealer. And the easiest way is to search the answer from the website as there are dozens of tutorials including videos and other detailed information guide, especially the website from Seicane which covers a wide range of Stereos for different car brands and even installation steps about them. Here is a link of the related product of 2013-2016 BMW 3 Series Radio.

Unlike the other stereos, this one can support original all functions including music, videos, phone calls as well as the backup camera. What’s more , it can adjust song with different tones and offer you various sense of sound during your driving way as it has 16EQ DSP tuning systems inside.

Besides, with 10.25 inch IPS screen, this unit looks very exquisite. Its screen feels very smooth and flawless. Just enjoy a visual feast on this 1280*480 resolution unit. And only exchange your original car TFT monitor,and it is easy to install. No Gap, OEM Style. More over, The are some outstanding functional features inside the radio including the stable and fast CPU, the large storage capacity as well as the latest Android 10.0 system.

All in all, if you really like it, it’s never too late to buy it and go for it now !

Brief Installation Manual of 2012-2018 Mercedes-Benz B-Class Stereo Navigation System with Bluetooth Carplay

Nowadays, car stereo has become the most modern way to interact your car with radio navigation system. And more and more people prefer to choose install the car stereo on their own instead of buying services as before. Apparently it is more convenient for people to install a new car stereo by themselves as there are supply of resources online. Suppose you are the owner of Mercedes-Benz B-Class, what is the plan of your installation of your car stereo ? Perhaps you can read the following brief installation manual of 2012-2018 Mercedes-Benz B-Class Stereo Navigation System with Bluetooth Carplay as the reference.

Before installation, you should pay attention to some important tips. First of all, you can disconnect the power and prepare some tools such as lever when you start the removal. Secondly, you should keep all the separate parts from the car and take great care of the dashboard to avoid scratching it during its detachment and installation.

Last but not least, you should keep handy any parts from the car and make use of all the original screws from the car as much as possible so that each related part of the unit can be fixed securely.

Installation Manual of Mercedes-Benz 2012-2018 B-Class Stereo 

Step 1: Lever the cover and Remove the screws.

Step 2: Pull out the display panel and remove the wires.

Step3: Lever vent hood on both left and right sides,then notice 4 buckles’ positions of the vent hood. 

Step 4: Remove the screws on the left vent hood and Lever the large panel from the right side.

Step 5: Lever the large panel to the left side and Take off the screws.

Step 6: Pull out the head unit and disconnect the wires.

Step 7: Take off 3 screws and the bracket of the original car screen.

Step 8: Get the new wire go through hole

on the left side.

Step9: Connect the original wire with the new wire and Plug the new wire into the head unit.

Step10: Install the head unit and fix 2 screws.

Step 11: Plug the LVDS wire.

Step 12: Install the large panel and the special screen holder.

Step 13: Fix the screws and Plug in the wires.

Step 14: Install the vent hood ,the screen and fix 2 screws.

After reading the above steps, I believe you should have the basic structure of installation plan. Even for those who almost have no experience before should have enough confidence that it will never be the problem if you start to read the installation guide from now. However if you still have some problems during the procedure, you can ask a professional for help or consult your car dealer who can offer the excellent advice to you.

Besides, you can also search more detailed information from the Internet. And here I would like to share a link of Mercedes-Benz 2012-2018 B-Class Radio from Seicane.  

Built-in 16EQ DSP tuning systems, it can adjust song with different tones and offer you various sense of sound during your driving way. Besides, it is the safest way for you to use phone while driving your car as it supports Carplay. With high CPU and large storage, not only can it offer smooth operation, but also it can offer stable performance.

Moreover, one of the outstanding function is that it supports 4G network which means you can enjoy online entertainment whenever you are driving.And it can also support the computer information display of the original car, highly analyze the original car protocol, support multi-functional steering wheel control, etc.

In a word, if you like this stereo ,don’t hesitate to buy this wonderful product at this moment !

How to remove and install a new Car Radio in the 2016 HONDA CIVIC Car?

2016 HONDA CIVIC Car Radio after installation

With the development of economy, there ‘s nothing difficult about buying a car stereo from website or other places nowadays, but the question of exactly how hard it is depends on whether it can help you to save some budget on replacing your factory radio and other fees. Therefore, more and more people choose to install the car stereo on their own to solve this problem. If you are thinking about the quick ways to finish this installation, you’d better read some related installation instruction to help you upgrade your in-car life. Here is a 2016 HONDA CIVIC car radio installation guide from Seicane. I would like to recommend it to you that you can refer to this guide carefully.

2016 HONDA CIVIC Car Radio after installation

Some tips before the installation:

1.Please disconnect the power before the installation.

2.Please prepare a lever and a screwdriver before the removal and the installation.

3.Please keep all the separate parts from the car. Please take great care of the dashboard to avoid scratching it during its detachment and installation. Please keep handy any parts from the car and make use of all the original screws from the car as much as possible. so each related part of the unit can be fixed securely.

2016 HONDA CIVIC car radio installation guide

1. Use a flat head plastic removal tool to pry the trim panels.

Use a flat head plastic removal tool to pry the trim panels

2. Remove the armrest cusion if necessary.

Remove the armrest cusion if necessary

3. Remove the trim panels.

Remove the trim panels

3-1
3-1

4. Carefully pull out the Aircon panel which is held by clips. And then disconnect the connector.

Carefully pull out the Aircon panel which is held by clips. And then disconnect the connector

5. Unscrew two bottom screws with a screwdriver.

Unscrew two bottom screws with a screwdriver

6. Disconnect the 2 connectors (Blue & Grey).

7. The car radio bracket is held by clips. Pull out the original car radio carefully.

The car radio bracket is held by clips. Pull out the original car radio carefully

8. Release the clamps that hold the wire harness.

Release the clamps that hold the wire harness

9. Disconnect the connectors at the back of the original car radio.

Disconnect the connectors at the back of the original car radio

10. Check all the accessories for the new Seicane car radio.

11. Connect the harnesses to the back of the new Seicane car radio.

12. Connect the Seicane car radio to your original radio’s plugs.

13. Turn on the new Seicane car radio to have a careful check if everything works well. If it doesn’t, please check whether all the cables are connected correctly.

14. Put the new Seicane car radio into the dash.

15. Put everything into their original place. All the installation is done.

After reading this installation guide, perhaps it is not difficult for you to install and replace a new car radio by yourself anymore. And there are many online guides and companies that provide comprehensive installation services. If you still have questions, you can ask them for help or you can consult your car dealer. Here is a recommended online link of  2016 HONDA CIVIC car radio from Seicane. You can check more details from it.

Loaded with the Latest Android 10.0 Operation system and siri microphone voice control, it provides you the best feeling when you driving on your ways. Built-in WiFi module, supports to connect WiFi hotspots to surfing internet. It can also support 3G&4G internet, require to buy external android compatible 3G&4G USB modem and insert internet SIM card from your local telecom carrier. You will enjoy a high speed entertainment during your driving journey.

Moreover, there are many optional functions are provided to the services including DVR which can record video only to storage in GPS slot card or USB storage,rear view camera which supports RCA AV connector type rear view camera signal input, automatically switch to parking image when reversing gear engaged.

Never miss this chance and you will own what you can cherish in your car life now !