How to upgrade your car radio for 2003-2012 Toyota Corolla E120 BYD F3 ?

How to upgrade your car radio for 2003-2012 Toyota Corolla E120 BYD F3 ?

As we know,the car can service us for many years since we got it.At the same time,we’re facing some kinds of disadvantages from old model cars such as no advanced GPS system,no DVD player,no latest Android and no touchable screen,etc.That’s the reason i write down this article which related to the Car GPS Navigation removal and installation for 2003-2012 Toyota Corolla E120 BYD F3. The upgraded car head unit will bring us lots of entertainments and convenience.

Precautions:

  1. Please apply the parking brake and remove the negative cable on the vehicle battery before the removal to ensure safety.
  2. A lever and a screwdriver need to be prepared before the installation.


The car GPS Navigation removal and installation for 2003-2012 Toyota Corolla E120 BYD F3.

Step 1 : Remove the dashboard and disconnect the connectors.

1-1
1-2
1-3
1-4
1-5

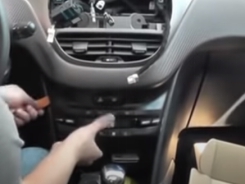
Step 2 : Use removal tool to take the A/C console gently and unplug the cables backwards.

2-1
2-2

Step 3 : Connect the marked red cable to rearview camera cable.

The Rearview camera cable is Optional selection, Please check link below for details:

https://www.seicane.com/ahd-night-vision-rearview-camera-waterproof-parking-assistance-system-for-car-radio-big-screen-sc92

Step 4 : Off the Door trim strip and A cylindrical panel.

Step 5 : Tap the GPS cable in proper place and get it out of A/C console position through inner way.

5-1
5-2

Step 6 : Place back the Door trim strip and A cylindrical panel well.

Step 7 : Carefully make the antennas and cables connected step by step as installation instructions

show. 

Step 8 : Put the new head unit into the dash and hold it in trim panel with screws.

Step 9 : Follow steps 1-2 in reverse order to install back the remaining parts.

Step 10 : Check if everything is going well with your car.


Hope this article helps you a lot with the installation for 2003-2012 Toyota Corolla E120 BYD F3.If you still have problem about it, please feel free to contact a dealer or professional for support. Surely you can check the link below for more information: https://www.seicane.com/hd-touchscreen-radio-android-gps-navegac-o-para-2006-2012-toyota-corola-e120-byd-f3-com-bluetooth-music-usb-audio-aux-wi-fi-mirror-link-volante-control-s6934g

This 2003-2012 Toyota Corolla E120 BYD F3 GPS Navigation comes with the latest Android Radio, RAM 4GB \ ROM 64GB \ CPU 8-core \ Built-in Carplay \ 2.5D IPS Screen, Support RDS, SWC, XM radio APP,support Split Screen Display etc. It replaces your factory radio with android based system of great utility and extendability. You can download any applications in the android market for access to games, Skype, MSN, YouTube, twitter, E-Book, G-mail etc. This system also supports installation or removal of apps on RAM or SD optionally. With this car radio you will have a various ways to enjoy your driving with friends and family.


The steps of removal and installation introduction for 2014 Peugeot 2008 Car Stereo

For new generations,its a little bit hard to afford a car if they just graduate from campuses. That’s why they prefer to select the car brand with high effectiveness-cost. The 2014 Peugeot 2008 is the recommended car brand which is affordable,modern,suitable to become the transport vehicle for new members of society. To have a upgraded car radio is smart way to have much fun during the on/off business ways but also lots of entertainments for trips. This article is about the removal and installation introduction for 2014 Peugeot 2008 Car Radio.


Important Tips:

1.Please park your car well and unplug the negative power cable to avoid any danger before you start up any work.

2.Please make sure that all fastened wires are isolated with electrical tape.

3.Please make sure the ignition is off to avoid short circuit.


The steps of removal and installation introduction for 2014 Peugeot 2008 Car Stereo.

1st step: Remove the panel with plastic removal tool (1-1) and unplug the connectors back of it (1-2).

1-1
1-1
1-2
1-2

2nd step : Take the head unit out (2-1) and disconnect the connectors backwards (2-2).

2-1
2-1
2-2
2-2

3rd step : Off the screws with screwdriver (3-1) and remove the frame(3-2).

3-1
3-1
3-2
3-2

4th step : Pull the harness gently towards your side as picture show and put it aside.

4-1
4-1
4-2
4-2
4-3
4-3

5th step : Remove the A/C console (5-1) and unplug the connectors (5-2).

5-1
5-1
5-2
5-2

6th step : Follow the steps 5-1 in reverse order to replace a new car radio.

7th step : Check if the everything of the car radio is going well.


Hope this article helps you a lot with the installation for 2014 Peugeot 2008 DVD Player .If you still have problem about it, please feel free to contact a dealer or professional for support. Surely you can check the link below for more information: https://www.seicane.com/for-2014-peugeot-2008-radio-android-hd-touchscreen-with-aux-bluetooth-gps-navigation-system-carplay-support-1080p-video-h2590

This 2014 Peugeot 2008 GPS Navigation  comes with the latest Android Radio, RAM 4GB \ ROM 64GB \ CPU 8-core \ Built-in Carplay \ 2.5D IPS Screen, Support RDS, SWC, XM radio APP,support Picture in Picture / Split Screen Display etc. The car stereo is equipped with worldwide real-time navigation function of high accuracy. With current location, speed, mileage, landmark building display, 3D street view, destination search and turn-by-turn voice directions, it will be your perfect road companion.

https://www.seicane.com/android-gps-navegac-o-radio-para-2014-2016-peugeot-2008-com-hd-touchscreen-bluetooth-usb-wi-fi-aux-suporte-carplay-swc-tpms-h6270

Above 2014-2016 Peugeot 2008 car stereo comes with RAM 2GB \ ROM 32GB \ CPU Quad-core \ Plug and play \ Support RDS, SWC,Carplay Android Auto Support,support Picture in Picture / Split Screen Display etc. Certainly this one will also fit for your car if related car brand and bring you lots of enjoyable time with driving.

Sharing 2003+ VW Volkswagen Golf GTI MK6 GPS Navigation installation and removal guide

Sharing 2003+ VW Volkswagen Golf GTI MK6 GPS Navigation installation and removal guide

2003+ VW Volkswagen Golf GTI MK6 GPS Navigation installation and removal guide


More and more people wanna own a car to have wonderful time with friends or families during trips and holidays because of living life improvements.As a result, its important and prior solution that people would like to get a upgraded and multifunctional car radio. With experience of car stereo installation and removal for 2003+ VW Volkswagen Golf GTI MK6, i am pleasant to share all you guys the process details about it.

First of all, please note:

1.Please park the car in safe area and remove the negative cable on the vehicle battery before the removal.

2.A lever and a screwdriver need to be prepared before the installation.

3.Put things aside well to avoid to have negative impact for later operation.


2003+ VW Volkswagen Golf GTI MK6 GPS Navigation installation and removal guide

1.Use a lever to pry along the plastic panel and remove the dashboard.

1-1
1-1

1-2                                                                      1-2
2.Remove the screws holding the radio in placewith a screwdriver.


3.Take the factory radio out of the dashboardand Unplug the back connectors of the a/c control unit.


4.Make the new head unit connectors backwards and the factory harness antennas and cables connected step by step as instructions show.(Please note the image 4-1 and 4-2)

4-1
4-1
4-2
4-2
4-3
4-3

5.Put the new Seicane unit into your dashboard and check whether your connections are correct, once it’s done, you’d better to have a tidy for the cables.


6.Check if the new Seicane unit is working well.

This touchscreen entertainment system features a built-in navigation system to guide you to those hard-to-find locations. In addition, the auxiliary input along with USB ports can provide a wide variety of input options. This DVD player can support steering wheel control,air condition system information,vehicle setting information display, and also the car parking system and original car camera. If you are interested,please check the link below for more information:

https://www.seicane.com/en/aftermarket-oem-autoradio-gps-estereo-para-2003-2011-vw-volkswagen-scirocco-golfe-polo-passat-jetta-tiguan-touran-sharan-sagitario-cadaver-cupra-assento-toledo-leon-alhambra-com-hd-touch-screen-obd-espelho-radio-dvd-player-s12840

This 2003+ VW Volkswagen Golf GTI MK6 DVD Player comes with the latest Android Radio, RAM 4GB \ ROM 64GB \ CPU 8-core \ Build-in Carplay \ 2.5D IPS Screen, Support RDS, SWC, XM radio APP etc. You can still keep the steering wheel control working perfectly after the installation of this fantastic stereo.


Meanwhile you also can check another link as following with little different parameters but still match car radio 2003+ VW Volkswagen Golf GTI MK6.

https://www.seicane.com/android-hd-1024-600-touch-screen-radio-for-2010-2011-vw-volkswagen-amarok-with-gps-navigation-wifi-bluetooth-music-mirror-link-steering-wheel-control-1080p-video-s129698e

Above 2003+ VW Volkswagen Golf GTI MK6 car stereo comes with RAM 2GB \ ROM 32GB \ CPU Quad-core \ Plug and play \ Support RDS, SWC,Carplay Android Auto Support etc. Certainly this one will works for your car and bring you joyful time with driving.