
If you cannot wait to enjoy a more convenient and enjoyable in-car environment in your car, it will be a wise choice for you to install a new aftermarket car radio to replace your factory radio. With such an idea car radio installed in your car, you will get access to GPS navigation, Bluetooth hands-free phone calls, Bluetooth streaming music, FM/AM radio, etc. While for the installation, you can either go to a car radio upgrade center or turn to a professional technician for help. The following is a 2006 2007 2008 2009 2010-2012 Suzuki SX4 car radio installation guide from Seicane, you refer to it if you own the same or similar dashboard.
Precautions for this installation:
1. Before you start up any work, park your car well and unplug the negative power cable to avoid any danger.
2. Please make sure that all fastened wires are isolated with electrical tape.
3. Please make sure the ignition is off to avoid short circuit.
4. For your convenience, here’s the recommended tools for removal and installation from Seicane, please check for more details: http://www.seicane.com/car-dvd-dismantling-device-srd-400
2006 2007 2008 2009 2010-2012 Suzuki SX4 car radio installation guide
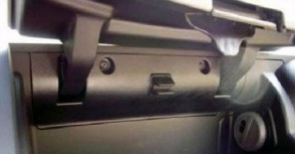
1. The original car radio.

2. Remove two side panels.

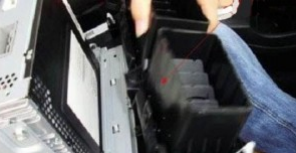
3. Remove four screws that are holding the radio.

4. Gently pull out the original radio.

5. Disconnect the connectors and cables at the back of the radio.
6. Check all the accessories for the new Seicane car radio.

7. Connect the harnesses to the back of the new Seicane car radio.

8. Connect the Seicane car radio to your original radio’s plugs.
9. Turn on the new Seicane car radio to have a careful check if everything works well. If it doesn’t, please check whether all the cables are connected correctly.
10. Put the new Seicane car radio into the dash.
11. Put everything into their original place. All the installation is done.
Now do you have a general understanding of the installation process about a 2006 2007 2008 2009-2012 Suzuki SX4 car radio? If you haven’t had any ideas, you can contact your dealer, communicate with someone experienced or turn to a professional for help. If you still think it hard to install the new car radio, you can directly arrange a professional technician to help you install the new car radio. And since it is very crucial for you to select an ideal car radio for your beloved car. If you don’t know which kind of car radio can fit your car well, you can refer to the following link which is a remarkable 2006 2007 2008 2009-2012 Suzuki SX4 car radio from Seicane. For more details, please click:
With the assistance of the worldwide real-time GPS navigation system of high accuracy, this car radio enables you to know your current location and find the right way to reach your desired destinations accurately even if you don’t have good sense of directions. And thanks to this unit’s dual zone function, this unit enables you to listen to your favorite music while navigating.
Besides, through the wireless Bluetooth connection between your Bluetooth-enabled mobile phone and this car radio, you can able to dial, answer, reject and mute Bluetooth hands-free phone calls as well as listen to your favorite music streaming from your phone music playlists.
What’s more, you can also add a rear view camera to this unit for automatically switching to the parking image while reversing, which can help you gain a safe driving experience to some extent.
Wish you like this unit and good luck to you!


Recent Comments