With fast process of the modern society, all walks of life face with fierce competition and change within one second. Take car industry for instance, Benz is also struggling for a long period of time and widely known all over the world in this century. Under the hard workings of Gottlieb Daimler and Carl Friedrich Benz, this gorgeous brand car has dazzled so many car lovers. An excellent car is not only its appearance, but also the internal structure, so a super DVD player GPS navigation system is necessary for its perfect. Today we will talk about Mercedes-Benz GLK X204 DVD player with GPS navigation system.At first,let us know that what is Mercedes-Benz GLK X204 DVD player looks like.
Mercedes-Benz GLK X204 DVD player.
Mercedes-Benz GLK X204 DVD player
Mercedes-Benz GLK X204 dvd player accessories.
Mercedes-Benz GLK X204 dvd player accessories
This video below will tell you how to use it:
Easy to install and convenient for operation, this Benz DVD Player is specially designed for your beautiful life. Except for the ordinary functions that other Mercedes-Benz DVD players can offer, like music, movies, pictures, etc. Mercedes-Benz GLK X204 DVD player with GPS navigation system has been added with more features. 7 inch high definition digital screen make it possible to get the most ideal picture quality every time. Smart volume with compact designs, it comes with fashionable menu and option buttons which are well-placed and responsive for convenience and ergonomic precision.To know more about it,you can visit: http://www.seicane.com/mercedes-benz-glk-x204-dvd-player-with-gps-navigation-radio-bluetooth-ipod-srd-8809 Stock enough products here, you have a good chance to find out the perfect one for your car life. Reasonable price and fast shipping have been our secret weapons to success. We do business world widely, wherever you are, if you want, just click the mouse to , all members here solve your problem immediately.
The use of Volkswagen Crafter dvd player is great.But you might end up with some complicated headaches on how to choose the dvd player for Volkswagen Crafter with GPS radio TV bluetooth. As a new concept of automotive electronic equipment,car navigation GPS equipment can provide a lot of convenience to vehicle owners in geographic information services, urban navigation and car excursion, etc.GPS car navigation systems have become a popular tool for assisted living, or even a necessity in Europe, Japan and other countries.At present,GPS car navigation products are no longer a minority professionals and explorers in the hands of the “fever” class equipment.Consumers are often in a “smattering” state when purchasing this type of high-tech products.At first,let us witness Volkswagen Crafterdvd player’s style:
Volkswagen Crafter dvd player.
Volkswagen Crafter dvd player
Volkswagen Crafter dvd player built-in GPS navigation system.
Volkswagen Crafter dvd player built-in GPS navigation system
Then we will learn some ways to choose the dvd player with gps navigation system.
Methods / steps:
1.Origin of the electronic map shall be authentic.Electronic map is the core and fundamental part in navigation application.Regular GPS navigation electronic map products must have national certification of specialized agencies.We can say that using authenticated electronic maps is equal to buy an “insurance” for user’s own travel tantamount.We also need test the amount of electronic map connotation after examining the source of the electronic map.
2.Product performance to differ materially.Currently, car navigation products for storing electronic map data and other related information in the mainstream media are mainly CF card, SD card and CD-ROM.When driving cars, due to the impact of external factors such as road conditions, it is easy to scratch the disc, resulting in an accurate map information can not be read.And with CF card, SD card navigation products for the media card slot design, high stability, so good seismic performance.So it is more accepted by users.In addition,a good GPS car navigation device should also have functions of satellite navigation and positioning,intelligent route planning,voice prompts throughout,a variety of ways to find information,route recording,stored waypoints and so on.Here is a video about how to use Volkswagen Crafter dvd player with GPS radio TV bluetooth:
Certainly,best for you is the best.Not the most expensive one.If you want to learn more about how to choose the dvd player for Volkswagen Crafter with GPS radio TV bluetooth,you can contact with us any time you feel free.Or you can visit: http://www.seicane.com/car-dvd-player-for-volkswagen-crafter-with-gps-radio-tv-bluetooth-srd-8822-5 We have the best service among peer.We will welcom you to ask more questions.At last,having a enjoyable driving journey.
A trend in electronics is increasingly simple operation.Clicking on the screen even a few buttons can help you accomplish what you want to set.However,simple operation does not mean you can slack treat.A little on the dim sum for daily using and maintenance can greatly extend the life of gps navigation.What should we notice on maintenance?Maybe you never realized that before. Following is the answer:How to care for Mercedes-Benz CLS-W219 DVD player GPS navigation system to make it last longer.At first,we will several pictures of Mercedes-Benz CLS-W219 which having installed a DVD player GPS navigation system.
1.Following such a shutdown sequence after using it:Turn off the page first.Then shut down.Finally, unplug.Some owners pull the plug directly after running it just for convenience.And they never turned off the system.This is a easy way,but it is easy to damage the electronic components over time.
2.The best to charge about 10 hours the first three times when using the machine so that the battery storage capacity to maximize out.
3.First starting the car,the cigarette lighter power plug latter.
4.Do not allow navigation screen contact with sharp objects.
5.Do not let portable navigation stay in the sun for a long time.The temperature difference affects not only navigation’s battery life but also the touch sensitive of LCD screen.
To know something about how to use it,you can see the video below:
Electronic products are things full of magic.But they are also Vulnerable. So how to care for Mercedes-Benz CLS-W219 DVD player GPS navigation system to make it last longer is especially important.Those are a little part of it above.If you are interested in Mercedes-Benz CLS-W219 DVD player GPS navigation system you can visit: http://www.seicane.com/car-dvd-player-for-mercedes-benz-cls-w219-with-gps-radio-tv-bluetooth-srd-8797-1 You can contact us any time you are convinent.No matter whether you want to get one or just knowing about it,we will provide the best service for you.
Alfa Romeo is a very attractive car.The installation of in-car navigation is icing on the cake for it.There may be some new gps navigation one machine users do not know how to upgrade vehicle system despite depending on it.Don’t worry,here collect several ways to upgrade Alfa Romeo Spider/159/Brera/159 Sportwagon dvd player gps navigation systems.Showing the original Alfa Romeo’s CD and DVD:
Here is one video about how to use Alfa Romeo Spider dvd player gps navigation system.
There are several ways to upgrade Alfa Romeo Spider/159/Brera/159 Sportwagon DVD player gps navigation systems below:
Methods / steps:
1.Where to go, where to buy upgrades.This upgrade method is relatively time-consuming, more trouble.If you buy a car navigation downstairs in your home, then this method is very useful.
2.Many car navigation manufacturers in order to retain the user to open a web self-service upgrades.This method is relatively fast.But the premise is that you are able to use it.Of course, your car navigation one machine must be genuine products.
3.Online upgrade method.This upgrade method requires the user to a better understanding of your in-car navigation.Because you have to set some com port,baud rate and stuff when upgrading.Of course there are some navigation systems have a key buttons to upgrade it.
4.Download a pirated system to upgrade it.Not recommended.
As we all know,dvd palyer has bring great changes and entertainment to people who have cars.Maybe many owns have enjoyed from it.But you really have experienced all its functions?If not,joining us and you will learn that there are so many Powerful features we didn’t have made full use of it.You are lucky to be a reader of this article:What should we know about Audi DVD player for A6 S6 RS6 with gps radio tv bluetooth?Follow me please,and we will find some interesting things about Audi dvd player.
At first,let us know about the big family members of dvd player for Audi A6 S6 RS6.
Audi A6 S6 RS6 dvd player accessories
High definition is the basic feature it brings us.It’s necessary to keep the touch screen clear especially when we are driving a car.Not only we can relax our eyes,but also can it reduce the rate of the traffic accidents.Just a small feature will make us stay away from dangerous.Let’s appreciate its total effect:
After installation for Audi A6 S6 RS6
There is one video about how to use it.After watching this video,you will operate your Audi dvd player more expertly.
The dvd player for Audi A6 S6 RS6 has used the newest 800MHz ARM11 processor and base on WinCE6.0 operation system.It supports GPS navigation system,3D GPS map,AUX,IPOD,analog TV,Digital TV,rear camera and external 500GB Hard Disk Drive.It possesses so great energy in its small body.Next,we will say the main functions it shows in front of us:Radio and bluetooth for hand free.I think they are indispensable parts of dvd player.Sometimes driving is a boring thing especially for a long trip.Even there isn’t any one along with you.At this moment,radio is a great partner accompanying you.Bluetooth is a great partner who can provide great conveniences.For example,you can play music in your phone via bluetooth.You also can answer the phone through the bluetooth instead of pick up the phone.What should we know about Audi DVD player for A6 S6 RS6 with gps radio tv bluetooth?The answer is just above.To know more about it,you can visit: http://www.seicane.com/car-dvd-player-for-audi-a6-s6-rs6-with-gps-radio-tv-bluetooth-srd-8721 In fact,the great functions of car DVD player are far from those above.You can explore it through visiting the website we provide.The journey will be enjoyable for it.
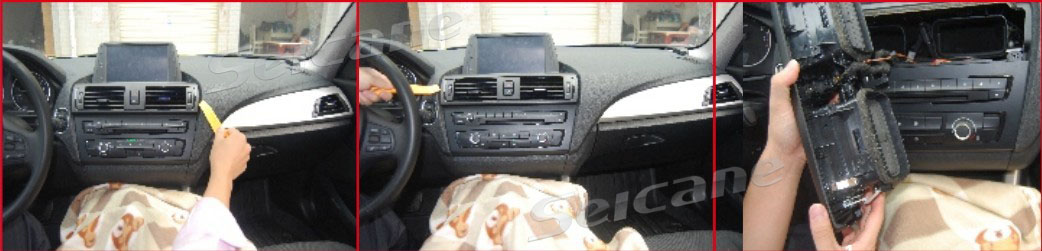
You want to make travel time more enjoyable and assured for you, so you decided on a GPS navigation system.Deciding to install a GPS navigation system can be rewarding in the long run,but a little complex in the beginning.Certainly,a novice also can complete this type of installation project,but some experience in this subject will make the process go more quickly. Either way you will save installation cost.You may also be able to seek installation support through the company you purchased the system from.Take your time and it will pay off on those long travel trips.Do you want to save some money and time on the installation?Please read this article:How to install BMW 1 Series F20 3 Series F30 GPS navigation system with Radio Bluetooth Ipod.And you will make it come true.
BMW F20 F30 navigation & audio system installation instruction and things to note.
BMW F20 F30 navigation & audio system installation instruction and things to note
1.Center Console Picture.
Center Console Picture
2.Accessories: 1) Head Unit 2) Mini Speaker 3) Ipod cable 4) USB cable 5) GPS antenna and two screws for fix Head Unit 6) User Manual 7) Touch Pen 8) Video cable 9) Power cable 10) Head Unit and display screen connecting cable 11) Display Screen
Accessories
3.Pry and remove air conditioning vent by pry tool,and unplug the connector.
Pry and remove air conditioning vent by pry tool,and unplug the connector
4.Remove the 4 screws which fixed the original screen and air conditioning panel by screwdriver.
Remove the 4 screws which fixed the original screen and air conditioning panel by screwdriver
5.Pry and remove the air conditioning,and unplug the connectors.
Pry and remove the air conditioning,and unplug the connectors
6.Use the pry tool remove the panel.
Use the pry tool remove the panel
7.Remove the two screws which for the original CD.
Remove the two screws which for the original CD
8.Remove the original display screen and unplug the connector.
Remove the original display screen and unplug the connector
9.Unplug the original CD’s connector,connect to our power cable,if there are fiber optic wires,please move to relevant PIN of our connector.
Unplug the original CD’s connector
10.Plug the Head Unit and display screen connecting cable and GPS antenna.
Plug the Head Unit and display screen connecting cable and GPS antenna
11.Put the USB cable to USB slot in storage box,and put the iPod cable to there too.
Put the USB cable to USB slot in storage box,and put the iPod cable to there too
12.Install the mini speaker and plug the mini speaker connector.
Install the mini speaker and plug the mini speaker connector
13.Plug all connectors and tighten the screws to fix the CD and head unit.
Plug all connectors and tighten the screws to fix the CD and head unit
14.Plug all connectors in screen and fix the screen by screws.
Plug all connectors in screen and fix the screen by screwsPlug all connectors in screen and fix the screen by screws
15.Put the air conditioning panel,panel,air conditioning vent back and plug all connectors,tighten the screws.
Put the air conditioning panel,panel,air conditioning vent back and plug all connectors,tighten the screwsPut the air conditioning panel,panel,air conditioning vent back and plug all connectors,tighten the screws
16. After installation picture.
After installation picture
How to setting up the sounds.
Set up our unit’s sounds out from original speakers.
1.Switch to original radio interface.
Switch to original radio interface
2.Switch to main interface by press MENU button in iDrive.
Switch to main interface by press MENU button in Idrive
3.Choice CD/Multimedia.
Choice CD/Multimedia
4.Enter into Multimedia interface by iDrive.
Enter into Multimedia interface by iDrive
5.Start the AUX and adjust to proper volume.
Start the AUX and adjust to proper volume
6.Press MENU button 3 Seconds to enter into our main interface.
Press MENU button 3 Seconds to enter into our main interface
Setting up the Navigation sounds from MINI speaker while listening original radio and CD.
1.Switch to original radio or CD interface.Press the voice shortcuts button to enter into navigation.
Switch to original radio or CD interface.Press the voice shortcuts button to enter into navigation
2.Now the original radio or CD still have sounds and navigation sounds from MINI speaker.
Now the original radio or CD still have sounds and navigation sounds from MINI speaker
Below is a video about how to use the GPS navigation system after installing it.
Through the introduction above,you will feel that it is not so complex about How to install BMW 1 Series F20 3 Series F30 GPS navigation system with Radio Bluetooth Ipod.Isn’t it?Maybe you are a novice,but keep patient and read this article carefully.You will learn something more than installation.To know more about BMW 1 Series F20 3 Series F30 GPS navigation system,please visit: http://www.seicane.com/bmw-1-series-f20-gps-navigation-with-radio-bluetooth-ipod-srd-8840http://www.seicane.com/bmw-3-series-f30-gps-navigation-with-radio-bluetooth-ipod-srd-8840-1 Enjoy the fun of driving is more important than just have it.GPS navigation system is a very important member in the big car family.If you have one,enjoying it to the fullest.If not,taking one as soon as possible.At that time,car is a lovely partner more than a vehicles.
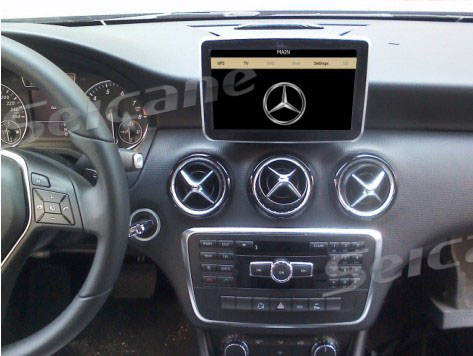
Almost all of owners know about the GPS Navigation System today.Even many ones have possessed one.Certainly,if you are the owner of a car who have not heard about GPS Navigation System yet,congratulations,you will have been out of date.What are you waiting for?Look at here and follow me to read the Detailed installation instructions for 2007-2011 Mercedes-Benz C Class W204 Head Unit GPS Navigation System.Then you will find it’s not so easy to fully possess her.Many owners will meet some trouble when installing the GPS Navigation System by themselves after buying her.So don’t get too excited.She isn’t the one who will be conquered so easy.Do you want to enjoy with you partner smoothly?Come on,this article will help you make the dream come true.Read it patiently.
Installation process and matters attention.
The navigation entertainment system for C200
1.Original car picture.
Original Mercedes-Benz C Class W204 picture
2.Original steering wheel control picture.
Original steering wheel control picture
3.Remove the original air-conditioning outlet.
Remove the original air-conditioning outlet
4. Remove the air-conditioning panel.
Remove the air-conditioning panel
5.Find the plug.
Find the plug
6.Pull out the plug.
Pull out the plug
7.Remove the screw on the store content box.
Remove the screw on the store content box
8.Remove the store content box.
Remove the store content box
9.Remove the plug.
Remove the plug
10.Remove the screw on the original CD.
Remove the screw on the original CD
11.Drawing out first in the direction shown by the arrow,and then picked up.
Drawing out first in the direction shown by the arrow,and then picked up
12.Find the original CD plug.
Find the original CD plug
13.Remove the original CD plug.
Remove the original CD plug
14.Pry the panel in the picture.
Pry the panel in the picture
15.Install the little loudspeaker.
Install the little loudspeaker
16.Put the cable on the mark position.
Put the cable on the mark position
17.Adjust the cable.
Adjust the cable
18.Connect the cable with our unit.
Connect the cable with our unit
19.Put back the original CD.
Put back the original CD
20.Install our unit and the original air-conditioning outlet.
Install our unit and the original air-conditioning outlet
21.The effect picture of install our unit and the original air-conditioning outlet.
The effect picture of install our unit and the original air-conditioning outlet
22.Install the frame.
Install the frame
23.Install the frame.
Install the frame
After installation,we can use it directly.The way to use it will be shown to us through the video below:
Through the detailed introduction above,we will have a basic frame at least.If you’ve chosen to install a Head Unit GPS Navigation System by yourselves and don’t know where to begin,you did get a real good deal after reading this article:Detailed installation instructions for 2007-2011 Mercedes-Benz C Class W204 Head Unit GPS Navigation System.You will know about more information about Mercedes-Benz C Class W204 Head Unit GPS Navigation System if you visit this: http://www.seicane.com/8-inch-touch-screen-2007-2011-mercedes-benz-c-class-w204-head-unit-gps-navigation-system-with-ipod-usb-sd-aux-rearview-canbus-srd-8810 You might find this project a little confusing,but the enjoyment and convinence GPS Navigation System brings is amazing.Don’t believe that?Just try experiencing it and you will fall in love with her.It will bring you home nowhere you are.
Nowadays,more and more owners are willing to install a GPS Navigation System in their cars.This fully shows that installing a GPS Navigation System is really necessary and convinent.But do you know how to install a GPS Navigation System for your car?Don’t worry,this article will tell you in some detail.Next,we will show you how to install Mercedes Benz A Class W176 B Class W246 Head Unit GPS Navigation System.
Announcements:Please check the appearance and the unit functions before install the unit.Don’t shorten or extened the GPS antenna,it will lead to the antenna problem.Don’t make the GPS antenna winding the steering wheel and shift lever,it will be dangerous.
Warm prompt:
1.Don’t use strong chemicals,cleaning agents,strong detergent to washing the machine.
2.Please use a clean soft fabric to wipe the screen,don’t use ordinary fabric.
3.Please use the touch screen pen to operation unit,please don’t use other sharp objects,or it will damage to the screen.
4.Please don’t self-service,maintenance or install the unit,in case of the power is on,don’t install or repair the unit,it is very dangerous if the person who did not receive the electronic equipment or vehicle installation training or lack of experienced personnel to install and repair the unit.
5.Please protect the original display when the staff dismounting the original CD and keep the original CD,try to use the original screw.
6.Navigation and rearview camera only to auxiliary function,it can’t replace your attention and judgment.
7.When the customer choose the digital TV,our unit could realized the digital TV touch.
Mercedes Benz A/B class Navigation & Audio System Installation Instruction Manual.
Mercedes Benz A/B class Navigation System Installation Manual
1.Original car console.
Original Mercedes Benz A/B class console
2.The accessories.
The accessories
3.Remove the screws and take out the display screen.
Remove Mercedes Benz A/B class screws and take out the display screen
Remove Mercedes Benz A/B class screws and take out the display screen
4.Remove the framework holder and the 3 fixed screws.
Remove the framework holder and the 3 fixed screws
5.Remove the Air Conditioner vent.
Remove the Air Conditioner vent
6.Loose the CD fixed screws in left and right vents.
Loose the CD fixed screws in left and right vents
7.Pull out the left and right screws and remove the original CD,unplug the main cable connector.
Pull out the left and right screws and remove the original CD,unplug the main cable connector
8.Remove the storage box and decorative plate in the co-polit seat for wiring.
Remove the storage box and decorative plate in the co-polit seat for wiring
9.Connect our power cable to original CD’s connector,and plug our male connector to original CD.
Connect our power cable to original CD’s connector,and plug our male connector to original CDConnect our power cable to original CD’s connector,and plug our male connector to original CD
10.Put the mini speaker to the central dashbord.
Put the mini speaker to the central dashbord
11.Plug the CAN BUS.
Plug the CAN BUS
12.Fix the framework holder and tight the 3 fixed screws.
Fix the framework holder and tight the 3 fixed screws
13.Connect the GND to the original CD’s shell.
Connect the GND to the original CD’s shell
14.Pull 2 original CD fixed screws and put back the original CD then tight the screws.
Pull 2 original CD fixed screws and put back the original CD then tight the screws
15.Plug the all cables and fix the head unit.
Setting sounds come out from original speakers
16.Picture after installation.
Picture after installation
Steps to setting up the sounds come out and interface switching.
1.Setting sounds come out from original speakers.Enter into original CD main menu first,select the Audio interface by original knobs,enter into AUX interface,now the our head unit sounds come out from original speakers.
Setting sounds come out from original speakersSetting sounds come out from original speakers
2.Setting the navigation sound come out from mini speaker while listening original CD and Radio.While in original CD or radio interface,press the navigation shortcut key in steering wheel control to enter into navigation interface.Now the original CD and radio play continued and the navigation sound come out from mini speaker.To use this shortcut key to foreground and background switching.
Setting the navigation sound come out from mini speaker while listening original CD and RadioSetting the navigation sound come out from mini speaker while listening original CD and Radio
3.Touch the original menu to switch to our menu.
Touch the original menu to switch to our menu
4.While in our menu,you can select the original functions to enter the original system.
While in our menu,you can select the original functions to enter the original system
Below is the video how to use the GPS Navigation System for Mercedes Benz A Class W176 B Class W246:
Through the detailed description,we believe that you have mainly grasped how to install Mercedes Benz A Class W176 B Class W246 Head Unit GPS Navigation System.For more information,please visit:http://www.seicane.com/8-inch-touch-screen-mercedes-benz-a-class-w176-head-unit-gps-navigation-system-with-usb-sd-ipod-canbus-aux-srd-8848 If you still have any problem on it,tell us and we will be happy to offer some help for you.At the same time,you will get a pleasant installation journey obviously.Then you will find how convinent and pefect when the GPS Navigation System comes in your car.At that moment,you will be proud of yourself for making such wise choice.Do you have a GPS Navigation System in your car? Why or why not?


Recent Comments