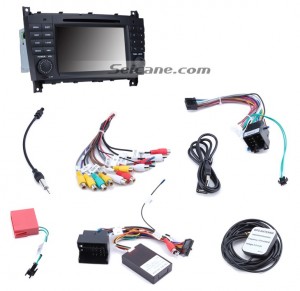
Can you believe that you are able to install a new car radio even though you are not a professional? The answer is absolutely yes. With some related installation experience, you can easily achieve the installation with the help of a step-by-step installation guide. Now please look at the picture below, it’s a 2004-2011 Mercedes Benz CLK Class W209 head unit after installation from Seicane. If you also have the same or similar dashboard, then you can refer to this detailed installation instruction for 2004-2011 Mercedes Benz CLK Class W209 in particular.

Some tips before the installation:
- Please disconnect the power before the installation.
- Please prepare a lever and a screwdriver before the removal and the installation.
- Please keep all the separate parts from the car. Please take great care of the dashboard to avoid scratching it during its detachment and installation. Please keep handy any parts from the car and make use of all the original screws from the car as much as possible. so each related part of the unit can be fixed securely.
- For your convenience, here’s the recommended tools for removal and installation from Seicane, please check for more details: http://www.seicane.com/car-dvd-dismantling-device-srd-400
2004-2011 Mercedes Benz CLK Class W209 head unit installation guide
1.The picture of the original car radio and 6-disc CD player.

2.First detach the gear shift panel.

3.Use a screw driver to remove the screw marked with a red circle to release the car charger and ashtray.

4.Remove the car charger and ashtray assembly.

5.Use a screw driver to remove the screw marked with a red circle.

6.Pry the air conditioner panel out with a plastic lever.

7.Remove the original air conditioner panel.

8.Remove the heated seat and control panel assembly.

9.Pay attention to this buckle.

10.Remove two screws.

11.Pull out the original car radio.

12.Check all the accessories for the new Seicane head unit.

13.Connect the harnesses to the back of the new Seicane head unit.

14.Connect the Seicane head unit to your original car radio ‘s plugs.
15.Install the new Seicane radio back after the wiring harness has been connected. Fasten the four screws.

16.Install the air conditioner panel, the car charger, the ashtray, the heated seat and the control panel back.

17.Reinstall cigarette lighter.

18.Turn on the new Seicane head unit and have a careful check if everything works well.
Can you understand all the installation steps for the 2004-2011 Mercedes Benz CLK Class W209 head unit? If not, you’d better ask your dealer or a professional for help. If you don’t find a fitting unit for your car, I’d like to introduce a wonderful 2004-2011 Mercedes Benz CLK Class W209 head unit from Seicane to you, please check it out:
This double din Mercedes Benz CLK Class W209 head unit comes with a large 7 inch multi-touch screen which is ideal for watching various kinds of videos to have more fun in your car. Thanks to the dual zone, you can also enjoy your favorite music on the way while you are navigating to your destination. Coming with the A/V input and output, this unit can support a rearview camera and will automatically switch to the reversing image for you to park easily. Why not take it right now and have great fun in your car in the future?

Hi I have a 2008 clk350 mercedes benz, it presently does have Bluetooth or a phone connection and a old style navigation system do you have a direct factory fitting replacement and the cost of the package to do it
“Dear,
This is Seicane.com.
Thanks for interested in our product.
Could you please send us the photo of your car’s dashboard to [email protected]?
And could you please tell us the model and year of your car?
Then we can help you check if this unit can fit your car or not ,hope you could cooperate with us.
Looking forward to hearing from you soon.
Thank you & Best regards!
“
Hi I have a 2007 CLK 350. Im not sure if I have fiber optic or not in my vehicle. Will this head unit work or will I need to buy extra adapters or harnesses?
dear,
we will send all the needed cables to you. it is plug and play.
Could you please send us the photo of your car’s dashboard to [email protected]?
And could you please tell us the model and year of your car?
Then we can check if our unit fit your car ,hope you could cooperate with us.
Looking forward to hearing from you soon.
Thank you & Best regards!
“
i have a 2004/05 model CLK 320 cabriolet. The current head unit that i have is a Karmon Harmon unit.
Can it be upgraded to a more modern one
Updates may cause more problems. So we do not recommend customers to update the software.