Clever Method on a 2009-2013 HONDA PILOT Radio Removal and Installation with An Aftermarket Audio Sound System

To keep your passengers relaxed in the back seats of your car, it is necessary for you to upgrade your factory radio by installing a new aftermarket stereo which is equipped with a lot of practical and entertainment features. If you own a 2009-2013 HONDA PILOT, and plan to upgrade your factory radio, you can read the following related installation steps to help with your installation.

2009-2013 HONDA PILOT car radio after installation

Tips about the installation:

1.Please disconnect the power before the installation.

2.Please prepare a lever and a screwdriver before the removal and the installation.

3.Please keep all the separate parts from the car. Please take great care of the dashboard to avoid scratching it during its detachment and installation. Please keep handy any parts from the car and make use of all the original screws from the car as much as possible. so each related part of the unit can be fixed securely.

4.For your convenience, here’s the recommended tools for removal and installation from Seicane, please check for more details: http://www.seicane.com/car-dvd-dismantling-device-srd-400

2009-2013 HONDA PILOT car stereo installation steps

1. The original car radio.

The original car radio

2. Start by moving shift lever into lower position.

Start by moving shift lever into lower position

3. Using your pry tool, carefully pry loose left dash panel and slide over shifter. Then use the pry tool to remove the right panel.

Using your pry tool, carefully pry loose left dash panel and slide over shifter. Then use the pry tool to remove the right panel
3-1
3-1
3-2

4. Using a Philip head screwdriver to unscrew screws that fix the pocket and then remove it.

Using a Philip head screwdriver to unscrew screws that fix the pocket and then remove it

5. Unscrews four screws that are holding the radio and then take out the radio.

Unscrews four screws that are holding the radio and then take out the radio

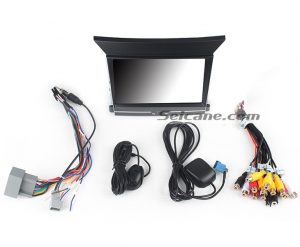
6. Check all the accessories for the new Seicane car stereo.

Check all the accessories for the new Seicane car stereo

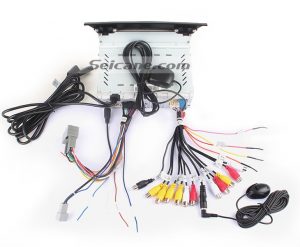
7. Connect the harnesses to the back of the new Seicane car stereo.

Connect the harnesses to the back of the new Seicane car stereo

8. Connect the Seicane car stereo to your original stereo’s plugs.

9. Turn on the new Seicane car stereo to have a careful check if everything works well. If it doesn’t, please check whether all the cables are connected correctly.

10. Put the new Seicane car stereo into the dash.

11. Put everything into their original place. All the installation is done.


Before the installation, please make clear every step. If you have any doubts, you can consult your dealer or ask someone experienced to help you. But if you still think it hard to finish the installation by yourself, you’d better go to a car stereo upgrade center to arrange a technician to install the stereo. Anyway, first of all, please check whether your new car stereo is compatible with your car or not. If not, here I would like to share a 2009-2013 HONDA PILOT gps navi dvd car stereo from Seicane with you. Please click:

http://www.seicane.com/7-inch-1024-600-touch-screen-2009-2013-honda-pilot-android-4-4-gps-navigation-system-with-3-g-wifi-bluetooth-tpms-dvr-obdii-rear-camera-aux-steering-wheel-control-mirror-link-1080p-quad-core-cpu-s083706

This Seicane 2009-2013 HONDA PILOT car stereo is based on the Pure Android 6.0 operation system and a R16 1.6 GHz Quad-core CPU, so you are able to embrace a brand new smoother and faster operation experience than ever. Even though you don’t have a good sense of direction, you are capable of finding the best way to get to your destinations with the help of the powerful 3D GPS navigation system in high precision. What’s more, with the help of the wireless Bluetooth technology, hands-free calls and Bluetooth music are both available if you connect your Bluetooth-enabled cell phone with this unit. If you like this car stereo, don’t forget to add it to your cart. Good luck to you!

How to Upgrade a 2007-2011 Toyota CAMRY Head Unit with GPS Navigation Sound System Wisely

2007-2011 Toyota CAMRY Head Unit after installation

The image shown below is a Seicane 2007-2011 Toyota CAMRY head unit after installation. This head unit comes with a variety of practical and entertainment features, which can meet almost all your different needs in car. If you own a 2007-2011 Toyota CAMRY, and plan to upgrade your factory radio with a new head unit to improve your in-car environment and driving experience, you can take the following installation guide as a reference to help with your upgrade.

2007-2011 Toyota CAMRY Head Unit after installation

Tips about the installation:

1.Please disconnect the power before the installation.

2.Please prepare a lever and a screwdriver before the removal and the installation.

3.Please keep all the separate parts from the car. Please take great care of the dashboard to avoid scratching it during its detachment and installation. Please keep handy any parts from the car and make use of all the original screws from the car as much as possible. so each related part of the unit can be fixed securely.

4.For your convenience, here’s the recommended tools for removal and installation from Seicane, please check for more details: http://www.seicane.com/car-dvd-dismantling-device-srd-400

2007-2011 Toyota CAMRY head unit installation guide

1. The original car radio.

The original car radio

2. Make sure that your car engages the parking brake.

3. Rotate the shift lever knob counterclockwise.

Rotate the shift lever knob counterclockwise

4. Grab and remove the two side panels.

Grab and remove the two side panels

5. Remove the panel around the shift lever and then unplug the connector at the backside.

Remove the panel around the shift lever and then unplug the connector at the backside
5-1
5-1
5-2
5-2

6. Remove the plastic part shown in the following picture and then unplug the connector at the backside.

Remove the plastic part shown in the following picture and then unplug the connector at the backside

7. Unscrew two screws that are holding the pocket.

Unscrew two screws that are holding the pocket
7-1
7-1

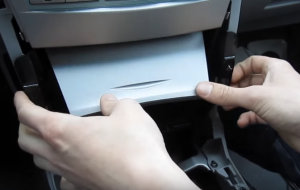
8. Take out the pocket and disconnect the connectors at the back of it.

Take out the pocket and disconnect the connectors at the back of it
8-1
8-1
8-2
8-2

9. Use a removal tool to pry the air vent and then remove it.

Use a removal tool to pry the air vent and then remove it
9-1
9-1

10. There are two top screws and two bottom screws fix the radio on the dashboard. Remove them with a screwdriver.

There are two top screws and two bottom screws fix the radio on the dashboard. Remove them with a screwdriver
10-1
10-1

11. Take out the original car radio gently.

Take out the original car radio gently

12. Disconnect the connectors and cables at the back of the radio.

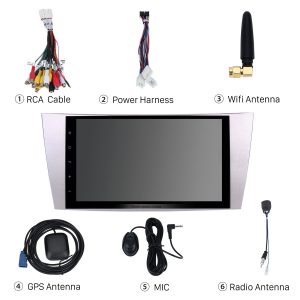
13. Check all the accessories for the new Seicane head unit.

Check all the accessories for the new Seicane head unit

14. Connect the harnesses to the back of the new Seicane head unit.

Connect the harnesses to the back of the new Seicane head unit

15. Connect the Seicane head unit to your original stereo’s plugs.

16. Turn on the new Seicane head unit to have a careful check if everything works well. If it doesn’t, please check whether all the cables are connected correctly.

17. Put the new Seicane head unit into the dash.

18. Put everything into their original place.


Wish you can learn something from the above installation guide. Before the installation, please make clear every step. If you have any questions, you can seek advice from your dealer or ask a professional for help. Besides, you can also go straightly to a head unit upgrade centre to install you head unit. Anyway, first of all, please check the compatibility between your new head unit and your car. If you don’t have any ideas about it, you can refer to the following link which is about a great 2007-2011 Toyota CAMRY bluetooth gps dvd head unit from Seicane, please click:

http://www.seicane.com/9-inch-oem-android-radio-capacitive-touch-screen-for-2007-2011-toyota-camry-support-3g-wifi-bluetooth-gps-navigation-system-tpms-dvr-obd-ii-aux-headrest-monitor-control-video-rear-camera-usb-sd-s082706

This Seicane 2007-2011 Toyota CAMRY head unit, equipped with both upgraded features and new functions, is ideal for you to replace your factory radio.

Featured with the high-end 3D GPS navigation system, this head unit can guide you to wherever you want to go through turn-by-turn directions and voice prompts. And the Bluetooth technology which enables you to dial, receive or reject as well as enjoy streaming music is also supported in this head unit to bring safety, convenience and enjoyment for you. Just enjoy your driving with this head unit installed in your car. Good luck to you!

How to Upgrade a 2015 2016 Mercedes-Benz SMART Car Sound System with Touch Screen Radio Navigation

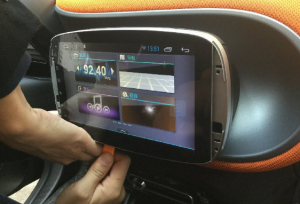
2015 2016 Mercedes-Benz SMART Car Sound System after installation

Nowadays, it won’t cost much money to replace a factory radio, so more and more car owners tend to replace the factory radio with a new one. If you are fed up with your factory radio due to its single function, you can easily upgrade it which help you not only gain a better driving experience but also catch up with the trend. Here comes a step-by-step 2015 2016 Mercedes-Benz SMART Car Sound System installation guide from Seicane for your reference to help with the installation.

2015 2016 Mercedes-Benz SMART Car Sound System after installation

Tips about the installation:

1.Please disconnect the power before the installation.

2.Please prepare a lever and a screwdriver before the removal and the installation.

3.Please keep all the separate parts from the car. Please take great care of the dashboard to avoid scratching it during its detachment and installation. Please keep handy any parts from the car and make use of all the original screws from the car as much as possible. so each related part of the unit can be fixed securely.

4.For your convenience, here’s the recommended tools for removal and installation from Seicane, please check for more details: http://www.seicane.com/car-dvd-dismantling-device-srd-400

2015 2016 Mercedes-Benz SMART car radio installation guide

1. Remove the decoration trim strips both on the left side and right side of the radio.

Remove the decoration trim strips both on the left side and right side of the radio
1-1
1-1
1-2
1-2

2. Use a plastic removal tool to pry the gap.

Use a plastic removal tool to pry the gap
2-1
2-1
2-2
2-2

3. Gently take out the original radio.

Gently take out the original radio
3-1
3-1

4. Unplug the connectors and cables at the back of the radio.

5. Check all the accessories for the new Seicane car radio.

6. Connect the harnesses to the back of the new Seicane car radio.

7. Connect the Seicane car radio to your original stereo’s plugs.

8. Turn on the new Seicane car radio to have a careful check if everything works well. If it doesn’t, please check whether all the cables are connected correctly.

9. Put the new Seicane car radio into the dash.

10. Put everything into their original place. All the installation is done.


Wish you can gain something useful from the above car radio installation guide. If you have any doubts, you can seek help from your dealer or a professional. Besides, before the installation, it is fairly necessary for you to check the compatibility of your new car radio. If the radio is not suitable enough, you can refer to this modern 2015 2016 Mercedes-Benz SMART Car Sound System from Seicane. Here is the link, please click:

http://www.seicane.com/9-inch-oem-android-radio-capacitive-touch-screen-for-2015-2016-mercedes-benz-smart-support-3g-wifi-bluetooth-gps-navigation-system-tpms-dvr-obd-ii-aux-headrest-monitor-control-video-rear-camera-usb-sd-s082651

Specially designed for 2015 2016 Mercedes-Benz SMART, this great car radio comes with a variety of functions and features to help you gain a better driving experience, which include 3D GPS navigation system, DVD player, Bluetooth technology, Backup camera, Wi-Fi, etc. Because of these practical functions and entertainment features, almost all your different needs can be satisfied by this multifunctional radio. Take the 3D GPS navigation system as an example. Under the guidance of the turn-by-turn directions and voice prompts provided by the GPS function, you can easily reach your destinations while enjoying your favorite music at the same time along the way. Don’t hesitate to install it in your beloved car and wish you enjoy your driving!